background image

33

ENGLISH

AddITIONAL wARNINGs


Š

Only use the fuel recommended by the manufacturer. The product must not be used as an incinerator.


Š

Do not use the product as a ladder or supporting structure.


Š

Do not place laundry on the product to dry it. Any clothes-horse or similar objects must be kept at due distance from the product. 

Danger of fire or damage to the coating.


Š

The user is fully liable for any incorrect use of the product. The manufacturer bears no civil or criminal liability for incorrect use.


Š

Unauthorised tampering of any nature or replacement of spare parts of the product with non-original parts may endanger the operator 

and the manufacturer bears no civil or criminal liability for this.


Š

Large parts of the surface of the product can get very hot (door, handle, glass, smoke outlet pipes, etc.). Please therefore avoid coming 

into contact with these parts without wearing suitable protective clothing or using appropriate measures, such as heat protective gloves. 


Š

DO NOT use the product with the door open or if the glass is broken.


Š

The product must be electrically connected to a system equipped with an operational earthing system.


Š

Turn off the product in the event of a failure or malfunctioning.


Š

Unburned pellets that build up in the burner following each failed start-up must be removed before attempting to start up the product 

again. Make sure that the burner is clean and correctly positioned before starting it up again.


Š

Do not wash the product with water. Water may penetrate into the unit and cause faults in the electrical insulation. This can cause 

electric shocks.


Š

Installations not complying with the regulations in force, as well as incorrect use and failure to comply with the maintenance scheduled 

by the manufacturer, will invalidate the guarantee.

DiSpoSAl

INfORmATION fOR mANAGEmENT Of ELEcTRIc ANd ELEcTRONIc APPLIANcE wAsTE cONTAINING bATTERIEs OR 

AccUmULATORs

This symbol, which is used on the product, batteries, accumulators or on the packaging or documents, means that at the end of its useful 

life, this product, the batteries and the accumulators included must not be collected, recycled or disposed of together with domestic waste.

Improper management of electric or electronic waste or batteries or accumulators can lead to the leakage of hazardous substances contained 

in the product. For the purpose of preventing damage to health or the environment, users are kindly asked to separate this equipment and/

or batteries or accumulators included from other types of waste and to arrange for disposal by the municipal waste service It is possible to ask 

your local dealer to collect the waste electric or electronic appliance under the conditions and following the methods provided by national 

laws transposing the Directive 2012/19/EU.

Separate waste collection and recycling of unused electric and electronic equipment, batteries and accumulators helps to save natural 

resources and to guarantee that this waste is processed in a manner that is safe for health and the environment.

For more information about how to collect electric and electronic equipment and appliances, batteries and accumulators, please contact your 

local Council or Public Authority competent to issue the relevant permits.

Summary of Contents for Marilena Plus AD

Page 1: ...MADE IN ITALY design production MARILENA PLUS AD 004277269 Rev 000 UK pellet stoves USER MANUAL...

Page 2: ...2 ENGLISH...

Page 3: ...Enabling disabling the chrono 20 Settings 22 Display 22 stand by 22 OPERATION with additional thermostat optional 22 Additional thermostat 23 Installation of additional thermostat 23 delta t 23 First...

Page 4: ...well as the instructions contained in this manual The Manufacturer cannot be held responsible for the failure to comply with such precautions After removing the packaging ensure that the content is in...

Page 5: ...ply cable so that it does not come into contact with hot parts ofthe appliance The power supply plug must be accessible after installation Do not close or reducethe dimensions ofthe airingvents in the...

Page 6: ...uid is used the latter could penetrate inside the crackles highlighting them SINCE THE PRODUCT CAN TURN ON AUTOMATICALLY THANKS TO THE TIMER OR REMOTELY USING THE DEDICATED APPLICATIONS IT IS STRICTLY...

Page 7: ...thoutdomestichotwaterproductionandinadjacentandcommunicating rooms 3 where the depression measured in situ between the external and internal environment is greater than 4 Pa N B Watertight appliances...

Page 8: ...tion If the exhaust is not inserted in an existing flue a vertical section with a windproof end piece is required UNI 10683 The vertical duct can be inside or outside the building If the smoke duct is...

Page 9: ...K Combustion air inlet C Combustion chamber access L On Off D Lateral fumes exhaust Fuse E Room air output 230v power supply F Display M Serial input G Upper fumes exhaust Additional thermostat input...

Page 10: ...allow for the duct motor to be controlled regardless of stove operation At this point simply set the desired temperature on the thermostat the thermostat will command the operation of the second moto...

Page 11: ...llowing CLOSE HOPPER DOOR This message indicates that you have 60 seconds to close the hatch door and pellet lid After the 60 seconds during the ignition phase the stove will go to DEPR ALARM mode whi...

Page 12: ...OOR QUALITY PELLETS OR ANY OTHER MATERIAL WILL COMPROMISE STOVE FUNCTIONS VOIDING THE WARRANTY AND RELEASING THE MANUFACTURER OF LIABILITY Pellet hopper pressurised closure During stove operation the...

Page 13: ...On off stove hold for 3 seconds 9 Degrees Celsius Fahrenheit 4 Set power 10 Press the button once to enable or disable the chrono 5 Set switch off delay The button allows to set the switch off delay F...

Page 14: ...gnal receiver Handle the remote control with care When it is not being used place it on the special base supplied The remote control must not be left in a place where it is exposed to direct sunlight...

Page 15: ...bled On the function is enabled Indicates the stove modulation On the stove is operating at the set power Flashing the power at which the stove is operating is not the set power the stove is modulatin...

Page 16: ...t is recommended to Ventilate the room well If present remove any majolica parts from the top of the product Activate the product at the maximum power and temperature Avoid remaining in the room for a...

Page 17: ...eturn to the previous menus to the initial state Language This menu allows you to set the preferred language The available languages are Italian English German French Spanish Portuguese Controls proce...

Page 18: ...e the set temperature has been reached the stove automatically reduces the power ensuring optimal comfort and reducing the consumption of pellets this process is called modulation LOW TA hot If the Se...

Page 19: ...CREASE RANGE SECOND INCREASE RANGE IF THE FIRST IS NOT ENOUGH THIRD INCREASE RANGE IF THE FIRST TWO ARE NOT ENOUGH Controls procedure Press 6 Press key 3 until easy setup appears and confirm by pressi...

Page 20: ...g3 1 5 Set power PRG3 prg4 Start prg4 OFF 00 00 Ignition time PRG4 Stop prg4 OFF 00 00 Switch off time PRG4 Monday Sunday On off Enable disable the days of PRG4 Set prg4 LOW TA 07 37 C HOT Set thermos...

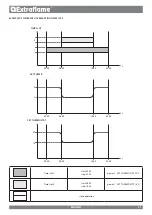
Page 21: ...23 00 08 00 16 30 t 22 18 2 1 21 ENGLISH Time slot 1 start 02 00 stop 23 00 power 3 set thermostat 22 C Time slot 2 start 08 00 stop 16 30 power 1 set thermostat 18 C stove operation Time slot Set po...

Page 22: ...exceeds the value of the Set Thermostat DELTA T OFF then the stove will switch off after a preset delay displaying STAND BY When the room temperature is lower than the Set Thermostat DELTA T and afte...

Page 23: ...pears and confirm by pressing 6 Use keys 4 5 to enable ON disable OFF Press 1 several times to confirm and exit the menu J FOR CORRECT OPERATION SET THE SET ROOM THERMOSTAT TO LOW TA Additional thermo...

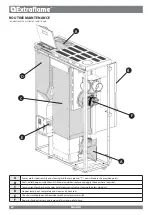
Page 24: ...e to comply with these instructions may damage the surfaces of the generator and result in the invalidation of the warranty Cleaning the ceramic glass Never use abrasive or chemically aggressive deter...

Page 25: ...ied Put the burn pot back in place and push it towards the back wall Put the pellet slide assembly back in place above the burn pot Make sure that the burn pot and pellet slide have been positioned co...

Page 26: ...26 ENGLISH Cleaning the combustion chamber deflector Remove the deflector and eliminate the ash that has deposited at the top of the deflector...

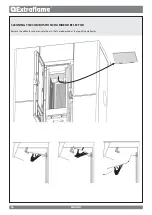
Page 27: ...o clean and remove the burn pot it is necessary to remove the pellet slide assembly B by lifting it To put it back in place perform the same operation in reverse order After repositioning it make sure...

Page 28: ...rranty SEALS pellet hopper lid DOOR ASH DRAWER AND BURN POT The seals ensure that the stove is airtight and they guarantee the proper operation of the same They must be regularly checked if they are f...

Page 29: ...ed points B Seals pallet hopper inspections ash drawer and door replace and apply silicone where required C Combustion chamber exchanger total cleaning including cleaning the glow plug duct D Hopper e...

Page 30: ...ed points B Seals pallet hopper inspections ash drawer and door replace and apply silicone where required C Combustion chamber exchanger total cleaning including cleaning the glow plug duct D Hopper e...

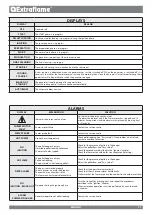
Page 31: ...by pressing key 1 for 3 seconds Fumes motor fault Fumes motor failure Contact the service centre Fumes probe Fumes probe fault Contact the service centre Hot fumes High exhaust temperature Check pell...

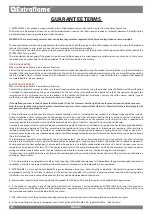
Page 32: ...bility to use the product and wrong maintenance by the consumer with respect to what is reported and recommended by the instructions manual of the product which is part of the sales contract this guar...

Page 33: ...aults in the electrical insulation This can cause electric shocks Installations not complying with the regulations in force as well as incorrect use and failure to comply with the maintenance schedule...

Page 34: ...34 ENGLISH...

Page 35: ...35 ENGLISH...

Page 36: ...extraflame it www lanordica extraflame com TO FIND THE SERVICE CENTRE NEAREST TO YOU CONTACT YOUR DEALER OR CONSULT THE SITE WWW LANORDICA EXTRAFLAME COM The manufacturer reserves the right to vary th...

Reviews: