ExtenHD X210
User Manual
ExtenHD X210
User Manual
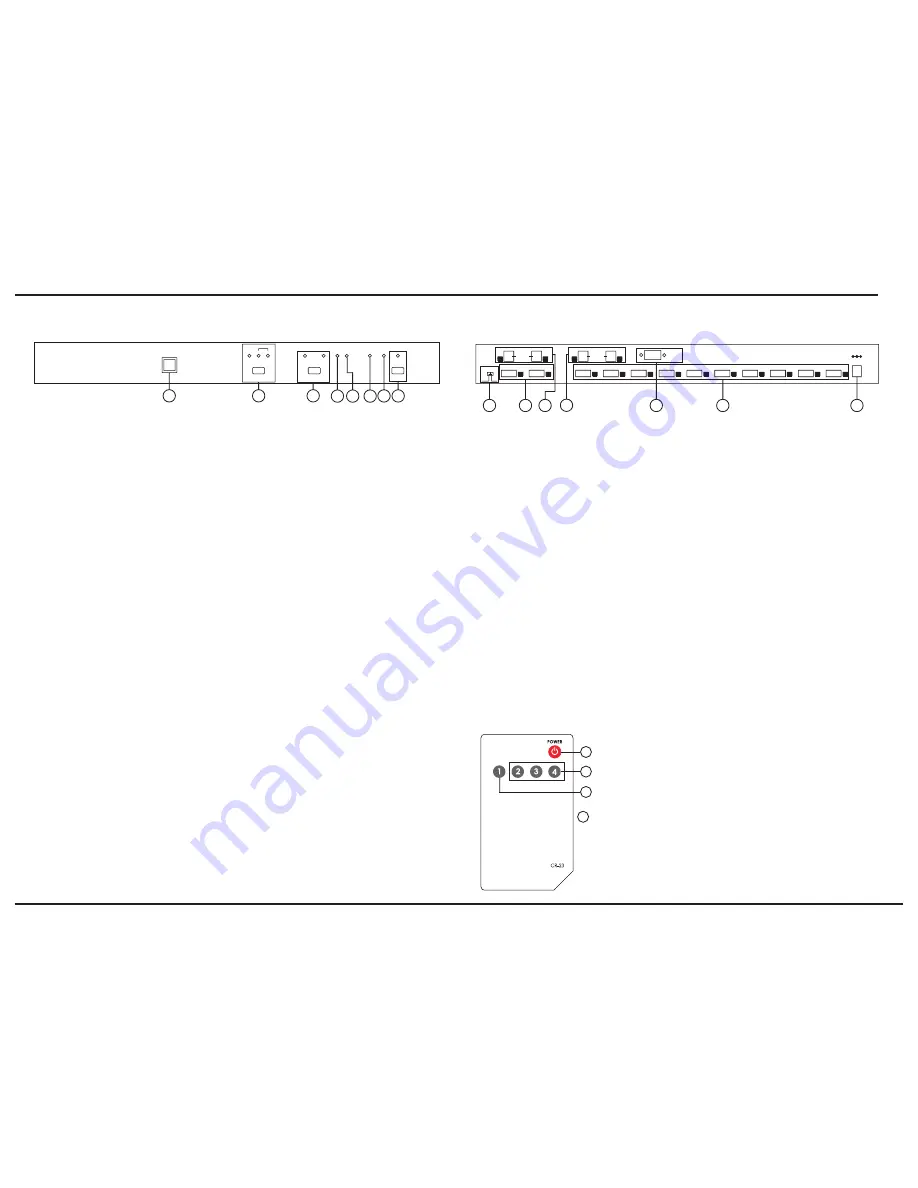
Remote Control Sensor.
AUDIO IN Select/Indicator:
Press the “AUDIO IN” button
sequentially to switch to your desired input audio source (HDMI,
OPTICAL 1 and OPTICAL 2), the LED will illuminate to indicate
which input source is selected.
HDMI IN Select/Indicator:
Press the “HDMI IN” button
sequentially to switch to your desired input audio/video source
(HDMI 1 and HDMI 2), the LED will illuminate to indicate which
input source is selected.
HDCP Indicator:
The LED will illuminate when the selected
HDMI input source is HDCP-protected.
HDMI/DVI Indicator:
The LED will illuminate when the selected
HDMI input source is originally from an HDMI output, the LED will
not illuminate when the selected HDMI input source is originally
from a DVI output.
SYNC Indicator:
The LED will illuminate when the selected
HDMI IN connects to an HDMI or DVI output correctly.
Key Lock:
Press and hold the “POWER” button for 5 seconds
will enter the Key Lock mode, Key Lock LED will illuminate and all
buttons will not function. Press and hold the “POWER” button for
5 seconds again to disable the Key Lock mode.
POWER Switch/Indicator:
Press the “POWER” button to turn
on/off the power, the LED will illuminate when the power is turned
on.
1.
2.
3.
4.
5.
6.
7.
8.
Page 4
Page 5
1
2
CHDMI-210T 2x10 HDMI SPLITTER
HDMI
INT
HDCP
KEY LOCK
HDMI/DVI
AUDIO IN
HDMI IN
POWER
HDMI 1
HDMI 2
SYNC
1
2
OPTICAL
3
4 5 6 7 8
OPTICAL
IN
1
2
RS232
HDMI IN
EDID
STD
TV
1
HDMI IN
2
HDMI OUT
1
HDMI OUT
2
HDMI OUT
3
HDMI OUT
4
HDMI OUT
5
HDMI OUT
6
HDMI OUT
7
HDMI OUT
8
HDMI OUT
9
HDMI OUT
10
OPTICAL
OUT
1
2
DC 5V
Real Cable
1
2 3
6
7
5
4
EDID Control Jumper:
Default factory setting is TV, leave as is if
the display is properly. Switch to STD if the display has problems.
HDMI Inputs 1 and 2:
Connect each of the input ports to the HDMI
or DVI output of your source equipment such as DVD player or set-
top-
box.
OPTICAL inputs 1 and 2:
Connect each of the input ports to the
audio output of your source equipment such as DVD player or
amplifier, using Toslink (optical fiber) cable.
OPTICAL Outputs 1 and 2:
Connect each of the output ports to
the audio equipment such as amplifier using Toslink (optical fiber)
cable. When both connected, the OPTICAL outputs 1 and 2 play
identical audio signal simultaneously.
RS232:
9-pin D-Sub connector for connecting to your PC or other
control console for remote control.
HDMI Outputs 1 to 10:
Connect each of the output ports to the
HDMI display. When more than one output connected, the HDMI
outputs play identical audio/video signal simultaneously.
Power:
Plug the 5V DC power supply into the CHDMI-210T and
connect the adaptor to AC wall outlet.
1.
2.
3.
4.
5.
6.
7.
1
2
1
3
POWER:
Press the button to turn on/off the unit.
Input Select for HDMI:
Press “1” button to switch
the HDMI input between HDMI IN 1 and HDMI IN 2.
Input Select for AUDIO:
Press “2” button to select
HDMI INT audio input, press “3” button to select
OPTICAL 1 input, and press “4” button to select
OPTICAL 2 input
1.
2.
3.
Operation Controls and Functions
Front Panel
Rear Panel
Remote Control


