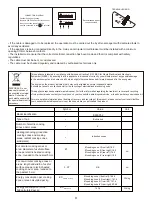
Exquisit EKI600-2 Installation And User Instructions Manual Download Page 14

Power level

Default working timer (hour)

1

8

2

8

3

8

4

4

5

4

6

4

7

2

8

2

9

2

If the display flashes  “    ”  alternately with the heat setting

This means that:

• you have not placed a pan on the correct cooking zone o

r, 

• the pan you’re using is not suitable for induction cooking o

r,

• the pan is too small or not properly centred on the cooking z

one.

No heating takes place unless there is a suitable pan on the cooking zone.
The display will automatically turn off after 1 minutes if no suitable pan is placed on it.

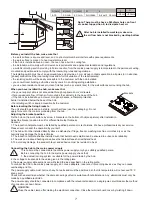
When you have finished cooking

1. Touching the heating zone selection control that you wish to switch off
2.  Turn the cooking zone off by scrolling down to”0” . Make sure the display shows”0”,then show”H”.
3. Turn the whole cooktop off by touching the ON/OFF  control.

4.  Beware of hot surfaces “H”  will show which cooking zone is

 hot to touch. It will disappear when the surface 

has cooled down to a safe temperature. It can also be used as an energy saving function if you want to heat 

further pans, use the hotplate that is still hot.

Locking the Controls

 You can lock the controls to prevent unintended use (for example children accidentally turning the cooking 

zones on).

• When the controls are locked, all the controls except the ON/

OFF control are disabled.

To lock the controls 
Touch the keylock control. The timer indicator will show “ Lo ” To unlock the controls
1. Make sure the Induction hob is turned on.
2. Touch and hold the keylock contro  for a while
3. You can now start using your Induction hob.
When the hob is in the lock mode,all the controls are disable except theON/OFF , you can always turn the 
induction hob off with the ON/OFF control in an emergency,but you shall unlock the hob first in the next 
operation

Over-Temperature Protection

A temperature sensor equipped can monitor the temperature inside the Induction hob. When an excessive 
temperature is monitored, the Induction hob will stop operation automatically.

Detection of Small Articles

When an unsuitable size or non-magnetic pan (e.g. aluminium), or some other small item (e.g. knife, fork, key) 
has been left on the hob, the hob automatically go on to standby in 1 minute. The fan will keep cooking down 
the induction hob for a further 2 minute.

Auto Shutdown Protection

Auto shut down is a safety protection function for your induction hob. It shut down automatically if ever you 
forget to turn off your cooking. The default working times for various power levels are shown in the below table: 

!

!

!

When the pot is removed, the induction hob can stop heating immediately and the hob 
automatically switch off after 1 minutes.

               People with a heart pace maker should consult with their doctor before using this unit.

Using the Timer

 You can set it to turn one cooking zone off after the set time is up.

 You can set the timer up to 99 minutes.

Setting the timer to turn one cooking zone off

Cooking zones set for this feature will:
1. Touching the heating zone selection control that you want to set the timer for. 
2. Touch timer control , The minder  indicator will start flashing and “30” will show in the timer display.

3. Set the time by touching the or control of the timer 

Hint: T

ouch the “-“ or “+” control of the timer once will decrease or increase by 1 minute.

T

ouch and hold the ”-“ or “+” control of the timer will decrease or increase by 10 minutes.

4.  Touching the “-” , to reduce the time outstanding to zero, or press the “timer control”, when the “00”
shows in the minute display, the timer is cancelled.
5. When the time is set, it will begin to count down immediately. The display will show the remaining time and the 
timer indicator flash for 5 seconds.

NOTE: 

The red dot next to power level indicator will illuminate indicating that zone is selected.

6. When cooking timer expires, the corresponding cooking zone will be switch off automatically.

6

H

0

or

6

30

--

36

6.

00

Other cooking zone will keep operating if they are turned on previously.

4


Summary of Contents for EKI600-2

Page 1: ...Gebruiksaanwijzing EKI600 2 Inbouw inductie kookplaat EKI600 2 Versie NL 10 2019 Pagina 1 van 10 ...

Page 2: ...Het niet correct installeren van dit apparaat kan garanties en aansprakelijkheidsclaims ongeldig maken Gebruik en onderhoud Gevaar voor elektrische schok Kook niet op een kookplaat die gebroken of gebarsten is gevaar voor elektrische schok Mocht de kookplaat breken of barsten schakel de kookplaat dan onmiddellijk uit via de wandschakelaar en neem contact op met een erkende monteur Schakel de kookp...

Page 3: ...ze dit apparaat kunnen gebruiken zonder gevaar voor hunzelf of hun omgeving Ga niet aan de slag met het repareren of vervangen van onderdelen van dit apparaat tenzij dit uitdrukkelijk in deze handleiding wordt beschreven Al het andere onderhoud moet door een gekwalificeerde monteur worden gedaan Gebruik geen stoomreiniger om uw kookplaat schoon te maken Laat geen zware voorwerpen op uw kookplaat v...

Page 4: ...is minder efficiënt dan kan worden verwacht Een pan waarvan de bodem een doorsnede van minder dan 14 cm heeft kan mogelijk niet worden gedetecteerd door de kookplaat Zet uw pan altijd in het midden van de kookzone Til pannen altijd van de inductie kookplaat af Glijden kan krassen op de glasplaat veroorzaken Goed Fout Fout Fout Fout Fout Fout verdiepte bodem bolle bodem te klein te groot vocht op d...

Page 5: ... verhitten en schakelt zichzelf automatisch na 2 minuten uit Personen met een pacemaker dienen hun dokter te raadplegen alvorens dit apparaat te gebruiken De timer instellen om één kookzone uit te schakelen De kookzones die voor deze functie zijn ingesteld 1 Aanraken van de keuzetoets voor de verwarmingszone waarvoor u de timer wilt instellen 2 Raak timerbesturing aan de kookwekkerindicator zal be...

Page 6: ...laat 3 Reinig het gemorste voedsel met een vaatdoek of keukenrol 4 Volg stap 2 en 4 voor dagelijkse vervuiling op het glas zie hierboven LET OP Verwijder vlekken van suikerhoudend overkooksel zo snel mogelijk Als u het op de glasplaat laat afkoelen kan het een stuk lastiger zijn om te verwijderen en zelfs permanente schade aan de glasplaat opleveren Gevaarlijk na verwijdering van de beschermhoes i...

Page 7: ...ipperende getallen in de timer display Technische fout Noteer de cijfers en letters van de foutmelding zet de kookplaat uit via de wandschakelaar en neem contact op met een gekwalificeerde monteur Foutmelding scherm en inspectie Als er een storing optreedt schakelt de inductiekookplaat automatisch over naar de beschermende status en geeft de bijbehorende beschermende codes weer e i t c a n e m e n...

Page 8: ...oor de gebruiker Voordat u de bevestigingsklemmen vastmaakt Leg de kookplaat op een stabiele vlakke ondergrond gebruik de verpakking Zet geen kracht op de knoppen die uitsteken De klempositie aanpassen Maak de kookplaat aan het werkblad vast door na de installatie 4 klemmen aan de onderkant van de kookplaat te schroeven zie tekening Afhankelijk van de dikte van het werkblad de klemmen aanpassen Wa...

Page 9: ... op met uw plaatselijke gemeente uw afvalverwerkingsbedrijf of de winkel waar u het product hebt gekocht Dit apparaat is gekenmerkt in overeenstemming met de Europese richtlijn 2012 19 EC voor elektrisch en elektronisch afval AEEA Door ervoor te zorgen dat dit apparaat op de juiste wijze wordt verwijderd helpt u mee om mogelijke schade aan het milieu of de menselijke gezondheid te voorkomen welke ...

Page 10: ...EKI600 2 Versie NL 10 2019 ...

Page 11: ...n This appliance should be connected to a circuit which incorporates an isolating switch providing full disconnection from the power supply Failure to install the appliance correctly could invalidate any warranty or liability claims Operation and Maintenance Electrical Shock Hazard Do not cook on a broken or cracked cooktop If the cooktop surface should break or crack immediately switch off the ap...

Page 12: ...eaning agents to clean your cooktop as these can scratch the induction glass This appliance is intended to be used in a household or similar environments such as staff kitchen areas in shops offices and other residential environments If the supply cord is damaged it must be replaced by a special cord or assembly available from the manufacturer or its service agent WARNING The appliance and its acc...

Page 13: ...2 Power Timer regulating key 3 keylock control 4 ON OFF control 5 Timer control Choosing the right Cookware Only use cookware with a base suitable for induction cooking Look for the induction symbol on the packaging or on the bottom of the pan You can check whether your cookware is suitable by carrying out a magnet test Move a magnet towards the base of the pan If it is attracted the pan is suitab...

Page 14: ...n excessive temperature is monitored the Induction hob will stop operation automatically Detection of Small Articles When an unsuitable size or non magnetic pan e g aluminium or some other small item e g knife fork key has been left on the hob the hob automatically go on to standby in 1 minute The fan will keep cooking down the induction hob for a further 2 minute Auto Shutdown Protection Auto shu...

Page 15: ...fficult to remove or even permanently damage the glass surface Cut hazard then the safety cover is retracted Use with extreme care and always store safely and out of rech of children 3 Spillovers on the touch controls 1 Switch the power to the cooktop off 2 Soak up the spill 3 Wipe the touch control area with a clean damp sponge or cloth 4 Wipe the arta completely dry with a paper towel 5 Switch t...

Page 16: ...y Technical fault Please not down the error letters and numbers switch the power to the induction hob off at the wall and contact a qualified technician Failure Display and Inspection If an abnormality comes up the induction hob will enter the protective state automatically and display corresponding protective codes Problem Possible causes What to do F3 F4 Temperature sensor of the induction coil ...

Page 17: ... surface use the packaging Do not apply force onto the controls protruding from the hob Adjusting the bracket position Fix the hob on the work surface by screw 4 brackets on the bottom of hob see picture after installation Adjust the bracket position to suit for different table top thickness Cautions 1 The induction hotplate must be installed by qualified personnel or technicians We have professio...

Page 18: ...and recycling of this product please contact your local council your household waste disposal service or the shop where you purchased it For more detailed information about treatment recovery and recycling of this product please contact your local cityoffice your household waste disposal service or the shop where you purchased the product Symbol Value Unit Model identification Type of hob Number o...

Reviews: