EXPERT GRILL GBC1816W Owner'S Manual Download Page 13

13 

Operating Instructions (Continued)

Cleaning and Care


W

CAUTION: If burner flame goes out during operation, immediately turn the control knobs to the “  OFF” 

position, 

LP gas tank valve “CLOSED” and open lid to let the gas clear for 5 minutes before re-lighting. 

Turning Off

1 .  Turn LP gas tank valve to “CLOSED .”
2 .  Turn all control knobs clockwise to the “  OFF” position . 

Note: A “poof” sound is normal as the last of the LP gas is burned .

3 .  Disconnect LP gas tank per “Disconnecting LP Gas Tank” section .

Controlling Flare-ups


W

CAUTION: Putting out grease fires by only closing the lid is not possible. 

1.  If a grease fire develops, turn control knobs to the “  OFF” position and LP gas tank valve “CLOSED.” Do 

NOT use water on a grease fire. This can cause the grease to splatter and could result in serious burns, 

bodily harm or other damage. 

2.  Do NOT leave grill unattended while preheating or burning off food residue on   (HIGH). If grill has not 

been cleaned, a grease fire can occur.


W

WARNING: When cooking, fire extinguishing materials should be readily accessible.  In the event of an oil/

grease fire, use type BC dry chemical fire extinguisher or smother with dirt, sand or baking soda. Do NOT 

attempt to extinguish with water.

Flare-ups are a part of cooking meats on a grill and add to the unique flavor of grilling .

Excessive flare-ups can over-cook your food and be dangerous.


Important:


Excessive flare-ups result from the build-up of grease in the bottom of your grill . 

If a grease fire occurs

, close the lid 

AND

 turn the control knob(s) to “  OFF” until the grease burns out . Be careful when opening the lid as 

sudden flare-ups may occur .
If excessive flare-ups occur, 

do NOT

 pour water onto the flames .

Minimize Flare-ups:

1 .  Trim excess fat from meats prior to cooking .
2 .  Cook high fat content meats on   (LOW) setting or indirectly .
3 .  Ensure that your grill is on a hard, level, non-combustible surface and the grease is allowed to drain into grease receptacle .


W

CAUTION:

1.  All cleaning and maintenance should be done when grill is cool and with the fuel supply disconnected.
2.  Do NOT clean any grill part in a self-cleaning oven. The extreme heat will damage the finish.
3.  Do NOT enlarge valve orifices or burner ports when cleaning the valves or burners.

Notices

1.  This grill should be thoroughly cleaned and inspected on a regular basis. 
2.  Abrasive cleaners will damage this product. 
3.  Never use oven cleaner to clean any part of grill.

Before Each Use:

1 .  Keep the grill area clean and free from any combustible materials, gasoline, and other flammable vapors and liquids .
2 .  Do NOT obstruct the flow of the combustion of LP gas and the ventilation of air .
3 .  Keep the ventilation opening(s) of the LP gas tank area free and clear from debris .
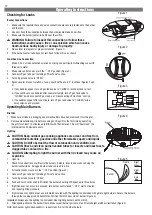
4 .  Visually check the burner flames to make sure your grill is working properly (Figure 6) .
5 .  See sections below for proper cleaning instructions .
6 .  Check for obstructions of airflow to the burners . Spiders, insects and webs can clog the burner/venturi tube .  A clogged burner tube can 

lead to a fire .

Summary of Contents for GBC1816W

Page 1: ...alifornia Proposition 65 Wash your hands after handling this product California Proposition 65 Handling the brass material on this product exposes you to lead a chemical known to the State of California to cause cancer birth defects or other reproductive harm Outdoor LP Gas Barbecue Grill Model No XG18 101 002 07 GBC1816W WARNING FOR YOUR SAFETY 1 Do NOT store or use gasoline or other flammable li...

Page 2: ...ety certified for use in the United States and or Canada only Do NOT modify for use in any other location Modification will result in a safety hazard and will void your warranty W W This grill is for use with liquid propane LP gas only The conversion to or attempted use of natural gas in this LP gas grill is dangerous may cause bodily harm and will void your warranty W W LP gas characteristics a L...

Page 3: ...id lava rocks gasoline kerosene or alcohol with this product W W Your grill has been checked at all factory connections for leaks Re check all connections as described in the Operating Instructions section as shipping can loosen connections W W Check for leaks even if your unit was assembled for you by someone else W W Do NOT operate if a gas leak is present Gas leaks may cause a fire or explosion...

Page 4: ...a lit grill unattended Keep children and pets away from grill at all times W W Do NOT leave grill unattended while preheating or burning off food residue on high If grill has not been cleaned a grease fire can occur that may damage the product W W Do NOT place empty cooking vessels on the appliance while in operation W W Use caution when placing anything on the grill while the appliance is in oper...

Page 5: ...ited Warranty does not cover damage to the finish such as scratches dents discoloration rust or other weather damage after purchase This Limited Warranty is in lieu of all other express warranties RA disclaims all warranties for products that are purchased from sellers other than authorized retailers or distributors including the warranty of merchantability or the warranty of fitness for a particu...

Page 6: ...6 Expanded View 1 2 3 4 4 4 5 6 7 8 9 10 10 11 12 13 13 13 14 16 18 17 19 19 21 22 24 26 23 23 20 27 28 29 25 30 30 31 15 ...

Page 7: ...30 7 Heat Shield G1716 200 8 Warming Rack G1716 060 9 Cooking Grid G1716 070 10 Side Shelf 2 G1716 090 11 Grill Body Assembly G1716 040 12 Burner 3 G1716 050 13 Control Knob 3 G1025 255 14 Grease Cup B0219 H00 15 LP Gas Tank Heat Shield G1716 210 16 Regulator Hose Assembly B0308 A18 17 LP Gas Tank Retainer Wire G1716 100 18 Front Panel G1716 110 19 Upper Cart Frame 2 G1716 130 20 Cart Frame Suppor...

Page 8: ...of cracks or openings 2 Spread out all parts 3 Tighten all hardware connections by hand first Then before completing each step go back and fully tighten all hardware Be careful not to over tighten That could damage surfaces or strip threads 4 For best results complete each step in the order presented To complete assembly you will need 1 Leak detection solution instructions on how to make the solut...

Page 9: ... 5 Attach Cart Frame Support B C 6 Attach Grill Body Assembly and LP Gas Tank Heat Shield 8 Attach LP Gas Tank Retainer Wire LP Gas Tank Blocking Wire Axle and Wheels 7 D B E A A x 2 B x 5 E x 1 A A x 2 D x 2 G x 4 C x 4 E E x 2 C G B E B x 2 E x 2 ...

Page 10: ...10 10 Attach Hanlde Heat Shield and Control Knobs 9 12 11 Insert Warming Rack I x 2 F x 2 H x 2 H I F Insert Grease Cup Insert Heat Plates and Cooking Grid ...

Page 11: ...gas line connection Connecting LP Gas Tank 1 Before connecting be sure there is no debris caught in the head of the LP gas tank head of the regulator valve or in the head of the burner or burner ports 2 Connect regulator hose assembly to tank by turning knob clockwise until it stops Disconnecting LP Gas Tank 1 Before disconnecting make sure the LP gas tank valve is CLOSED 2 Disconnect regulator ho...

Page 12: ...otective films have been removed from the grill 2 Remove manufacturing oils before cooking on this grill for the first time by operating the grill for at least 15 minutes on HIGH with the lid closed This will heat clean the internal parts and dissipate odors Lighting W W CAUTION Keep outdoor gas cooking appliance area clear and free from combustible materials gasoline and other flammable vapors an...

Page 13: ...the build up of grease in the bottom of your grill If a grease fire occurs close the lid AND turn the control knob s to OFF until the grease burns out Be careful when opening the lid as sudden flare ups may occur If excessive flare ups occur do NOT pour water onto the flames Minimize Flare ups 1 Trim excess fat from meats prior to cooking 2 Cook high fat content meats on LOW setting or indirectly ...

Page 14: ...esidue and dirt from burner surface 10 Clean any clogged ports with a stiff wire such as an opened paper clip 11 Inspect burners for any damage cracks or holes If damage is found replace with new burner s from manufacturer 12 Re install burner s Checking to insure that gas valve orifice is correctly positioned inside each burner venturi tube Also check position of spark electrode 13 Replace heat p...

Page 15: ...n until solid stop Tighten by hand only do NOT use tools Obstruction of gas flow Clear burner venturi tube Check for bent or kinked hose Disengagement of burner to valve Reengage burner and valve Spider webs or insect nest in venturi Clean burner venturi tube Burner ports clogged or blocked Clean burner ports Sudden drop in gas flow or reduced flame height Out of gas Exchange refill or replace LP ...

Page 16: ...round burner system Turn control knobs to OFF Turn LP gas tank valve to CLOSED Leave lid in closed position and let fire burn out After grill cools remove and clean all parts per Cleaning and Care section Flashback fire in burner tube s Burner and or burner venturi tube are blocked Clean burners and or burner venturi tube Inside of lid is peeling like paint peeling Baked on grease buildup has turn...

Reviews: