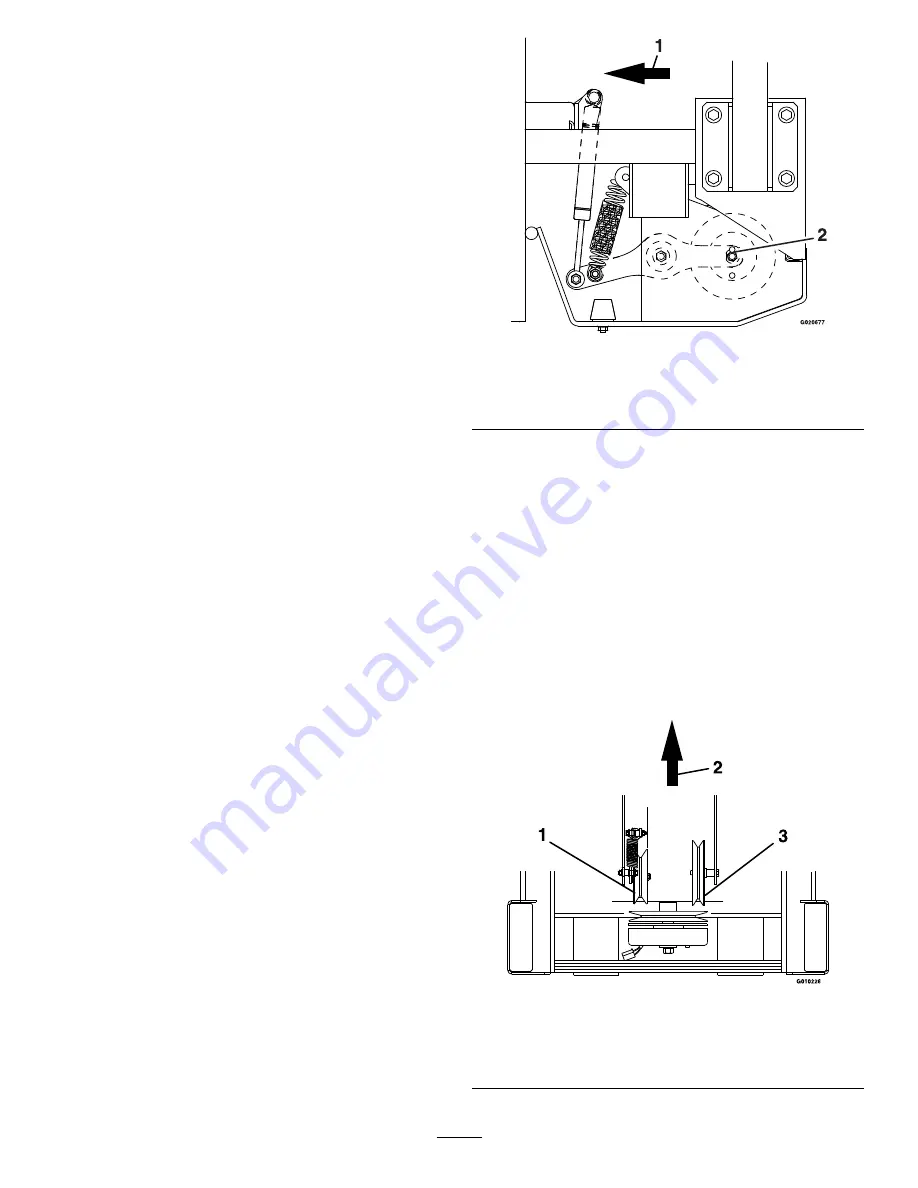
assemble the bushing, spacer, and extension spring
onto the tightener arm assembly as shown in Figure 2.
14.
Secure the upper spring hook to the frame using
3/8-16 x 2 1/2 inch bolt, spacer, bushing, and 3/8 inch
nyloc nut as shown in Figure 2.
15.
Attach the lower end of the dampener to the outside
hole in the tightener arm assembly using 3/8-16 x 2
1/2 inch carriage bolt, spacer, and 3/8 inch flanged
nut as shown in Figure 2.
Note:
Be sure to install the damper with the rod end
down for proper operation.
16.
Attach the upper end of the damper to the bracket,
installed in step 9, using 3/8-16 x 2 1/2 inch carriage
bolt, spacer, and 3/8 inch nut as shown in Figure 2.
17.
Using the same technique from step 4, extend the
spring and slip the belt back into the pulley groove.
Make sure the belt is positioned in all the pulley
grooves. Slowly release the spring. Adjust the belt
tension per the
Mule Drive Belt Tension Adjustment
section.
Mule Drive Belt Tension
Adjustment
Note:
Adjust the mule belt drive tension initially and then
after the first five hours.
Self-tensioning idler, adjust as follows:
1.
Stop engine, wait for all moving parts to stop, and
remove key. Engage parking brake.
2.
On the left side of the engine deck support, check the
location of the bolt head in the center of the spring
loaded pulley. The top of the bolt should be at the
bottom of the upper alignment hole as shown in
Figure 6. It is necessary to adjust the belt tension when
the center of the bolt head is at or below the center of
the bottom alignment hole.
Figure 6
1.
Front of unit
2.
Locate the top of the bolt
with the bottom of the
upper alignment hole
3.
When adjustment is necessary, loosen the idler pulley
on the right-hand side so it can move up and down in
the slot.
Place a wrench on the 3/8 inch nut in the center of
the spring loaded pulley and apply upward pressure to
relieve tension on the spring (1/2 inch drive breaker
bar and 9/16 inch socket works best).
Reposition the adjusting pulley towards the bottom of
the slot.
Note:
When installing a new belt, it is necessary to reposition
the right adjusting pulley upward in the slot in order to place
the spring loaded pulley in the correct location (reference
step 2).
Figure 7
1.
Spring idler pulley
2.
Front of unit
3.
Right side idler pulley (adjustable)
4


