background image

MSP-30106-V02

Step 5. 

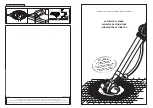
Attach the drainage valve connector to the drain outlet by turning connector 

in a clockwise direction.

Step 6. 

Open the out drain plug on the inside of the pool and the water will begin to 

drain immediately.

Step 7. 

Disconnect the hose and drainage valve connector when finished.

Step 8. 

Replace the out drain plug on the inside of the pool.

Step 9. 

Be sure that the pool liner is completely dry before folding the pool for 

long-term storage. Leaving the pool exposed to sunlight for a few hours will clean 

and speed the drying process and make it easier to fold the pool for storage. (Never 

attempt to fold or stow a pool that is not completely dry as this could lead to a 

proliferation of mold or mildew build-up during the time the pool is in storage.)

Step 10. 

Remember, proper off-season storage is critical to protect your investment 

in your pool.(espeically in winter)  Once drained and dry, your pool should be 

carefully folded and wrapped in a ground cloth (if available) or other similar 

protective tarp-like material. The pool and all applicable accessories such as the 

pump, cover, ground cloth, ladder, hoses, clamps, and hardware should be kept 

together and stored indoors, in a reasonably warm, dry and weatherproof location. 

6.1 Folding instruction

Before folding, it’s better to dry all parts and pool completely by lying them in the 

sun for one hour or so.(PIC.1). And then, spread some talcum powder to prevent 

the vinyl from sticking together.

Step 1. 

Please fold the protrusion sides inside to gain rectangle shape. (PIC.2).

Step 2. 

Fold each half of the rectangle to gain a smaller rectangle shape. (PIC.3).

Step 3. 

Fold each ends backwards. (PIC.4).

Step 4. 

Fold the rest ends together to create an ultimate rectangle one. (PIC.5).

TIPS 1. 

Please remove air inside to make the folded pool thin and flat during each folding.

TIPS 2. 

The original packing can be used for storage.

PIC.1

PIC.3

PIC.4

PIC.2

PIC.5

Summary of Contents for 12FTX48IN

Page 1: ...n und verwenden lesen verstehen und beachten Sie sorgf ltig alle anweisungen und f r k nftige bezugnahme aufbewahren Belangrijke veiligheidsvoorschriften Voor installatie en gebruik zorg dat u alle in...

Page 2: ...MSP 30106 V02...

Page 3: ...MSP 30106 V02 1 0 Part reference 1 2 6 11 9 12 5 4 3 8...

Page 4: ...ication We also continuously test our production runs and periodically have independent tests performed again as a further check Only products which live up to the highest EXIT Toys standard are marke...

Page 5: ...ldren and those who do not know how to swim AT ALL TIMES Never swim bathe in the pool alone 3 NEVER permit diving or jumping into the pool Never enter the pool from any decks or other raised surfaces...

Page 6: ...nd healthy Store water treatment products out of reach of children 9 Plan Phone near the pool do not leave your children unattended when you call Buy and pole near the pool 10 Moreover some devices ma...

Page 7: ...Circuit Interrupter GFCI The pool should be set no closer than 10 ft to the power source but no further than the length of the filter pump cord Under no circumstances should an extension cord be used...

Page 8: ...xcept the time for site preparation and water filling 30 up to 45 minutes Step 1 Account for all parts Remove all the parts from the carton s and place them on the ground in the location where they ar...

Page 9: ...MSP 30106 V02 Step 3 Install the horizontal beams through the sleeves of the pool Step 4 Foot pad Step 5 Install T joints and frame BELT...

Page 10: ...it fills evenly 6 2 Continue filling the pool until water level 6 0 Disassembly and storage WARNING Do not let your children stand at downfold and face the water outlet during the drainage The water c...

Page 11: ...in your pool espeically in winter Once drained and dry your pool should be carefully folded and wrapped in a ground cloth if available or other similar protective tarp like material The pool and all...

Page 12: ...DED that you drain your pool clean and dry it thoroughly and store it in a protected area for the off season This will help extend the life of your pool and prevent a safety hazard from developing whi...

Page 13: ...e purchased separately as an accessory Please contact your local after sale service center if you want to get advice on any repair during the life of the pool kit 4 If applicable check your filter pum...

Page 14: ...liner Test water often to maintain proper chlorine levels POOL WATER IS COOL Water is not warming to a comfort able swimming temperature Pool was set up in an excessively shady or tree lined area Heat...

Page 15: ...elbst st ndig unsere Produktionsabl ufe und lassen diese als weitere Kontrolle regelm ig durch unabh ngige Stellen berpr fen Nur Produkte die den h chsten EXIT Toys Standards gerecht werden werden mit...

Page 16: ...Benutzung 3 Anf nger und Nichtschwimmer sollten bei Benutzung des Pools Schwimmhilfen tragen 4 Wenn der Pool nicht benutzt oder nicht beaufsichtigt wird entfernen Sie alle Spielzeuge aus und rund um d...

Page 17: ...den Pool von der Wasseroberfl che 7 Sch tzen Sie Poolbenutzer von wasserrelevanten Krankheiten indem Sie das Poolwasser behandeln und auf gute Hygiene achten Beachten Sie die Richtlinien zur Wasserbeh...

Page 18: ...MSP 30106 V02...

Page 19: ...act Dutch Toys Group Edisonstraat 83 7006RB Doetinchem the Netherlands P O Box 369 7000AJ Doetinchem the Netherlands info exittoys com www exittoys com EXIT is a registered trade mark of Dutch Toys Gr...

Reviews: