background image

6

Valet mode


  Valet mode prevents the remote start feature from being activated. It should be 

used, for example, when you have your vehicle serviced. 

To engage Valet mode:

•  Press and hold the Valet Switch for 3 seconds; the Status Light will turn on and 

stay on to indicate Valet Mode. Attempts to remote start will result in no response. 

Keep this in mind if remote start stops functioning.

•  To turn off Valet Mode, simply press & release the Valet Switch once. The Status 

Light will turn off.

using The Valet Switch

Step 1

  Turn the ignition key “ON”, then “OFF”

Step 2

  Within 5 seconds of step 1, press the valet switch 5 times to access user 

features (10 times to access installer features).

  ~ The parking lights and the status light will turn on.

Step 3

  Within 10 seconds of step 2, press the valet switch the number of times cor-

responding with the desired feature’s number.

  ~ The status lights and the parking lights will flash equal to the selected feature.

Step 4

  Change the feature by pressing the brake pedal the same number of times 

that corresponds with the desired setting.

  ~ The status lights and the parking lights will flash equal to the selected setting.

Step 5

  If you wish to change more features, repeat steps 3 & 4 at this time.

Step 6

  To exit programming, turn the ignition key “ON” then “OFF”. Or, you can wait 

10 seconds for programming mode to expire. The lights will turn off.

manual Override


This puts the system in a “ready” state allowing for programming operations.

•  Turn the vehicle’s ignition “on”.

•  Press and release the valet switch once.

Programming Features

The valet switch is a push button located in the dash area of your car. The specific 

location is chosen by the installer. If you do not know the specific location of your 

valet switch, contact your installing dealer.

Summary of Contents for RS-140-DP

Page 1: ...RS 140 DP Deluxe Keyless Entry Remote Start December 5 2011 Operation Guide Temporary cover Color cover is in a separate file ...

Page 2: ...te Start Features 4 Low Battery Low Temp Automatic Starting 4 Turbo Timer Feature 4 Pit Stop Feature 4 The Status Light 5 Using The Valet Switch 6 Programming Features 6 User Programmable Features 7 Installer Programmable Features 8 Programmable Features Matrix 11 ...

Page 3: ...r components that you should famil iarize yourself with The Status Lights which indicate the current system status and helps in troubleshooting failed remote start attempts as well as in customizing the programmable features The specific operations of the lights are described on page 5 The Valet Switch is used to access transmitter and feature program ming It is also used to place the system in va...

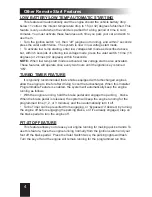
Page 4: ... very useful when the vehicle is parked for a long period of time in cold climates You must activate these features each time you park your car and wish to use them Turn the ignition switch on then off engine not running and within 7 seconds press the valet switch twice The system is now in low voltage start mode To activate low temp starting enter low voltage start mode as described above but wit...

Page 5: ...4 Flashing Fast after activating remote start The system is in the process of start ing the engine Remote Starting Diagnostics Whenever the system is placed into Valet Mode the Status Light illuminates solid However when this first occurs the Status Light will flash 1 to 6 flashes be fore resuming solid illumination This indicates why the engine stopped running from the last previous remote starti...

Page 6: ... switch the number of times cor responding with the desired feature s number The status lights and the parking lights will flash equal to the selected feature Step 4 Change the feature by pressing the brake pedal the same number of times that corresponds with the desired setting The status lights and the parking lights will flash equal to the selected setting Step 5 If you wish to change more feat...

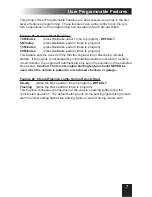
Page 7: ...ature should NEVER be used when the vehicle is parked in an enclosed structure or garage This group of User Programmable Features are all accessed as a group in the first level of features programming These features have a direct affect upon the sys tem s operations so the programming and operation of each are described Feature 2 Steady Flashing Lights During Remote Start Steady press the brake pe...

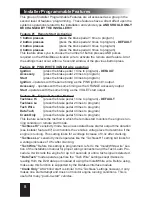
Page 8: ... associated base starter output time duration see installer feature 7 and monitors the vehicle s voltage level to determine if the engine is running This setting looks for a voltage increase of 0 3v after cranking Tachless Lo sensitivity mode operates like the Tachless Hi setting but looks for a voltage increase of 0 5v after cranking Tach Wire Before this setting is programmed refer to the Violet...

Page 9: ...crank time of the 1st start attempt when in Tachless mode If the engine doesn t start on the first attempt it will retry up to 3 more times extending the crank time by an additional 0 2 second with each attempt Feature 4 Gasoline Or Diesel Engine Gasoline press the brake pedal 1 time to program DEFAULT Diesel 15 Sec Delay press the brake pedal 2 times to program Diesel 20 Sec Delay press the brake...

Page 10: ...m 400ms press the brake pedal 4 times to program When the vehicle s interior temperature is below freezing this feature adds extra crank time to the base timing see installer feature 7 It applies to tachless modes only installer feature 3 Feature 13 Data Port Protocol D2D Trilogix press the brake pedal 1 time to program DEFAULT ADS iData press the brake pedal 2 times to program This feature determ...

Page 11: ...ITE wire function Ignition Accessory Start 3 Engine Detection Tachless Hi Tachless Lo Tach Wire Datatach Crank Only Brake Pedal x 5 4 Gas or Diesel Engine Gas Diesel 15 sec delay Diesel 20 sec delay Diesel 30 sec delay 5 Sat Port Green Wire Starter Pulse After Start Status 6 Sat Port Blue Wire Status Ignition 7 Crank Time 0 7 Sec 1 00 Sec 1 5 Sec 2 25 Sec 8 Low Temp Crank Extender 0ms 200ms 300ms ...

Page 12: ...Back Cover Color cover is in a separate file ...

Reviews: