

C
ongratulations on your purchase of the
Motorized Bumper Boat from Excalibur
Electronics. Sit on your very own infl atable
throne as you cruise the water thanks to the
powerful, single propeller.
Please read this manual thoroughly, especially
noting safety and care instructions. Keep this
manual for reference. This package contains 1
bumper boat, 1 electric pump and all its parts for
assembly and 1 userʼs manual.
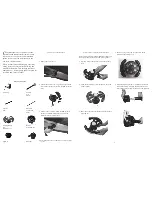
MAIN PARTS LIST
Air Pump
Control
Arm
Sleeve
Control
Electrical
Arm
Connection
Shaft
Steering Wheel
Battery
and
Compartment
Battery Cover
Lug Nut
Propeller
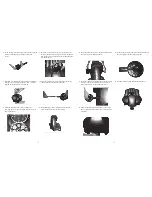
I
NFLATING
Y
OUR
B
UMPER
B
OAT
1. Remove the valve cover.
2. Connect the nozzle to the air pump. Check to make
sure that this nozzle also fi ts into the Bumper Boatʼs
valve.
3.
There are two “cavities” where the Bumper Boat
needs to be infl ated. Turn on the air pump and
infl ate each cavity until it is fi rm.
4.
After filling each cavity, remember to close the valve
covers.
A
SSEMBLING
Y
OUR
M
OTORIZED
B
UMPER
B
OAT
Once you have properly infl ated the Bumper Boat, you
can begin assembling the motor and steering wheel.
1. Use the wrench to unscrew the nuts on the battery
cover.
2. Assemble the battery cover with the nuts, bolts and
o-rings in place.
3. Place the nut onto the bolt and then onto the battery
compartment.
4. Place an o-ring on the end of each bolt to fi nish
assembling the battery cover.
5. Match the direction of the “2” printed on the control
arm and the battery compartment. Slide the control
arm in through the bottom of the battery compartment.
3


