background image

CONFIGURATION OF ENVIRONMENTS OF THE HOME

23

environment

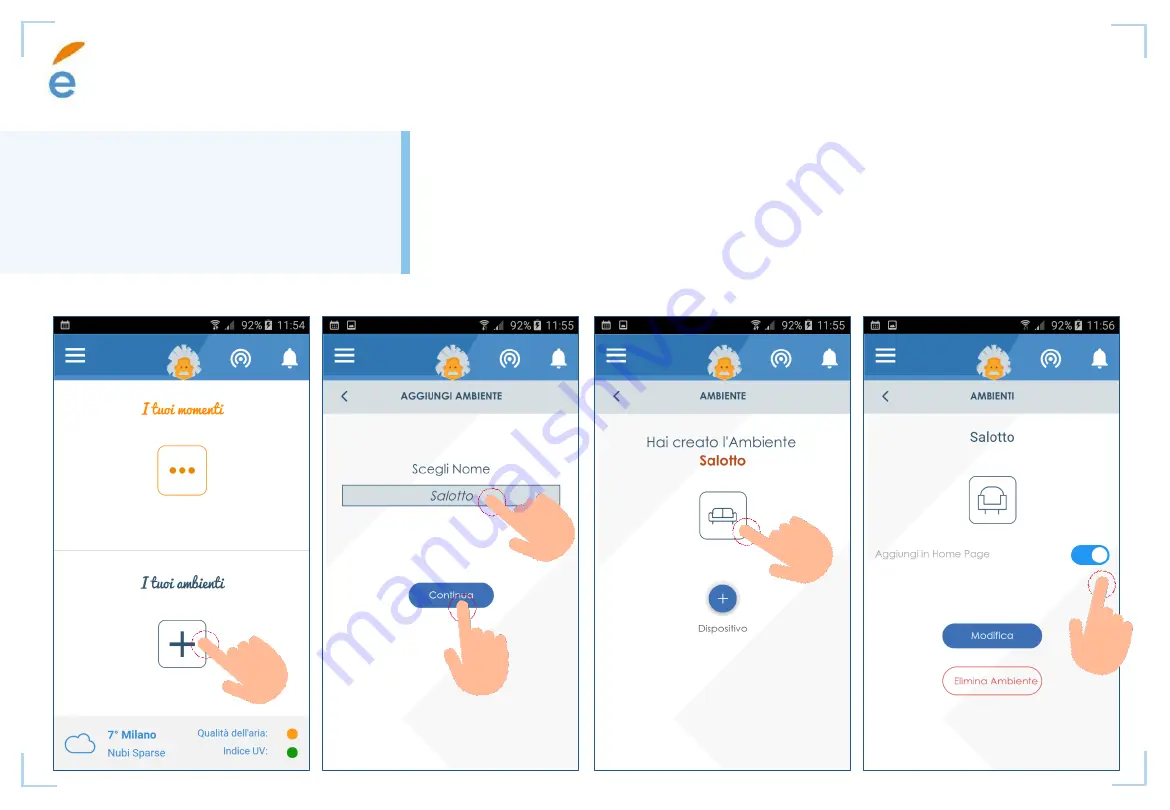
Create environments for 

every place of your home

1. From home page or section

Ambienti’

click on 

+ to add an environment

2. Choose a name for your environment and click on 

continua

3. Choose a template, then click on 

+

to add devices to the environment

4. You can add the environment to the home view

Summary of Contents for Eugenio

Page 1: ...userguide 1 ...

Page 2: ...INTRODUCTION Part1 ...

Page 3: ...figuration of the Gateway the association of smart devices the building of automation scenarios and the remote control of your home Eugenio is the system for all your needs introduction 3 The guide is divided into several sections 1 introduction 2 configuration 3 your moments 4 5 6 appendix instructions and advices your environments ...

Page 4: ...ns of a smartphone APP which permits to configure automations for your home The HGM supports S2 protocol of Z Wave that is it can include securely devices which supports S2 protocol Wireless Connection of Smart Devices and APP Usage 4 The Eugenio APP is available for Android and iOS freely downloadable from Apple Store and PlayStore introduzione ...

Page 5: ... quickly No more cables Anytime Eugenio let you add new sensors or actuator to enhance the possibilities of control of the home Create the Domotic System which fits your needs 5 introduction PVENERGYPRODUCTIONCONTROL ENERGY STORAGE EVRECHARGE SECURITY LOADMANAGEMENT HEA TING COOLING ENERGYMANAGEMENT MANAGEMENTBY APP HUB CLOUD ...

Page 6: ...tion Eugenio can remotely control the states of associated devices create scenarios and rules based on custom daily needs detect and transmit notifications about anomalies and alarms read electrical loads and state change of devices ...

Page 7: ... of devices from different vendors and of different types The compatible set of devices follows Eugenio can interacte with multi brand devices 7 introduction Lighting Access control Load control Remote control Flood Smoke Temperatura movimento Smart metering ...

Page 8: ...tall configure and use Follow the instructions of this Manual and use the contact information to ask support to our Customer Service Evolvere Customer Service is at your side For information and support call us at 800 190 570 from mobile line 39 0266710922 Mon Fri from 9 00 to 19 00 ...

Page 9: ...INSTRUCTIONSANDADVICES Part2 ...

Page 10: ...eraction among different electrical machineries could lead to interferences which could impact on the correct behaviour of medical appliances or alter the measurements of electronic toolboxes No modification of the device si allowed The Gateway can be used by users with a minumum knowledge of basic Informatics Please follow the instruction of this Manual In case of anomalies or incorrect behaviour...

Page 11: ...mperatures The devices is supposed to work under usual ambient temperatures Handle carefully in order to avoid mechanical or electrical damages to its parts Avoid any movements when the devices is powered on In order to avoid electrostatic shocks handle the device from the borders Before using the power adapter follow these instruction to avoid hazards Do not disassemble the device and do not touc...

Page 12: ... of the home must contain the ground pole connection The electric line must be stable and free of electrical noises and interferences of any type Power the device with supply power as specified in the external label Do not bend the power cable with objects and take care to not expose the power cable around free walk areas No objects or person should stepped on the power cable If liquids accidental...

Page 13: ...a giunta a fine vita è organizzata e gestita dal produttore L utente che vorrà disfarsi della presente apparecchiatura dovrà quindi contattare il produttore e seguire il sistema che questo ha adottato per consentire la raccolta separata dell apparecchiatura giunta a fine vita L adeguata raccolta differenziata per l avvio successivo dell apparecchiatura dismessa al riciclaggio al trattamento e allo...

Page 14: ...CONFIGURATION Part3 ...

Page 15: ... the Cloud Turns on at every Z Wave operation inclusion exclusion etc Turns on when the 3G modem is active ON OFF Z Wave RESET MICRO USB This button control the reboot of the device see next page This button controls Z Wave operations such as inclusion exclusion etc See next page This button starts the Factory Reset of the gateway and the Z Wave module The gateway will switch to Access Point mode ...

Page 16: ...he Z Wave LED blinks quickly during INCLUSION stays ON during EXCLUSION stays oFF no on going Z Wave operation is present blinks randomly normal state whenever a Z Wave communication takes happen RESET BUTTON The button allows the following functions Factory reset1 a long press for more than 10 seconds starts hard reset of all the configurations Access Point mode a long press of 3 seconds starts t...

Page 17: ...e power supply port Eugenio can be used also without a WiFi connection This port connect the gateway to the local LAN WARNING If you change the type of connection WiFi or Ethernet Eugenio tries to restart Internet connection and the service could be unavailable for some second ...

Page 18: ...ll turn on 2 If you have not a WiFI connection connect the gateway by means of the RJ45 cable to your LAN 3 Download the Eugenio APP Play store or Apple store and follow the instructions Few steps to activate your Eugenio 18 configuration Micro USB power port ON OFF button RJ45 port ...

Page 19: ...d click on Registrati Click on Procedi Scan the QR code placed on the buttom of the chassis of Eugenio Type in your Client Code your email password Check your e mail Eugenio has sent you the access info and the token to validate your e mail 1 2 3 1 2 3 4 4 ...

Page 20: ...I Connect your smartphone the WiFi access point with SSID SENTINEL AP The required password is admin_ap Tback to the App now configure the WiFi Access Point to be used by the gateway from now and click on CONNETTI NOW THE CONFIGURATION IS COMPLETED YOU CAN ENJOY USING EUGENIO 4 5 6 4 5 6 ...

Page 21: ...o change the WiFi connection of the gateway METEO weather forecast and external air quality measures TERMOSTATO digital and connected thermostat that let you manage home heating CHECK UP ENERGETICO energy check up service to help you saving energy AMBIENTI here you can create your environment and include the devices STORICO MISURE every sensor data is recorded in the cloud Here you can find sensor...

Page 22: ...YOURENVIRONMENTS Parte4 ...

Page 23: ...s for every place of your home 1 From home page or section Ambienti click on to add an environment 2 Choose a name for your environment and click on continua 3 Choose a template then click on to add devices to the environment 4 You can add the environment to the home view ...

Page 24: ...nvironment Add devices to your environment 1 From section Ambienti chose one environment and click on modifica 2 Clicca on to add a device to your environment 3 To add one of the devices already included select it from the list and click on Aggiungi ...

Page 25: ...on 3 If device supports S2 security protocol with DSK you need to write the whole DSK to enable secure adding of device 4 Wait for the confirmation message in the App then rename your device and click on ASSOCIA EXAMPLE To add the Motion Sensor Fibaro 1 Click on Nuovo 2 Eugenio will be in inclusion mode 3 Click 3 times the B button 4 The App will confirm you the inclusion ...

Page 26: ...How to remove a device 1 Select the device you want to remove from the Z Wave network from the section Ambienti 2 Clic on Elimina Dispositivo to start the procedure on controller 3 Follow the instructions of the device to remove it from Z Wave network ...

Page 27: ...for adding device The LED turns off when the procedure ends Press the Z Wave button for at least 6 seconds The Z Wave LED turns on and Eugenio is in the listening state for removing device The LED turns off when the procedure ends To cancel on going operations just press once the Z Wave button environment You can add devices without the App ...

Page 28: ...YOURMOMENTS Parte5 ...

Page 29: ...APP you can read multisensor data temperature or movement you can switch on off the plug or control the LED intensity Rules examples lux rule turn on the led when the motion sensor detects low luminance security rule send me an mail when the multisensor detects movement smoke rule send me an mail when the smoke sensor detects smoke Moment examples al home moment lux rule smoke rule not at home mom...

Page 30: ... 1 Click on aggiungi momento 2 Rename the moment and click on continua 3 Click on Aggiungi regola to create an automation rule If you want to create a rules indipendent from the moments always active click on Sempre and create the rule Create moments for every daily need ...

Page 31: ...eated 2 Choose what you want to happen COSA 3 Choose when you want It to happen QUANDO always or when a condition occurs or when a condition occurs but only with a certain duration or in a defined period 4 Verify the rule RIEPILOGO rename It and save Define what you want and when you want it Your moments ...

Page 32: ...ge or from section Momenti 1 Clickon the moment you want to activate 2 Confirm the activation 3 The moment icon become green active moment Choose what moment activate during your day Non activated moment Activated momet Your moments ...

Page 33: ...APPENDIX Parte6 ...

Page 34: ...he gateway is able to group devices according to the Z Wave protocol However the user has no access to grouping functions and only one group is supported Home Group 1 is configured by default This means that alarms sent on other groups are not handled Also the DSK is included in the chip and it s fully printed both on the label attached on the bottom of the chassis and on product s packaging Howev...

Page 35: ...er as well The procedure can be activated ONLY by accessing the Configuration server running on the local web server Usually the address of the Configuration server you must connect a PC to the LAN the GW is runnning within start a web browser at the address https sentinel local 3000 If everything is fine you will land into the login page Use your Eugenio account to enter the Configurazione server...

Page 36: ...OPERATIONS LISTOFNODES 36 appendix Go to the section Z Wave You will find a group of buttons which permit management operations such as showing the devices included in your network or inclusion Exclusion of controller ...

Page 37: ...rmation from another Z Wave controller 1 Go to the Z Wave section and click on Learn mode button 2 On the second controller start the add node procedure If you are using another Eugenio HGM a Access the Configuration server of the 2nd Eugenio b In the Z Wave section click on Add node The procedure to remove controller from existing network is similar just click on Learn mode and repeat 2a 2b the p...

Page 38: ...arn Mode procedure If you are using another Eugenio HGM a Access the Configuration server of the 2nd Eugenio b In the Z Wave section click on Learn Mode 3 If everything is fine you will see the Z Wave LED blinking on second controller and you can check new network configuration by clicking on Nodi get nodes 4 The procedure to remove a controller is the similar just click on Learn mode and repeat 1...

Page 39: ...Z WAVENETWORKANDNODEUPDATE 39 appendix These operations are useful to update network topology or to update a single node by adding its ID in the network ...

Page 40: ...e network e g by correcting routing misbehaviour or solving problems related to devices apparently not responding to commands To understand if a Z Wave network is working well just launch an Health Check operation After that you can decide the action to perform on Z Wave nodes ...

Page 41: ... respond anymore to the Controller Such nodes are called Failed nodes You can include an identical new node as substitute of the failed one Just insert the ID of the failed node and its DSK if supported and press Sostituisci Substitute Then insert the new device and start the inclusion process ...

Page 42: ...r your network resetting it will result in the nodes in your network being orphaned and it will be necessary after the reset to exclude and re include all of the nodes in the network If this controller is being used as a secondary controller in the network use this procedure to reset this controller only in the event that the network primary controller is missing or otherwise inoperable ...

Page 43: ...43 ...

Reviews: