background image

/11

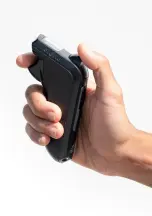
REMOTE

A. Brake

B.  Mode 1 Button

C.  Mode 2 Button

D.  On/Off Button

E.  Lanyard Loop

F.  LCD Screen

G. Accelerator

H.  Safety Switch

I.   Charge Port

F

G

H

I

A

B

C

D

E

Summary of Contents for BAMBOO GTR

Page 1: ...USER MANUAL BAMBOO GTR CARBON GTR ...

Page 2: ...ith endless fun Please read ALL the information below before you begin using your equipment From all of us at Evolve we wanted to thank you for choosing us We are stoked to welcome you to the Evolve community CONGRATULATIONS ON YOUR PURCHASE WWW EVOLVESKATEBOARDS COM ...

Page 3: ......

Page 4: ...2 WARNING MESSAGES 14 CHARGING THE BOARD 16 CHARGING THE REMOTE 17 TURNING THE BOARD ON OFF 18 TURNING THE REMOTE ON OFF 19 REMOTE SCREEN GUIDE 21 REMOTE MENU CONTROLS 22 PAIRING SYNCING THE REMOTE 23 CHANGING SPEED MODES ON THE REMOTE 24 SAFETY SWITCH 26 HOW TO ACCELERATE 27 HOW TO BRAKE 28 ...

Page 5: ...E BATTERY INDICATOR DISPLAY 33 LOW BATTERY WARNINGS ON THE REMOTE 34 TRIP METER 35 AUTO SAFE FUNCTION 36 POWER SAVE FUNCTION 37 SPEED LIMITER 38 R2 TRIGGER RESET PROCEDURE 39 OTHER REMOTE OPERATION FUNCTIONS AND TIPS 42 HEAT PROTECTION WARNING 43 ERROR CODES 44 MAINTENANCE GUIDE 45 BATTERY CARE 46 TROUBLE SHOOTING 47 ...

Page 6: ...6 BAMBOO GTR 1 Battery 2 Motor Controller 3 Charger port 4 ON OFF switch 5 USB ports 6 Front truck 7 Rear truck 8 Motors 9 Belt 10 Deck 11 All Terrain Wheels 12 Street Wheels 1 5 4 9 2 3 5 8 7 6 11 10 12 ...

Page 7: ...r Controller 3 Charger port 4 ON OFF switch 5 USB ports 6 Front truck 7 Rear truck 8 Motors 9 Belt 10 Deck 11 Motor Plate 12 Drive Gear 13 All Terrain Wheels 14 Street Wheels BAMBOO GTR 10 6 4 1 3 8 2 5 5 9 11 12 7 14 13 ...

Page 8: ... 8 CARBON GTR 1 Battery 2 Motor Controller 3 ON OFF switch 4 Charger port 5 Front truck 6 Rear truck 7 Motors 8 Belt 9 Deck 10 All Terrain Wheels 11 Street Wheels 1 3 8 2 4 7 6 5 10 11 9 ...

Page 9: ...GTR 1 Battery 2 Motor Controller 3 ON OFF switch 4 Charger port 5 Front truck 6 Rear truck 7 Motors 8 Deck 9 Motor Plate 10 Belt 11 Drive Gear 12 All Terrain Wheels 13 Street Wheels 5 3 4 1 2 7 8 9 6 12 11 10 13 ...

Page 10: ... 10 FOOT PLACEMENT FOOT PLACEMENT DOES VARY PERSON TO PERSON THE CLOSER YOUR FRONT FOOT IS TO THE FRONT TRUCK THE MORE CONTROL YOU WILL HAVE REGULAR GOOFY R R DIRECTION OF TRAVEL L L ...

Page 11: ... 11 REMOTE A Brake B Mode 1 Button C Mode 2 Button D On Off Button E Lanyard Loop F LCD Screen G Accelerator H Safety Switch I Charge Port F G H I A B C D E ...

Page 12: ...you are comfortable without power or brakes Due to a low battery on your board or remote your board can lose brakes and power during your ride ALWAYS obey and check the local road rules in your area for where you can ride Do not ride on busy roads with line markings ALWAYS respect pedestrians DO NOT RIDE BEFORE READING ...

Page 13: ...these controls to avoid being thrown off the board Start by trying to move as slowly as possible within these speed modes while using both the brake and accelerator DO NOT RIDE the board if you are under the influence of drugs or alcohol DO NOT RIDE the board in wet conditions The board may slide from under your feet causing injury ...

Page 14: ...components may be damaged due to water Riding in wet conditions is very dangerous and may cause injury WATER DAMAGE IS NOT COVERED BY WARRANTY ABUSE Do not jump on the board do not ride off gutters or curbs do not smash the board into hard objects do not drop the board on the ground for starting operation Although the product has been made to handle rigorous riding it is still an electrical produc...

Page 15: ...hough the GTR boards can climb hills of up to 25 degree gradient riding continuously on an insanely steep hill will put massive stress on the electronics We have installed current protections within our electronics however if you feel the board slowing down on a steep hill this is because the protection is kicking in and giving you warning it s working too hard At this time you must consider stopp...

Page 16: ...oint Now remove the rubber grommet from the charger port on the board and insert the charger plug The charger will show GREEN LIGHT FULLY CHARGED RED LIGHT CHARGING Once the board is fully charged the light on the charger will turn green remove the charge plug from the board re install the rubber grommet on the board and remove the plug from the power point ...

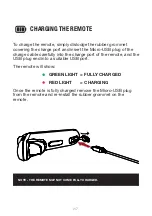
Page 17: ...efully into the charge port of the remote and the USB plug end into a suitable USB port The remote will show GREEN LIGHT FULLY CHARGED RED LIGHT CHARGING Once the remote is fully charged remove the Micro USB plug from the remote and re install the rubber grommet on the remote CHARGING THE REMOTE NOTE THE REMOTE MAY NOT COME FULLY CHARGED ...

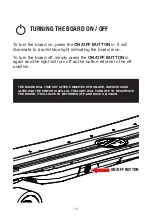
Page 18: ... simply press the ON OFF BUTTON in again and the light will turn off as the button returns to the off position TURNING THE BOARD ON OFF ON OFF BUTTON THE BOARD WILL TIME OUT AFTER 5 MINUTES OF NON USE IN WHICH CASE ALTHOUGH THE SWITCH IS STILL IN THE LIGHT WILL TURN OFF TO REACTIVATE THE BOARD IT WILL HAVE TO BE TURNED OFF AND BACK ON AGAIN ...

Page 19: ...ss the ON OFF BUTTON one time the remote will vibrate once and the LCD screen will power on displaying the Evolve logo The ON OFF BUTTON will light up on the remote and display the default screen To turn the remote off press and hold the ON OFF BUTTON for one second or until the screen and ON OFF light turn off ON OFF BUTTON ...

Page 20: ......

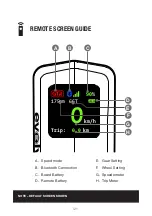
Page 21: ...SCREEN GUIDE 175mm Trip 0 0 km km h 66T 0 90 A Speed mode B Bluetooth Connection C Board Battery D Remote Battery E Gear Setting F Wheel Setting G Speedometer H Trip Meter A B C D G H F E NOTE DEFAULT SCREEN SHOWN ...

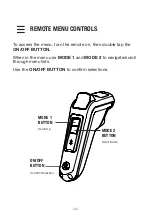
Page 22: ...uble tap the ON OFF BUTTON When in the menu use MODE 1 and MODE 2 to navigate scroll through menu lists Use the ON OFF BUTTON to confirm selections REMOTE MENU CONTROLS ON OFF BUTTON Confirm Selection MODE 1 BUTTON Scroll Up MODE 2 BUTTON Scroll Down ...

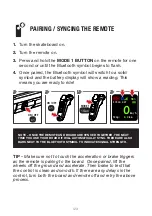
Page 23: ...D BOARD ARE SYNCED TOGETHER THE NEXT TIME YOU USE YOUR BOARD IT WILL AUTOMATICALLY SYNC THERE ARE ALSO BARS NEXT TO THE BLUETOOTH SYMBOL TO INDICATE SIGNAL STRENGTH TIP Make sure not to touch the acceleration or brake triggers as the remote is pairing to the board Once paired lift the wheels off the ground and accelerate Then brake to test that the control is clean and smooth If there are any dela...

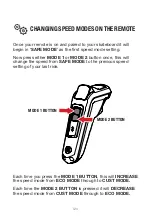
Page 24: ...e this will change the speed from SAFE MODE to the previous speed setting of your last ride CHANGINGSPEEDMODESONTHEREMOTE MODE 2 BUTTON MODE 1 BUTTON Each time you press the MODE 1 BUTTON this will INCREASE the speed mode from ECO MODE through to CUST MODE Each time the MODE 2 BUTTON is pressed it will DECREASE the speed mode from CUST MODE through to ECO MODE ...

Page 25: ...e ITUNES App Store or on the Android Play Store TIP Use the speed change buttons as you would gears on a bike Cycle through them according to the riding situation for example Select PRO or GTR MODE for an approaching hill then cycle back down to PRO or ECO MODE once you have reached the top of the hill CUSTOM MODE is your individual power curve preference whether its weak acceleration or insane ac...

Page 26: ...THE ACCELERATOR TRIGGER THE BOARD WILL NOT MOVE Once you begin moving and reach speeds of 3 5km hr or above you will be able to ride freely without engaging the SAFETY SWITCH during acceleration braking or neutral trigger movements When you come to a stop or reach 0km hr the SAFETY SWITCH reactivates You must press in the SAFETY SWITCH the next time you wish to use the accelerator trigger again Th...

Page 27: ... you pull the trigger in the faster you will go Once over 5km h you can release the safety switch For more information refer to the SAFETY SWITCH section TIP Have your weight positioned on the front foot when you accelerate this stops the board flying out from under your feet HOW TO ACCELERATE ACCELERATOR SAFETY SWITCH ...

Page 28: ...ofter than when you are riding at a higher speed Have your weight on the back foot when you apply the brake function to stop you from flying forward when applying the brakes TIP The brake trigger takes precedence over all other remote functions and if pressed will cut acceleration prevent acceleration or changing modes and will not allow you to turn off the remote HOW TO BRAKE BRAKE ...

Page 29: ... to move your weight toward your front foot whilst accelerating and towards your rear foot whilst braking to account for the forces created by such actions Evolve Skateboards highly recommend starting in ECO MODE when learning to ride the board and use the remote Be sure to be very gentle with the trigger control to avoid being thrown off the board Start by trying to move as slowly as possible wit...

Page 30: ... and Street wheel and gear sizes Confirm if you are using either All Terrain wheels or Street wheels then move the highlighted box to your selection by pressing either MODE 1 or MODE 2 BUTTON then press the ON OFF BUTTON 3 Use the MODE BUTTONs to scroll through to the correct wheel and gear size Press the ON OFF BUTTON to select correct wheel and gear option Once selected you will now be back in t...

Page 31: ...Press the ON OFF BUTTON to change the unit of measurement for your region KMH or MPH 4 Once selected press the MODE 2 button to move the highlighted box to the Return selection then press the ON OFF BUTTON This will now take you back to the default screen with the preferred unit of measurement SELECT KMH OR MPH SCROLL ON OFF ON OFF x1 x2 Unit km Battery Bar DeadMan ON Powersave ON Return 1 2 4 3 ...

Page 32: ...left in the skateboard and remote in real time The battery of the skateboard is displayed as a small percentage symbol in the top right hand corner of the LCD screen and as a small battery bar under the percentage symbol for the remote battery 175mm Trip 0 0 km km h 66T 90 0 SKATEBOARD BATTERY REMOTE BATTERY ...

Page 33: ... MODE 2 BUTTON until you reach Return then press the ON OFF BUTTON This will take you back to the default screen with the new battery display CHANGE BATTERY INDICATOR DISPLAY TIP As you ride your skateboard and use your remote the skateboard battery meter and remote battery meter will slowly deplete If you ride up hills accelerate heavily and ride over grass you should expect the battery to drain ...

Page 34: ...l continue to vibrate then go into ECO MODE During this time you will not be able to use PRO or GTR speed modes as the battery is virtually flat LOWBATTERYWARNINGSONTHEREMOTE NOTE THE AUTO ECO MODE WILL PREVENT THE BOARD FROM TURNING OFF SUDDENLY WHEN THE BATTERY IS VERY LOW ON VOLTAGE AND THE RIDER IS TRYING TO STILL RIDE THE BOARD IN THE FASTER CURRENT SPEED MODES THIS PROTECTS BOTH THE RIDER AN...

Page 35: ...eturn to 0 value TRIP METER NOTE FOR BEST ACCURACY BE SURE TO HAVE SELECTED THE CORRECT WHEEL AND GEAR SETTING SIZE ON YOUR REMOTE IF THE INCORRECT SELECTION IS BEING USED ON THE REMOTE THE REMOTE WILL GIVE THE INCORRECT SPEED AND TRIP DISTANCES REFER TO CHANGING WHEEL AND GEAR SETTINGS FOR MORE INFORMATION 175mm Trip 0 0 km km h 66T 90 0 TRIP METER ...

Page 36: ...bed even if it s minor the remote will detect and make the control go to safe mode If the safe mode does come on when riding the remote will vibrate for one second giving you warning and the control feeling will have weak acceleration and braking strength If there is a genuine error with the skateboard error messages will be displayed in the Product Info screen To get out of the auto Safe mode fun...

Page 37: ...e remote is at a low angle Power save will automatically activate one minute after the remote is turned on When the rider lifts the remote to a more level position it will turn back on To deactivate reactivate this function go into the Options section of the remote menu and change the settings for Power Save POWER SAVE FUNCTION ...

Page 38: ...ill bring you into the main menu screen 2 Scroll down by pressing the MODE 2 BUTTON until you reach Speed limit then press the ON OFF BUTTON 3 Scroll to the desired speed limit 32km hr 25km hr 20km hr or OFF then press the ON OFF BUTTON to select A green tick will then be placed next to the selected speed setting Please note the speed limit selection will also be displayed on the home screen as a ...

Page 39: ...e case In most cases this can be resolved by resetting the acceleration and brake trigger settings bringing it back to factory settings In the event the trigger settings are required to be reset use the following steps 1 Ensure the skateboard is turned off Press the ON OFF BUTTON on the remote 2 From the default screen double click the ON OFF BUTTON to enter the remote menu 3 Using the MODE 2 BUTT...

Page 40: ...TON once to set the value 6 With Set ACC Max highlighted release the ACCELERATOR TRIGGER all the way and press the ON OFF BUTTON once to set the value ON OFF ON OFF ON OFF MODE 2 MODE 2 PULL HOLD RELEASE x2 x1 x1 x2 x2 Acc Trigger XXXX Brake Trigger XXXX Throttle X Set Acc Min XXXX Set Acc Max XXXX Set Brake Min XXXX Set Brake Max XXXX return Acc Trigger XXXX Brake Trigger XXXX Throttle X Set Acc ...

Page 41: ...t the trigger screen Turn the remote off by holding the power button for 1 2 seconds The remote trigger limits have now been set ON OFF ON OFF ON OFF ON OFF x1 x1 x1 x1 Acc Trigger XXXX Brake Trigger XXXX Throttle X Set Acc Min XXXX Set Acc Max XXXX Set Brake Min XXXX Set Brake Max XXXX return Acc Trigger XXXX Brake Trigger XXXX Throttle X Set Acc Min XXXX Set Acc Max XXXX Set Brake Min XXXX Set B...

Page 42: ... the triggers go When the Safety Switch is enabled and you kick push the skateboard to start you can avoid pressing in the Safety Switch this is also good for battery efficiency Get to know the vibration warnings on your remote these can be useful during your ride The LCD screen is much easier to see when there is less direct sunlight The R2 remote will turn off after 5 minutes of non use to save ...

Page 43: ...rider continuing to put stress on the electric system If ever the system does reach this protection mode the remote will automatically go to PRO speed mode and will vibrate one time and the km hr reading will change to a red colour During this time you will not be able to change speed modes above PRO speed until the board cools down to a safe temperature HEAT PROTECTION WARNING ...

Page 44: ...e the risk of damage to the battery MAINTAIN BATT This error code may be displayed if a cell in the battery is detected as being out of balance In the event this occurs the board will limit the speed mode to SAFE to reduce the risk of damage to the battery MOTOR ERR This error code may be displayed if an error has been detected from one or both of the motors in operation The error will indicate Mo...

Page 45: ...would do so with any longboard skateboard as the drive wheels will wear the fastest Regularly clean check the belt and drive gear for any damage Replace if necessary Always store your board at room temperature Clean your board from dust and dirt so its looks and rides as new at all times Use a damp dry cloth to clean Be sure to keep your All Terrain tyres between 30 45 PSI tyre pressure when ridin...

Page 46: ...d power output If you are riding in low temperatures you may experience lower range top speed and acceleration Exposing the battery to excessively low temperatures may have a permanent effect or cause damage The battery cannot charge past 42 volts as the charger has voltage cutoff detection installed however we recommend removing it from charge once the charger shows green If you will not be using...

Page 47: ...he distributor website TROUBLE SHOOTING WWW EVOLVESKATEBOARDS COM WARRANTY THIS BOARD IS COVERED BY A 12 MONTH MANUFACTURERS WARRANTY TIME PERIOD MAY BE DIFFERENT IN OTHER COUNTRIES SUCH AS USA AND EUROPE THAT COVERS DEFECTS IN WORKMANSHIP AND MATERIAL THIS DOES NOT COVER MISUSE PERISHABLE ITEMS SUCH AS WHEELS TYRES TUBES BEARINGS BELTS NEGLECT ABUSE ACCIDENT OR RIDING IN WATER AND SHIPPING DAMAGE...

Page 48: ... 48 ...

Reviews: