background image

32

*Trademark

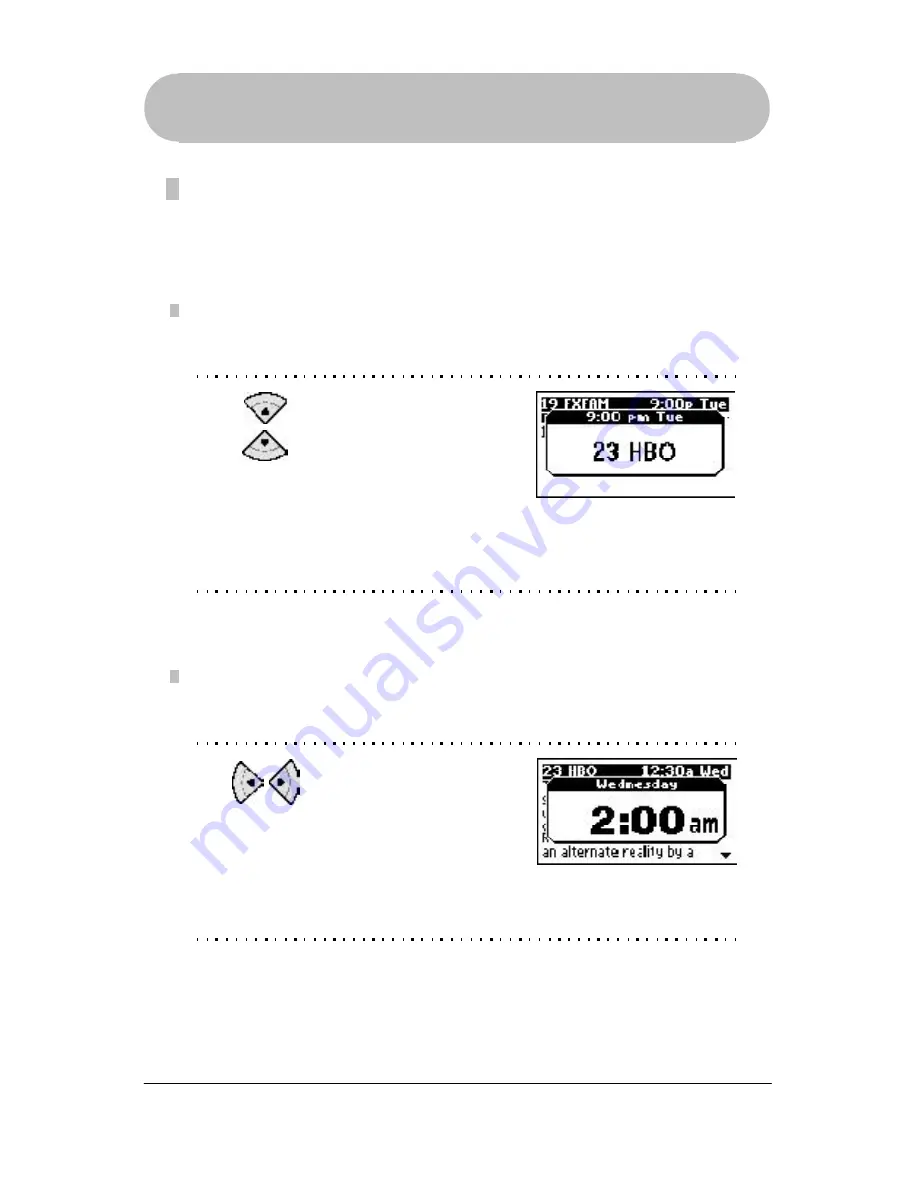
Press and hold  the

Up / Down Arrow 

key and a

channel popup will appear.

Continue to hold the key until
the channel you want to
watch appears.  Release the
key to return to the

Program Descriptions

.

Press and hold the

Left / Right Arrow 

key and a

time popup will appear.

Continue to hold the key until
the desired time slot appears.
Release the key to return to
the 

Program Descriptions

.

Channel Quick Browse

This feature allows you to quickly navigate the channels in the 

Program

Descriptions

.

Time Quick Browse

This feature allows you to quickly navigate among time slots in the 

Program

Descriptions

.

Quick Browse

Quick Browse allows you to quickly navigate the 

Program Descriptions

.  There are

two types of quick browse:  Channel and Time.

Using the GUIDE Key

Using the Remote

Summary of Contents for GUIDE Remote RD5000

Page 1: ...User s Manual RD5000 This changes everything SM...

Page 2: ...Setup DirecTune a Determining DirecTune Device b Setup DirecTune Device Using the Remote 1 Channel Screen 2 Changing Modes 3 Using the GUIDE Key a Accessing Program Listings Suggestions and Reminders...

Page 3: ...nel Tuning e Channel Promo Screens f Browsing Promos 9 Alert Screens Advanced Settings 1 View Device Settings 2 ViewDirecTune Settings 3 Adjust DirecTune Method 4 Adjust DirecTune Speed 5 Channel Key...

Page 4: ...teract with your requested information on your computer PC using the Internet The screen on your GUIDE Remote is always on providing instant access to the TV program listings Interactivity Offers and...

Page 5: ...e 4 0 or AOL 5 0 Web Browser NOTE Microsoft Internet Explorer 5 0 must be installed on your computer even if it is not your default browser because RemoteLinker uses resource files provided only with...

Page 6: ...3 Key Descriptions Introduction Key Layout Key Descriptions Keys shown in gray are used to navigate and control what appears on the remote screen All other keys operate like those found on regular rem...

Page 7: ...lighted item s and or request links to Promo Offers on the screen Press this key to quit the current operation Press this key to access the remote functions that are not represented on the GUIDE Remot...

Page 8: ...the backlight on the screen Turns on or off the device your remote is currently controlling Changes channels up or down Adjusts volume up or down Turns the volume on or off Tunes your TV back to the p...

Page 9: ...e to remove the battery cover Insert four new 1 5 volt AA alkaline batteries taking care to align the poles and as indicated in the battery compartment Close the battery cover Note The batteries in yo...

Page 10: ...uter meets the minimum system requirements see page 4 Temporarily turn off any PDA syncing anti virus or screen saver software on your computer Activate Remote Control Note Palm Users You should disab...

Page 11: ...l be connecting the cable and click Apply Connect RemoteLinker Cable Before you connect the RemoteLinker cable you should determine the COM port to which you will be attaching the cable If your comput...

Page 12: ...ation process successfully Activating and Signing Up When you double clicked on the RemoteLinker icon you started the activation and sign up process at www GuideRemote com The instructions on the Webs...

Page 13: ...r if it is not already connected 2 Double click on the RemoteLinker icon located in the lower right hand corner of your computer screen in the system tray to download and get your Program Listings Pro...

Page 14: ...ighlight Setup a Device and press the SELECT key Highlight Television and press the SELECT key Highlight the brand of your TV and press the SELECT key If you cannot find your brand on the list you can...

Page 15: ...d press the SELECT key then go to step 8 If the keys do not respond highlight No and press the SELECT key repeat step 7 to test the next code Once a code is found that operates your device basic setup...

Page 16: ...ome Control is an easy process To setup these types of devices perform the following steps Getting Started 1 2 3 4 Turn on the device that you will be setting up Press the MENU key to enter the Main M...

Page 17: ...this example we will setup a Panasonic VCR If you can not find the brand on the list you can choose the brand UNKNOWN the last choice on the list Note Choosing UNKNOWN brand requires you to test all t...

Page 18: ...pressing the ADVANCED key and follow step 7b Note Most devices can be tested using the hard keys on the remote like POWER VOL CHAN etc However depending on the device such as stereo receivers CD play...

Page 19: ...w key Once a code is found that operates your device basic setup is complete Press the Right Arrow key 7d If the keys respond highlight Yes and press the SELECT key then go to step 8 If the keys do no...

Page 20: ...ice highlight Yes and press the SELECT key Getting Started Note If you remove a DirecTune device you will see a caution screen In addition you will not be able to tune from within the TV Listings or a...

Page 21: ...ce You may change the DirecTune device settings at anytime Getting Started Setup DirecTune 6 Setup DirecTune Determining DirecTune Device Which device should you set up as your DirecTune device To ass...

Page 22: ...wn Arrow key to read all the text Press the Right Arrow key to continue 3 Highlight Setup DirecTune and press the SELECT key 1 2 Turn on the DirecTune device that you will be setting up Press the MENU...

Page 23: ...TV and press the SELECT key Getting Started Setup DirecTune 6 Read and follow the instructions on the screen and press the Right Arrow key to continue 5 Highlight your DirecTune device and press the S...

Page 24: ...to continue Note For most devices you tune channels by pressing number keys or by pressing number keys followed by the ENTER key 8 Highlight the method you use to tune channels and press the SELECT ke...

Page 25: ...e If you experience problems tuning channels after you set up DirecTune you should first try changing the DirecTune Speed in Main Menu Remote Settings Advanced Settings Adjust DirecTune Speed seepage5...

Page 26: ...the Channel screen simply press the EXIT key The Channel Screen appears only if your remote is controlling the DirecTune device Time Day Channel Number and Station Call Sign Device Mode Program Title...

Page 27: ...ght or Mode Left key again to switch to different modes Continue pressing the MODE keys until you find the device you want to control Note The current mode for your device is always indicated on the C...

Page 28: ...ptions by selecting that option at www GuideRemote com Press the GUIDE key to access Program Listings Program Descriptions Suggestions and Reminders in turn Each press of the GUIDE key toggles to the...

Page 29: ...ernate for highlighted program Tip You can access the Program Listings at any time even if the remote is not controlling the DirecTune device When you tune from within the Program Listings the remote...

Page 30: ...minders continue pressing the GUIDE key until you access the Program Listings Note If you highlight a show that is not currently airing and you press the SELECT key your TV will tune to the channel yo...

Page 31: ...want to watch appears Release the key to return to the Program Listings Press and hold the Left Right Arrow key and a time popup will appear Continue to hold the key until the desired time slot appear...

Page 32: ...ing steps 3 Press the SELECT key to tune to the described show 1 Press the GUIDE key to enter the Program Listings 2 Press the Up Down Arrow key to move the highlight bar to the channel you want to wa...

Page 33: ...old the key until the desired time slot appears Release the key to return to the Program Descriptions Channel Quick Browse This feature allows you to quickly navigate the channels in the Program Descr...

Page 34: ...m the following steps Using the Remote 1 2 Press the GUIDE key until you see your Suggestions critic screen Press the Down Arrow key to access the Suggestions list Note Press the GUIDE key again to ac...

Page 35: ...w key to access the list Press the SELECT key to tune to the highlighted show Reminders Notification If you have set up Reminders at the Website and have synced your remote the GUIDE Remote will notif...

Page 36: ...your remote to remind you of a personal event you want to remember If you have set up Personal Reminders at the Website and have synced your remote the GUIDE Remote will prompt you by flashing and be...

Page 37: ...ote Interactivity Keys There are five Interactivity keys on the GUIDE Remote VOTE CLIP WIN SHOP and INFO These keys allow you to review Interactivity Offers and request related links accessible from o...

Page 38: ...nel screen Press the appropriate Interactivity key s VOTE CLIP WIN SHOP orINFO to see web offers For this example we will use the SHOP key Review web offers and press the same key again to save your r...

Page 39: ...our Website Interactivity Key Symbols Express Your Opinion with the Vote Key If you really like the show you re watching or think it s so so let us know Vote on any show at any time You can rate shows...

Page 40: ...or Interactivity Key Symbols on the screen see the Channel screen on page 25 2 Look for Interactivity Offer Symbols in Program Listings and press the GUIDE key to access Program Descriptions You will...

Page 41: ...iliar with the various items indicated you will be able to navigate smoothly and easily within menu screens This symbol indicates that you can move the highlight bar up or down Press the SELECT key to...

Page 42: ...ress the MENU key Highlight Remote Support and press the SELECT key Help Access Help for general assistance with key descriptions remote features and settings and additional information Tour Take the...

Page 43: ...Note If you choose Display Time and Date you will only be able to view the time and date and not adjust them 4 Press the Up Down Arrow key to adjust the numbers Press the Left Right Arrow key to chan...

Page 44: ...me familiar with the various items indicated you will be able to navigate smoothly and easily to the desired extended functions listed on the screens Time Day Device Mode Screen Indicator PresstheRigh...

Page 45: ...device Press the ADVANCED key Tip You don t have to exit the Extended Function Screen to change device modes Press the MODE keys to change modes Note If you are in the menu system press the EXIT key...

Page 46: ...keys other than the LIGHT key while the light is on the backlight will stay on It will turn off if you stop pressing keys for several seconds Using the LIGHT Key Promo Screens 8 Promo Screens The scr...

Page 47: ...hese screens offer you a chance to receive a fun and informative email such as a horoscope news trivia games and more You ll recognize these links by the with a small envelope If you re interested in...

Page 48: ...ery few minutes If you want to see all of the screens you can scroll through them one at a time To browse the Promo Screens perform the following steps Press the Left Right Arrow key to access all the...

Page 49: ...ill see this screen when you press an Interactivity key and did not setup a DirecTune device This screen will also appear if you did not set up a DirecTune device before attempting to request promos 9...

Page 50: ...You will see this screen when you press any of the Interactivity keys and your TV Listings have expired Log in at our Website and sync your remote to update your TV Listings Sorry Offers Have Expired...

Page 51: ...e to press the Right Arrow key you will return to the Advanced Settingsmenu Press the Down Arrow key to scroll down to see all of the settings for the device Press the Right Arrow key to view the sett...

Page 52: ...her DirecTune method To change the DirecTune Method perform the following steps 1 2 Press the MENU key and SELECT Main Menu Remote Settings Advanced Settings Adjust DirecTune Method Read and follow th...

Page 53: ...key go to step 6 If your TV does not tune channels properly highlight No and press the SELECT key repeat step 3 Adjust DirecTune Method Note You may press the EXIT key at any time prior to selecting...

Page 54: ...too slowly you can adjust the DirecTune speed To adjust the DirecTune speed perform the following steps 1 2 Press the MENU key and SELECT Remote Settings Advanced Settings Adjust DirecTune Speed Read...

Page 55: ...ls properly highlight Yes and press the SELECT key go to step 6 If your TV does not tune channels properly highlight No and press the SELECT key repeat step 3 Adjusting the DirecTune Speed is complete...

Page 56: ...r satellite 2 You may choose to setup the CHAN CHAN key to match your Program Listings lineup In that case when you press the Channel keys your TV will tune only to those channels in your Program List...

Page 57: ...Arrow key The CHAN CHAN key is set to match the channel lineup in your Program Listings 4 Advanced Settings Channel Key Settings Highlight Yes or No and press the SELECT key For this example we will s...

Page 58: ...N and LAST on a Toshiba TV will actually operate a Scientific Atlanta cable box instead In other words when you are controlling the Toshiba TV and you press the CHAN CHAN and LAST keys you will be cha...

Page 59: ...the remote is controlling the Toshiba TV the CHAN CHAN and LAST keys will control the Scientific Atlanta cable box instead Channel Lock set up is complete Press the Right Arrow key 6 Add or Clear Chan...

Page 60: ...L and MUTE on a Scientific Atlanta cable box will actually operate a Toshiba TV instead In other words when you are controlling the Scientific Atlanta cable box and you press the VOL VOL or MUTE key y...

Page 61: ...Scientific Atlanta cable box the VOL VOL and MUTE keys will control the Toshiba TV instead Volume Lock set up is complete Press the Right Arrow key 6 Add or Clear Volume Lock Highlight a device you w...

Page 62: ...tteries with new ones Check your Program Listings for channel order Pressing the CHAN CHAN key should tune to channels in the same sequence that appears in your Program Listings If the Program Listing...

Page 63: ...ote and the computer before syncing the remote Check to see if the RemoteLinker software is configured to communicate with the serial port that is connected to the RemoteLinker cable To access COM por...

Page 64: ...pear again in your remote after you log in at our Website and sync your remote Check to see if your time and date is set correctly To access the time and date settings press the MENU key and SELECT Re...

Page 65: ...mote Where can I review my requested Interactivity Offers and promos Log in to our Website and sync your remote Then visit the Links in the Members section How do I go back to the Channel Screen to se...

Page 66: ...ower management Dimensions 3 3 x 6 3 x 1 6 Weight 10 ounces Serial Cable Length 6 0ft 1 8m Computer RS 232 serial port connector 9 pin D shell female Memory 2 MB non volatile flash memory 512KB RAM Ba...

Page 67: ...for any reason whatsoever Licensee shall not and shall not allow any third party to i decompile disassemble or otherwise reverse engineer except to the extent expressly permitted under applicable law...

Page 68: ...CH DAMAGES SOME STATES DO NOTALLOW THE LIMITATION OR EXCLUSION OF LIABILITY FOR INCIDENT ALOR CONSEQUENTIAL DAMAGES IN NO EVENTSHALL LICENSOR STOTAL LIABILITY UNDER THISAGREEMENTFORALL DAMAGES LOSSES...

Page 69: ...ies agree that a material breach of this Agreement by Licensee would cause irreparable injury to Licensor for which monetary damages would not be an adequate remedy and that the Licensor shall be enti...

Page 70: ...e basis Although collected on each individual remote once uploaded to our Network this data is not associated in any way with your individual personal profile or information We will never sell individ...

Page 71: ...nd Date Reset 48 Arrow keys 6 B Backlight 45 Batteries 8 65 Installation 8 Low Battery icon 8 Battery Cover 3 8 Beep and Flash 34 C Changing Modes 25 Channel keys 7 24 51 54 Testing 24 51 54 Channel K...

Page 72: ...Numeric keys 7 O Offers Interactivity 37 Promos 45 P Personal Reminders 35 POWER key 7 Program Listings 28 Accessing 27 Browsing and Tuning 29 Quick Browse 30 Program Title 25 28 Program Rating 25 Pr...

Page 73: ...65 Station Call Sign 25 28 Suggestions 27 33 Accessing 27 Tuning 33 Sync Remote Control 12 T Time 25 28 42 Time and Date 42 Time and Date Reset 48 Time Quick Browse 30 32 Tour 41 Troubleshooting 61 62...

Page 74: ...tions 1 this device may not cause harmful interference and 2 this device must accept any interference received including interference that may cause undesired operation Service This product should be...

Page 75: ...warranty Some states do not allow limitations or exclusions on implied warranties or how long they remain in effect so the above limitations may not apply to you Evolve GUIDE Remote User s Manual Uni...

Page 76: ...This product is covered by US Patents 6002450 5410326and5907322 Additionalpatentspending Evolve Communications Inc 152 Technology Drive Suite 200 Irvine CA 92618 Printed in USA...

Reviews: