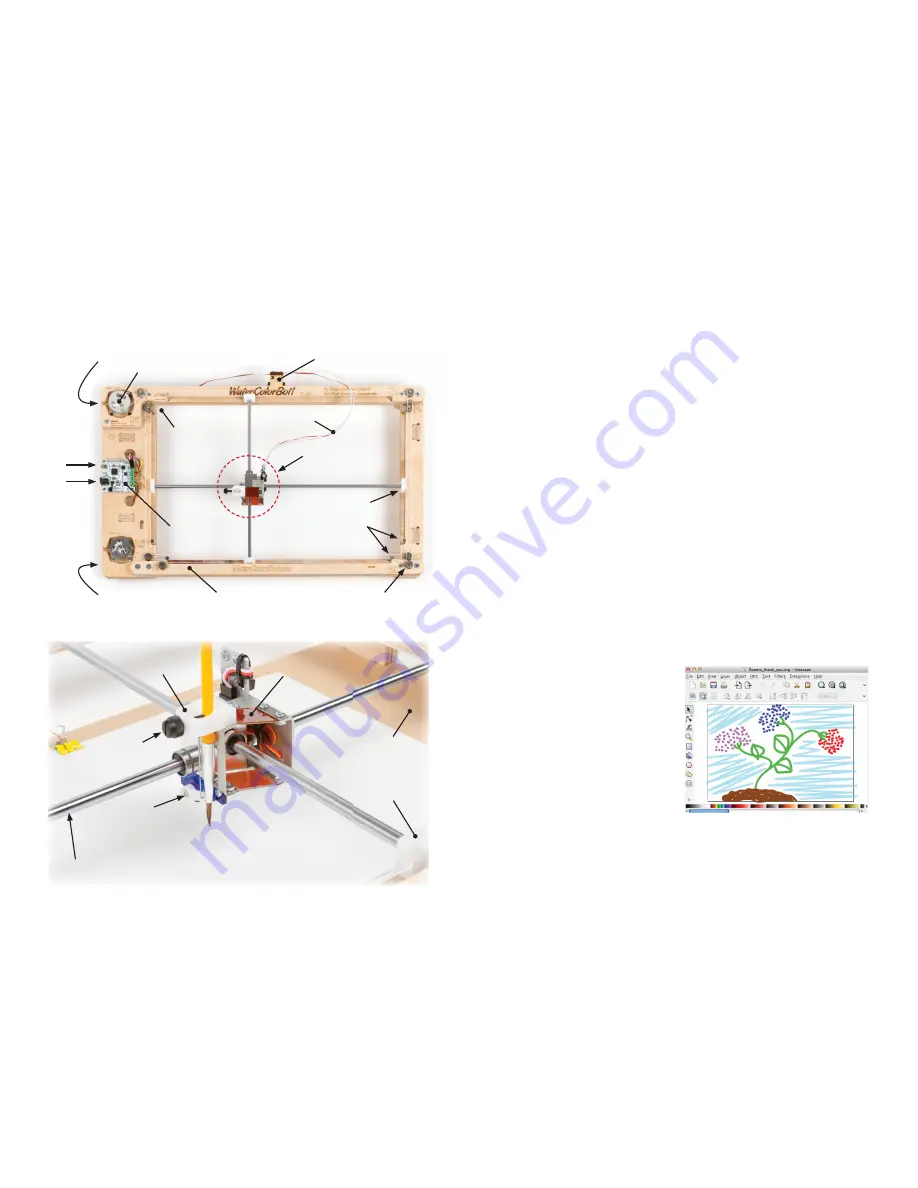
Let’s take a brief look at what the diff erent parts of the machine are called. We’ll refer
to many of these parts in the instructions, so it is helpful to know what’s what.
1.2 WaterColorBot Anatomy
Carriage
Rod-end
sliders
Rods (6 mm shafts)
Brush-lift
(servo) motor
Spoilboard
Paper
clip
Brush
holder
Thumbscrew
Vertical Flexure stage
{
Rod-End Sliders
Travel Endstops
Cable guide support
Control Board:
EBB (EibotBoard)
Carriage
START Position
(Home Corner)
Motor 2 (Y)
USB Port
Power Jack
Motor 1 (X)
Winch (atop motor)
V-Groove Bearings
Spectra cord
Cable guide
In brief, here are the steps to getting started with WaterColorBot 2.0:
Part 3 of this guide goes through the fi rst item on the list: The diff erent software options
for WaterColorBot. Part 4 goes through the “prefl ight check,” and Part 5 goes through
the rest of setup. It is followed by a sections on troubleshooting and tips and tricks for
using your WaterColorBot.
Part 2:
Quick Start / Overview
1) Install WaterColorBot software.
2) Prefl ight checks: Remove stowage straps. Make sure that carriage moves smoothly.
3) Move the carriage by hand to the START (home corner; upper left) position.
4) Set up desired media on spoilboard. For example,
• When painting with watercolors: Paper, a paint palette, and water dishes
• When sketching with a felt-tip pen: Paper alone
• When using a dip pen: Paper and one well of ink
5) Connect power and USB cables.
6) Insert the brush into the brush holder, and check its height.
In this context, the term “brush” means
the object mounted in the brush holder
.
You can use essentially any tool or writing implement that (a) fi ts in the brush
holder, (b) doesn’t weigh too much, and (c) doesn’t require substantial down-
ward pressure. Yes, you can use literal paintbrushes, but also pens and pencils,
and perhaps (with some experimentation) a conductive ink pen, laser module, hot
wax pen (for batik), tube dispensing frosting or adhesives, a vacuum pick-up tool,
stylus for your tablet, or something entirely diff erent. But for brevity, we simply
use the term “brush.”
7) Open or create the artwork that you would like to print, and begin painting from
within the software.
3.1 Overview and Installation
Part 3:
Software
All of our software is free to download, cross platform, and open-source in nature.
For current software download links and instructions, please visit:
http://watercolorbot.com/software
Before you can actually begin using your
WaterColorBot, you will need to download
and install software.
There are three main programs that we
use to control the WaterColorBot, each of
which has unique advantages.
In what follows, we will introduce the dif-
ferent programs and interfaces. For in-
terested developers and hackers, we’ll also
mention what’s “under the hood” of each
one.


