background image

EVGA Z75 Motherboard 

11 

Preparing the Motherboard 

Installing the CPU 

Be very careful when handling the CPU. Hold 

the processor only by the edges and do not 

touch the bottom of the processor.  
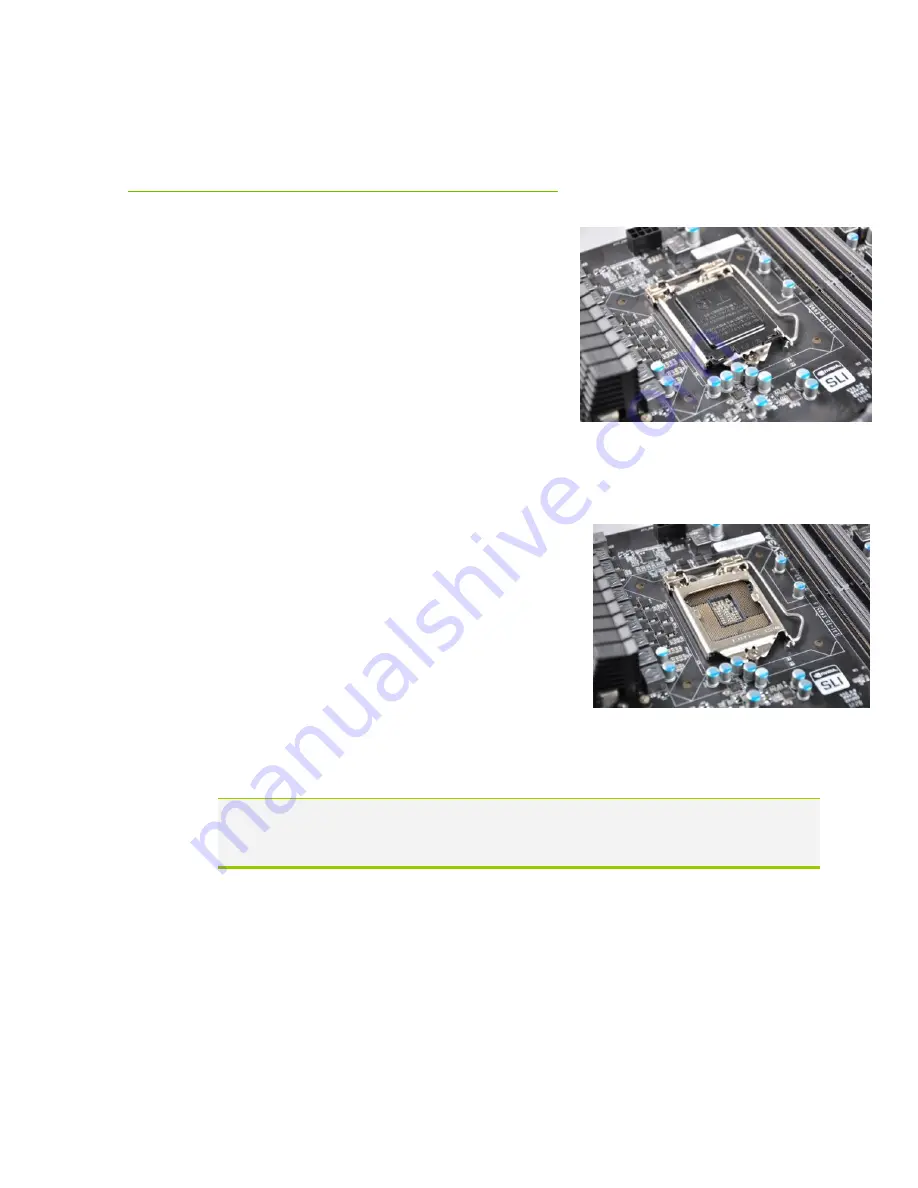
Use the following procedure to install the CPU 

onto the motherboard:  

Unhook the socket lever by pushing 

down

 and 

away

 from the socket.  

 Pull the socket lever back and the load plate will 

automatically lift. There is a protective 

socket cover within the CPU socket to 

protect the socket when there is no CPU 

installed.   

Remove the protective socket cover from the 

CPU Socket.  


Note:  After removing the CPU socket cover, it is recommended that you keep it 

in case you need to remove the CPU so for any reason you can replace 
the cover to avoid damaging the CPU socket pins. 


Summary of Contents for Z75 SLI

Page 1: ...User Guide EVGA Z75 SLI Motherboard...

Page 2: ...ng and Parts Descriptions 7 Unpacking 7 Equipment 8 Hardware Installation 10 Safety Instructions 10 Preparing the Motherboard 11 Installing the CPU 11 Installing the CPU Fan 12 Installing System Memor...

Page 3: ...n bench sessions and regular 24 7 usage 17 Connecting Internal Headers 18 Connecting Internal Headers 18 Front Panel Header 18 USB Headers 19 Audio 20 PCI E x1 Slots 21 PCI E x16 x8 Slots 21 Onboard B...

Page 4: ...questions Parts NOT in the Kit This kit contains all the hardware necessary to install and connect your new EVGA Z75 SLI Motherboard However it does not contain the following items that must be purcha...

Page 5: ...therboard into a PC case If you are building a PC you will use most of the cables provided in the kit If however you are replacing a motherboard you will not need many of the cables When replacing a m...

Page 6: ...s up to 32GBs of DDR3 memory USB 2 0 Ports Supports hot plug Supports wake up from S1 and S3 mode Supports USB 2 0 protocol up to a 480 Mbps transmission rate USB 3 0 Ports Backwards compatible USB 2...

Page 7: ...rts ACPI Advanced Configuration and Power Interface Supports S0 normal S1 power on suspend S3 suspend to RAM S4 Suspend to disk depends on OS and S5 soft off Expansion Slots PCI E x1 slots PCI E x8 x1...

Page 8: ...O Shield Installs in the system case to block radio frequency transmissions protect internal components from dust foreign objects and aids in proper airflow within the chassis 2 2 Port SATA Power Cab...

Page 9: ...EVGA Z75 Motherboard 9 1 Installation CD Contains drivers that are needed to setup the motherboard 1 User Manual Contains Information needed to properly install and configure your EVGA Motherboard...

Page 10: ...oard Installing the CPU Installing the CPU fan Installing the memory Installing the motherboard Connecting cables Safety Instructions To reduce the risk of fire electric shock and injury always follow...

Page 11: ...lever by pushing down and away from the socket Pull the socket lever back and the load plate will automatically lift There is a protective socket cover within the CPU socket to protect the socket when...

Page 12: ...d level in the socket Close the load plate over the CPU and press down while you close and engage the socket lever The CPU installation is complete Installing the CPU Fan There are many different fan...

Page 13: ...f the DIMM slot This slot matches the slot on the DIMM to ensure the component is installed properly 1 Unlock a DIMM slot by pressing the module clips outward Align the memory module to the DIMM slot...

Page 14: ...O Shield The motherboard kit comes with an I O shield that is used to block radio frequency transmissions protects internal components from dust and foreign objects and promotes correct airflow withi...

Page 15: ...9 spacers and screws 1 Carefully place the motherboard onto the stand offs located inside the chassis 2 Align the mounting holes with the stand offs 3 Align the connectors to the I O shield 4 Ensure...

Page 16: ...pins are properly aligned with the connector on the motherboard Firmly plug the power supply cable into the connector and make sure it is secure Figure 1 PWR_24 Motherboard Connector Table 1 PWR_24 P...

Page 17: ...r and press firmly until seated BIOS Select Jumper The BIOS Select Jumper is located at the bottom left of the board right next to the front panel header The addition of 2 physical BIOS chips on the m...

Page 18: ...our cables Be sure to match the name on the connectors to the corresponding pins PWRSW Attach the power button cable from the case to these two pins Pressing the power button on the front panel turns...

Page 19: ...ect an optional external bracket containing up to four 4 USB 2 0 ports 1 Secure the bracket to either the front or rear panel of your chassis not all chassis are equipped with the front panel option 2...

Page 20: ...o output choices the Front Audio and the Rear Audio The Front Audio supports re tasking function Table 4 Front Audio Connector Connector Pin Signal Front Audio Connector 1 PORT1_L 2 AUD_GND 3 PORT1_R...

Page 21: ...cs Cards and PCI E x1 x4 x8 and x16 devices The design of this motherboard supports multiple Graphics Card technologies such as SLI or CrossFireX When installing a PCI E Graphics Card be sure the rete...

Page 22: ...oard or on the external I O Panel RESET and POWER Button These onboard buttons allow you to easily turn on off the system These buttons allow for easy debugging and testing of the system during troubl...

Page 23: ...ter the system has fully booted into the Operating System LED Status Indicators Theses LEDs indicate the system s status POWER LED Red When the System is powered on This LED is on DIMM LED Yellow When...

Page 24: ...ating system The motherboard supports Windows 7 Vista and XP both 32 and 64 Bit The kit comes with a CD that contains utilities drivers and additional software The CD that has been shipped with the EV...

Page 25: ...Debug LED readout located directly onboard the motherboard This Debug LED will also display current CPU temperatures after the system has fully booted into the Operating System Table 5 AMI POST Code 0...

Page 26: ...tion Programming memory timing information 2E Memory initialization Configuring memory 2F Memory initialization other 30 Reserved for ASL see ASL Status Codes section below 31 Memory Installed 32 CPU...

Page 27: ...PPI is not available 5C 5F Reserved for future AMI error codes E0 S3 Resume is stared S3 Resume PPI is called by the DXE IPL E1 S3 Boot Script execution E2 Video repost E3 OS S3 wake vector call E4 E...

Page 28: ...zation 73 77 South Bridge DXE Initialization South Bridge module specific 78 ACPI module initialization 79 CSM initialization 7A 7F Reserved for future AMI DXE codes 80 8F OEM DXE initialization codes...

Page 29: ...cy Option ROM Initialization B3 System Reset B4 USB hot plug B5 PCI bus hot plug B6 Clean up of NVRAM B7 Configuration Reset reset of NVRAM settings B8 BF Reserved for future AMI codes C0 CF OEM BDS i...

Page 30: ...and Power Interface BCLK Base Clock or operating frequency of base system bus BIOS Basic Input Output System CD ROM Compact Disc Read Only Memory CMOS Complementary Metal Oxide Semiconductor CPU Cent...

Page 31: ...EE Institute of Electrical and Electronics Engineers IGP Integrated Graphics Processors IMC Integrated memory controller IRQ Interrupt Request JBOD Just a Bunch of Disks JEDEC Joint Electron Device En...

Page 32: ...QDR Quad Data Rate QPI Quick Path Interconnect RAID Redundant Array of Inexpensive Disks RGB Red Green Blue SATA Serial Advanced Technology Attachment SB Southbridge SCSI Small Computer System Interfa...

Page 33: ...nology Equipment EN 55024 1998 A1 2001 A2 2003 Trademark Copyright Information 2001 2012 EVGA Corp EVGA the EVGA logo and combinations thereof are trademarks of EVGA Corp All brand names company names...

Reviews: