background image


13 


3.2


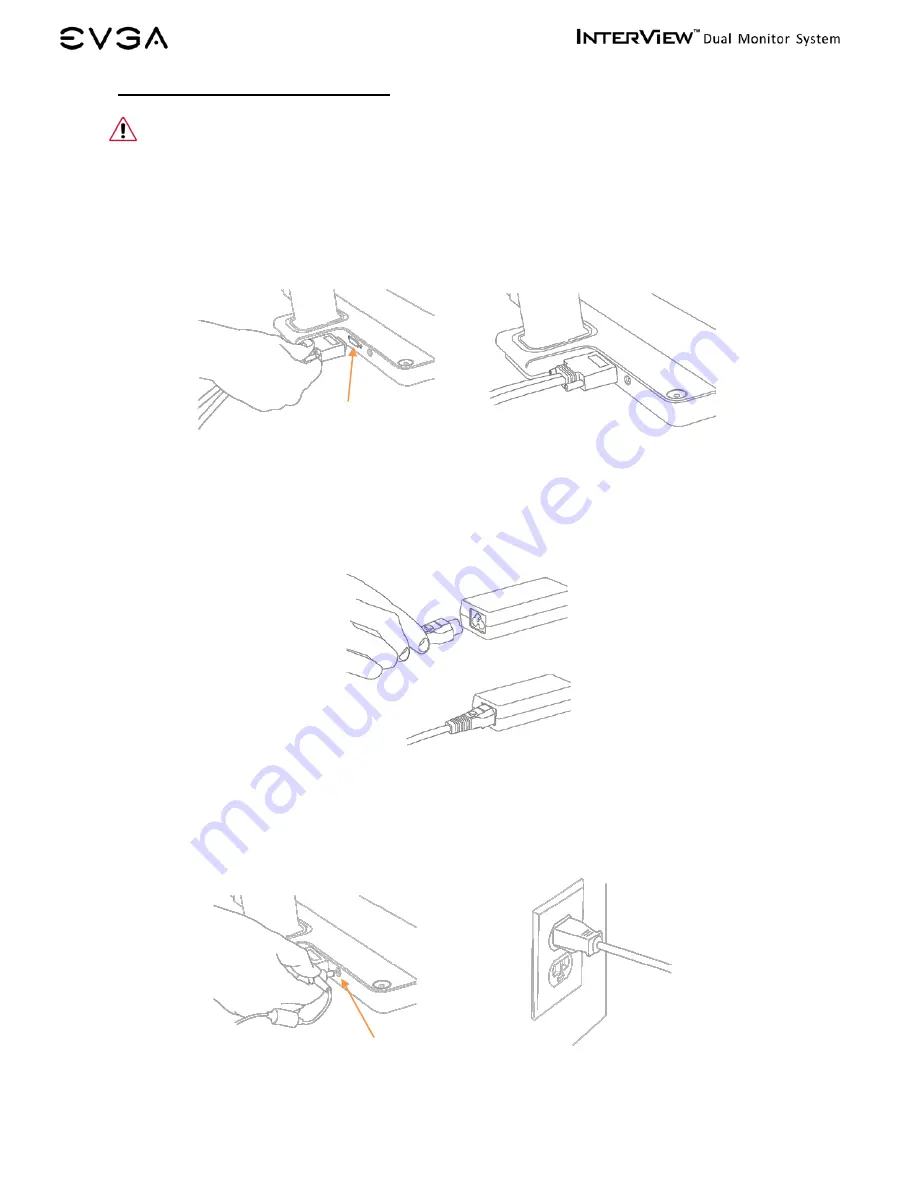
Connecting InterView to a PC 

 Before setting up InterView, you must power down your computer(s). 


1.


Connect the monitor to a computer(s) using the DMS to Dual DVI-I cord. 
Note: You can use either the D-Sub plug or the DVI-D plug if there’s no available 
DVI-I port on your PC. 


2.


Plug the power cord into the power adapter: 


3.


Connect the monitor to the electrical outlet using the power cord: 


Summary of Contents for InterView 1700

Page 1: ......

Page 2: ...ting InterView to a PC 13 3 3 Plug and Play Compatibility 15 4 HOW TO ADJUST INTERVIEW 16 4 1 Rotating Folding 16 4 2 Control Buttons 17 4 3 Brightness Adjustment 17 4 4 Auto Adjustment 17 5 SYSTEM RE...

Page 3: ...3 7 3 Warranty Terms and Conditions 31 8 COMPLIANCE INFORMATION 33 8 1 FCC Notice 33 9 LEGAL INFORMATION 34 9 1 Trademark Information 34 9 2 Software License Agreement 34 9 3 Rights 34...

Page 4: ...s are included with InterView InterView Monitor Dual 17 Inch LCD Panels InterView Multiplatform Control Base AC Power Adapter Power Cord DMS to DUAL DVI I Signal Cable DVI I to VGA Adapter Microphone...

Page 5: ...ng metallic or push objects into any openings Do not use benzene thinner ammonia abrasive cleaners or compressed air as these will cause damage to the LCD screens If possible use a special screen clea...

Page 6: ...6 1 3 Product Views Panel Front View 1 Integrated Webcam 2 Balance Bar 3 Multiplatform Control Base 4 Integrated 3 Port USB 2 0 Hub 5 17 Inch LCD Panels 5 3 1 2 5 4...

Page 7: ...t View 1 Power Button 2 Power Light Indicator Left Panel 3 Power Light Indicator Right Panel 4 Panel Selection Button 5 Brightness Adjust Down 6 Brightness Adjust Up 7 Auto Adjust 8 Integrated Microph...

Page 8: ...8 Control Base Back View 1 USB to PC Port 2 Microphone Jack 3 DMS Port 4 AC Power Connector 1 2 3 4...

Page 9: ...5 45 CR 10 Pixel pitch 0 255 X 0 255 mm White luminance 220 typ Contrast ratio 500 1 typ Response Time 8ms typ 14ms typ max Resolution Optimal preset resolution 1440x900 2 60 Hz Highest preset resolut...

Page 10: ...4x768 60 023 75 029 78 750 VESA 1152 864 67 500 75 000 108 000 VESA 1280x1024 63 981 60 020 108 000 VESA 1280x1024 79 976 75 025 135 000 VESA 1440x900 55 935 59 887 106 500 VESA 1440x900 70 635 74 984...

Page 11: ...ad the safety instructions before setting up the InterView 3 1Steps to Assembling InterView 1 Rotate the balance bar out from the bottom of the base 2 Remove the caps on the stand and the panel 3 Asse...

Page 12: ...12 4 Push in the button and turn it clockwise to lock up the stand and the panel 5 Open up the panel 6 Push the balance bar back into the base...

Page 13: ...ter s 1 Connect the monitor to a computer s using the DMS to Dual DVI I cord Note You can use either the D Sub plug or the DVI D plug if there s no available DVI I port on your PC 2 Plug the power cor...

Page 14: ...nect InterView to the MIC or Line in input of the computer This is required to use the onboard microphone 6 Connect InterView to the computer s with the USB cable to enable the front USB 2 0 HUB locat...

Page 15: ...ility You can use InterView with any Plug and Play compatible system The system configures itself and optimizes the display s settings In most cases InterView s installation is automatically processed...

Page 16: ...4 HOW TO ADJUST INTERVIEW 4 1Rotating Folding Each panel can rotate 180 degrees The display will automatically adjust to the correct position Each panel can be opened and closed 90 degrees horizontal...

Page 17: ...htness Adjustment Users can adjust the monitor brightness levels from the Brightness Up Down buttons The Brightness levels can be adjusted from level 0 to level 8 and will be displayed on the screen w...

Page 18: ...2Installing the Webcam Software Some functions provided in InterView Application may not work if the driver is not installed properly Step 1 Before the Installation View the Device Manager to check if...

Page 19: ...pplication you would like to install then click Next to continue Note For users who select to install both webcam driver and application the installation will starts from the webcam software then to t...

Page 20: ...20 Installation in process the dialogue box will automatically close when the installation completes Installing the Webcam Driver Click Install Click Install...

Page 21: ...ing to the next step please be patient Click Finish to exit the wizard then the computer will automatically restart Step 3 Self Check To ensure the driver has successfully installed visit the Device M...

Page 22: ...22 5 3Using the InterView Camera Application Main Panel Layout 1 Display screen 2 Record 3 Snapshot 4 Color setting page 5 Snapshot setting page 6 Record setting page 7 Misc setting page 1 2 3 4 5 6 7...

Page 23: ...color settings by dragging the track bars 1 Brightness adjustment 2 Contrast adjustment 3 Hue adjustment 4 Saturation adjustment 5 Sharpness adjustment 6 White balance adjustment 7 Gamma adjustment 8...

Page 24: ...uous shooting In this panel the application allows users to set snapshot functions such as time intervals and output formats 1 Photo quantity for continuous shooting 1 30 2 Time intervals for continuo...

Page 25: ...e webcam 1 Select the audio device to be captured 2 Select the audio recording source Ex Microphone 3 Select the audio encoder to encode the audio stream 4 Select the video encoder to encode the video...

Page 26: ...the image 1 Video Flip Flips the video horizontally vertically 2 Exposure control Low Light avoid under exposure in low light environment High Light avoid under exposure in high light environment 3 Fl...

Page 27: ...6 If the power indicator remains orange after using the previous procedure check your VGA card cable and computer system your monitor is functioning properly 6 2FAQs Before calling for assistance che...

Page 28: ...oper video mode Screen has one or more lines Perform monitor reset on Display Reset Auto Adjust via OSD Perform monitor self test feature check and determine if these lines are also in self test mode...

Page 29: ...the color to PC Custom Color or MAC Custom Color Adjust R G B value of PC Custom Color or MAC Custom Color Change the Color Format to PC RGB or YPbPr for Video DVI HD inputs Faint shadow from the sta...

Page 30: ...e of product failure For more details please visit www evga com EAR 7 2Pixel Policy The EVGA monitor is evaluated on the number of acceptable non performing pixels and the distance between each non pe...

Page 31: ...fire lightning malicious damage water damage abuse or other circumstances beyond EVGA s control b by the use of parts or peripherals not authorized by EVGA c as a result of normal wear and tear d by u...

Page 32: ...ftware related faults resulting from incorrect software installation or usage or software viruses or software inherent bugs shall not be considered as product faults and may incur a charge for rectifi...

Page 33: ...this equipment does cause harmful interference to radio or television reception which can be determined by turning the equipment off and on the user is encouraged to try to correct the interference by...

Page 34: ...gage in nor permit third parties to engage in any of the following Providing or disclosing the software to third parties Providing use of the software in a computer service business network time shari...

Page 35: ...35...

Reviews: