background image

                       MViP-II 

                                                                  IP Based Multi-Image Display & Monitoring Solution 


Revision 1.2


Page - 53


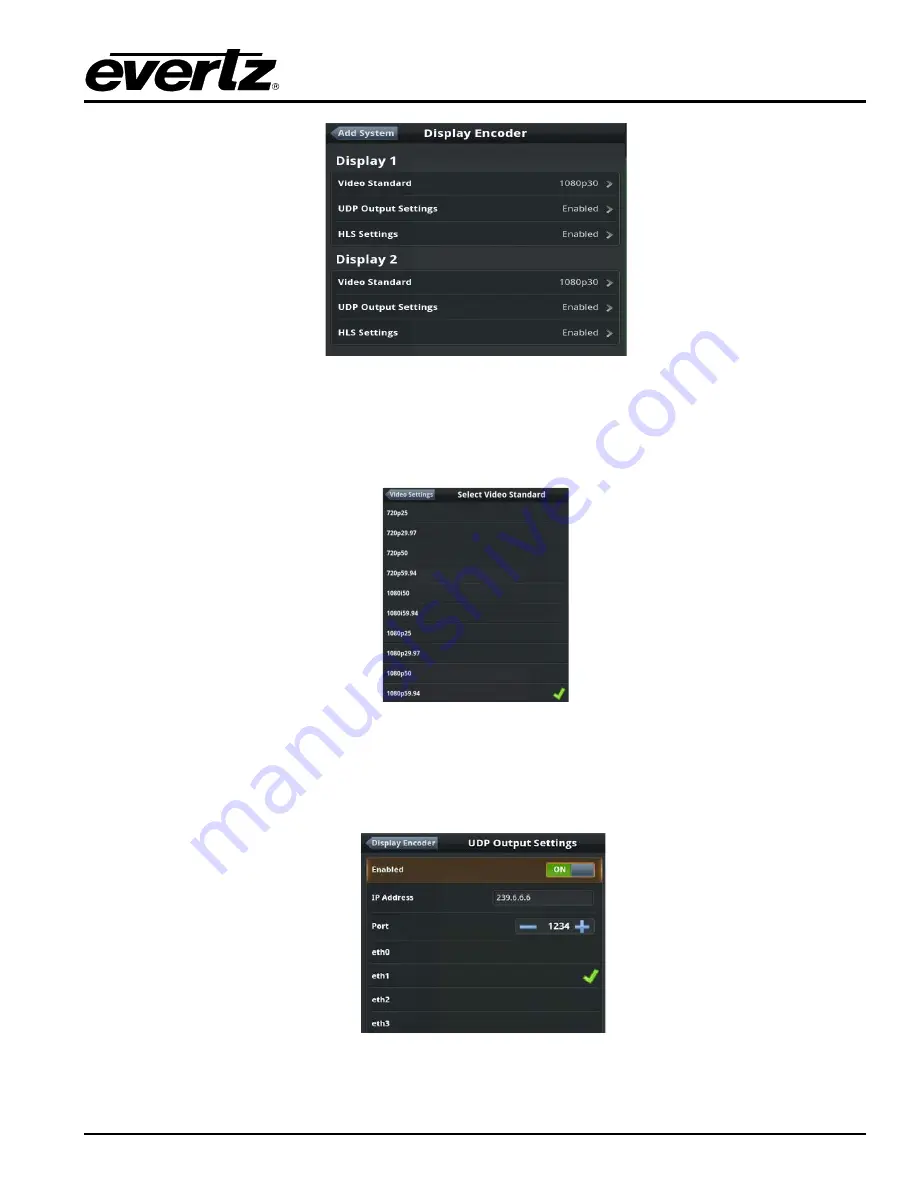
Figure 


6-37 : Display Encoder Menu 

For Display 1 and Display 2: 
 

Video Standard: 

There are different  options that can be selected for the encoded video output  

(Figure 


6-38)


Figure 


6-38 : Selecting Video Standard for the Encoded Output 

 
UDP Output Settings:  

This section allows  the user to enable the output of the stream using UDP; 

select the output multicast address and port number for the encoded stream, and also  select which 
Ethernet port to be used as shown in Figure 


6-39. 


Figure 


6-39 : UDP Output Settings 


Summary of Contents for MViP-II

Page 1: ...1 905 335 7571 Version 1 2 May 2019 The material contained in this manual consists of information that is the property of Evertz Microsystems and is intended solely for the use of purchasers of the MViP II product Evertz Microsystems expressly prohibits the use of this manual for any purpose other than the operation of the Servers All rights reserved No part of this publication may be reproduced w...

Page 2: ...This page left intentionally blank ...

Page 3: ... and Putty SSH 11 3 3 3 Upgrading MVIP II Using User Interface 13 4 VERSION LICENSING ADDING PLUS OPTIONS 15 4 1 1 Version Information 15 Adding Product Licenses for the Plus Options on the MViP II 15 5 MVIP II UI USER INTERFACE 17 5 1 MODES OF OPERATION 17 5 1 1 Operations Mode 17 5 1 2 Layout Edit Mode 18 5 1 3 Widget Edit Mode 19 5 2 NAVIGATING AROUND THE MVIP II VUE UI 20 5 3 ADDING WIDGETS TO...

Page 4: ... widget 41 6 2 1 8 Tally widget 41 6 2 2 VistaLink Pro widget 41 6 2 3 Graphical Elements 45 6 2 3 1 Analog Clock widget 45 6 2 3 2 Digital Clock widget 45 6 2 3 3 Graphic widget 45 6 2 3 4 Label widget 45 6 2 3 5 Screen Lock widget 45 6 2 3 6 Action Button Widget 45 6 2 4 Remote Systems 45 6 2 4 1 Remote Desktop 45 6 3 SOURCES SIDEBAR 46 6 3 1 Configure Sources 46 6 3 1 1 Sources 46 6 3 1 2 Sourc...

Page 5: ...4 7 6 FAULT WIDGET 65 7 6 1 Fault Window Settings 65 7 6 1 1 Active faults Menu 65 7 7 TALLY WIDGET 65 7 8 GRAPHIC WIDGET 66 7 8 1 Border 67 7 8 2 Background 67 8 WEB INTERFACE 69 8 1 MVIP II MAIN MENU 69 8 1 1 File Manager 69 8 1 2 Install firmware 70 8 1 3 Download system log Files 70 8 1 4 Display Configuration 70 8 1 5 Input settings 71 8 1 6 View streaming Output 71 8 1 7 VNC Viewer 71 8 1 8 ...

Page 6: ...e 10 Figure 3 8 Selecting Firmware file to install 11 Figure 3 9 WinSCP Login 11 Figure 3 10 PuTTY Configuration 12 Figure 3 11 PuTTY Configuration 12 Figure 3 12 PuTTY Configuration 13 Figure 4 1 About VUE Licensing Menu 15 Figure 4 2 Web Interface MViP II Main Menu 15 Figure 4 3 Adding a Product License Key 16 Figure 5 1 Operations Mode of MViP II 17 Figure 5 2 Layout Edit Mode 18 Figure 5 3 Wid...

Page 7: ...47 Figure 6 31 Selections on the MPTS Settings 48 Figure 6 32 Setting the Fault Parameters for Video Monitoring 49 Figure 6 33 Setting the fault parameters for Video Monitoring 50 Figure 6 34 Compliance Recording Configuration Tab 51 Figure 6 35 Compliance Recording Menu 51 Figure 6 36 Encoder Output Configuration Tab 52 Figure 6 37 Display Encoder Menu 53 Figure 6 38 Selecting Video Standard for ...

Page 8: ...12 WebEASY Source Cycle Tab Part 3 80 Figure 8 13 WebEASY Output Control 80 Figure 8 14 WebEASY Display Encoder ENC option 81 Figure 8 15 WebEASY Thumbnail Control 82 Figure 10 1 Server Configuration Login 87 Figure 10 2 Configuration Menu 87 Figure 10 3 Network Configuration Menu 88 Figure 10 4 WinSCP Login 89 Figure 10 5 PuTTY Configuration 90 Figure 10 6 PuTTY Configuration 90 Figure 10 7 PuTTY...

Page 9: ...mational use only and are not warranties of future performance either expressed or implied The only warranty offered by Evertz in relation to this product is the Evertz standard limited warranty stated in the sales contract or order confirmation form Although every attempt has been made to accurately describe the features installation and operation of this product in this manual no warranty is gra...

Page 10: ...MViP II IP Based Multi Image Display Monitoring Solution Page viii Revision 1 2 This page left intentionally blank ...

Page 11: ...P II is SNMP enabled which allows VistaLINK PRO to configure and store all monitoring values and alarms Features Benefits Supports video compression formats MPEG 2 H 264 AVC Supports audio compression formats MPEG 1 MPEG 2 AC 3 AAC Dolby E Up to 8 audio program decode Stereo or Dolby 5 1 Dual output resolution up to 4K Audio monitoring output Decoded video can be displayed multiple sizes up to ful...

Page 12: ... 2 Revision 1 2 Additional Input Format RF via 7780DM LB IP series ASI via 7880IP ASI IP and 3080ASI IPGE series Set top box via 160RM Options REC Stream capture based on faults ENC H 264 Encoded output and HLS streaming mirror copy of outputs CCA Source Cycling ...

Page 13: ...ns 2 2 POWER SUPPLY Redundancy 1x1 Serviceability Hot swap Input Range Full range AC 100 240V Input Range Frequency 50 60 Hertz Output Watts 1000 watts 2 3 I O PORTS USB 2 ports at rear COM 1 DB 9 COM port VGA 1 D Sub 15 pin port RJ45 4 ports RJ45 1 Dedicated IPMI 2 4 IP INPUT Type Gigabit Ethernet Connector 4 x RJ45 Transport Stream Specifications Type TS over UDP Multicast or Unicast TS over RTP...

Page 14: ...LS HDS Smooth Streaming MMSH MMST Supported Audio Compression Formats Type MPEG 1 L2 DOLBY E AC3 AAC Additional I O Option RJ45 4 Ports 10G 2 Ports SFP 2 5 VIDEO OUTPUTS Type Dual output support from 1280x720 up to 1920x1200 Connector 1 x DVI I connector 1 x HDMI connector 1 x Display Port connector 2 6 ADDITIONAL INPUT FORMAT RF via 7780DM LB IP series Optional ASI via 7880IP ASI IP and 3080ASI I...

Page 15: ...rt Plug in Keyboard and Mouse Plug in network cable for the CONTROL network left hand Ethernet port Plug in network cables to the DATA ports Up to 3 network connections can be made Figure 3 1 Rear Connections for DVI Port Display Port HDMI Port and Ethernet Ports NOTE Figure 3 1 top rear panel covers the products which were purchase by customers before 2019 Users who have bought a unit after 2019 ...

Page 16: ...ATA 5 ETHERNET 6 DATA 6 ETHERNET 7 DATA 7 ETHERNET 8 DATA 8 ETHERNET 9 DATA 9 Table 3 1 Ethernet Port Mappings 2 Plug in the audio cables green is the main output Figure 3 2 Rear Connections for USB Ports IPMI Port Serial Port VGA Port and Audio Outputs 3 Plug in two power cables 4 Power on MVIP II 2 USB Ports IPMI Port Serial Port VGA Port Audio Outputs Green is the main output ...

Page 17: ... MVIP II is running o Press Ctrl E the sidebar should appear on the left 7 Toggle between screens using Ctrl 1 and 2 if there are two screens connected 3 2 NETWORK SETTINGS To set IP Address settings on MVIP II 1 Press CTRL ALT F2 to access local terminal command line 2 Login to Configshell username admin password admin Figure 3 4 Server Configuration Login 3 Navigate to Network eth0 eth1 eth2 eth...

Page 18: ...2 Figure 3 5 Main Configuration Menu 4 Enter in the IP Address settings select Save and Apply Figure 3 6 Network Configuration Menu 5 Confirm network communication to eth0 of the MVIP II unit from a remote computer ping the IP address 6 Navigate to System Configuration Reboot ...

Page 19: ...o receive multicast to the interfaces Specify which Ethernet port will receive multicast data Login to Configshell Navigate to Network scroll down and select Multicast Interface Select an interface select Save and Apply o Default interface is set to eth1 3 3 MVIP II UPGRADE INSTRUCTIONS 3 3 1 Upgrading MVIP II Using WEB 1 Click on Install Firmware ...

Page 20: ...II IP Based Multi Image Display Monitoring Solution Page 10 Revision 1 2 Figure 3 7 Web Interface MVip II main menu Install Firmware 2 Choose File and click on install Once finished the unit will be rebooted ...

Page 21: ...Download WinSCP and PuTTY software from their official websites 2 Install it on the PC from where you can ping the MVIP unit Run WinSCP Host name IP address of MVIP User name and Password mvip set protocol to SCP NOTE If the MVIP box is running Initial firmware the User Name is mvip and Password is mvip Figure 3 9 WinSCP Login 3 Copy the efp file to the MVIP default directory ...

Page 22: ... the PuTTY program Enter the IP address of the unit in the Host Name field Figure 3 10 PuTTY Configuration 5 Login is mvip and password is mvip 6 Type the following command sudo efpinstall firmware file name Figure 3 11 PuTTY Configuration 7 When the following appears reboot the MVIP ...

Page 23: ...ace 1 Place the firmware efp package onto a top level of a fat32 formatted USB stick 2 Press CTRL E to open General Sidebar 3 Select Firmware Update 4 Select Browse the MViP II will search the system for available firmware packages 5 Select the appropriate EFP and click Upgrade 6 Once Upgrade procedure is finished remove USB stick then reboot MViP II ...

Page 24: ...MViP II IP Based Multi Image Display Monitoring Solution Page 14 Revision 1 2 This page left intentionally blank ...

Page 25: ...r the top of the About page Figure 4 1 Figure 4 1 About VUE Licensing Menu Adding Product Licenses for the Plus Options on the MViP II Product License keys are used to add options for the MViP II using the Web Interface For ordering options please contact Evertz Sales To access the web interface enter in the IP address configured for the control port on Ethernet 0 Select Input Settings on the MViP...

Page 26: ...2 For Login and Password type root and evertz respectively to login on to the MViP II server Add the Product License key provided by Evertz and Apply settings Product Features will list all the enabled features for the MViP II Figure 4 3 Figure 4 3 Adding a Product License Key ...

Page 27: ...VIP II UI USER INTERFACE 5 1 MODES OF OPERATION There are three modes of operation Operation mode Layout Edit Mode and Widget Edit Mode Section 5 2 describes how to navigate through the different modes 5 1 1 Operations Mode Interact with widgets Figure 5 1 Operations Mode of MViP II ...

Page 28: ...ed Multi Image Display Monitoring Solution Page 18 Revision 1 2 5 1 2 Layout Edit Mode In the Layout Edit Mode the user can add delete widgets resize widgets and move widgets on the canvas Figure 5 2 Layout Edit Mode ...

Page 29: ...toring Solution Revision 1 2 Page 19 5 1 3 Widget Edit Mode Select a widget to modify settings The widget is focused to the center zoomed in and interaction with the widget is available system commands are disabled Figure 5 3 Widget Edit Mode ...

Page 30: ... Based Multi Image Display Monitoring Solution Page 20 Revision 1 2 5 2 NAVIGATING AROUND THE MVIP II VUE UI Get a feel for moving between the different MVIP II Modes Figure 5 4 Navigating the MVIP II UI Workflow ...

Page 31: ...mp to Widget Edit Mode Tap on the widget to bring up the Radial Menu Tap the tool icon on the bottom of the menu to open the widget settings Alternatively double click the widget to open the widget settings From Widget Edit Mode Jump back to Layout Edit Mode Select the tool icon located at the top right to go back to Layout Edit Mode as shown in Figure 5 5 Alternatively press ESC or double click a...

Page 32: ...oring Solution Page 22 Revision 1 2 5 3 ADDING WIDGETS TO THE CANVAS 1 Go into Layout Edit Mode 2 Navigate to the Widgets tab in the VUE Sidebar 3 Click and drag a widget onto the VUE canvas Figure 5 6 Drag and Drop widgets Onto the VUE Canvas ...

Page 33: ...ouble click on widget or tap on widget to display Radial Menu and select the tool icon Exit Widget Edit Mode Tap on Tool icon located top right of screen or press ESC Save the current layout Ctrl S or General sidebar Save Layout Open a saved layout Ctrl O or General sidebar Open Layout Open Terminal into VNC Ctrl Shift F12 Open console Ctrl Input interrogator Ctrl i Open Layout Ctrl O Fit widget t...

Page 34: ...e Radial Menu Figure 5 7 Radial Menu Move Change widget position Click and Drag the center move icon to place the selected widget anywhere on the canvas Open Widget Edit Settings Tap the tool icon on the bottom of the menu to open the widget settings for the selected widget Scaling Tap on the scale icon to expand the wheel to show the anchors which can be used to resize the widget from the sides o...

Page 35: ...eel to show additional edit functions Figure 5 9 Additional Edit Functions Duplicate Copy Create a copy of the selected widget with all customized widget settings onto the canvas Delete Remove the selected widget Linker Add Custom widget Linking Create a link association between widgets for added functionality Add Custom widget Add custom widgets to the Widget Drawer for re usability Adjust Order ...

Page 36: ...der Decrease Layer position of widget to 1 Adjust Order Increase Layer position of widget to 1 Scale Scale your window size from 25 to 200 to size of window or to the size of video Add Add new widgets like Closed Captioning Audio Bar StatMUX Label Subtitle Fault window and Bitrate Monitor ...

Page 37: ...Menu Screen 6 1 1 Layouts Menu 6 1 1 1 Load Layout The Load layout section allows the user to load a saved layout into MViP II and view a preview of the layout before loading it into MViP II display Figure 6 1 Layouts Load layout Menu To load a layout follow below steps Press Ctrl O Select your layout and click open or double click your layout preview ...

Page 38: ...dit Mode and bring up the General sidebar 2 Under Layouts select Load Layout 3 Use the Zoom slider to enlarge the Layout Preview 4 Select a layout to load o Double click on the layout or press the Open button 6 1 1 2 Save Layout The Save Layout section allows the user to save the current layout into MViP II by adding a new filename for the layout or overwriting an existing layout ...

Page 39: ...elect the Save button o Double click an existing layout to overwrite with the new layout 6 1 1 3 Autosave Interval Minutes This section allows autosaving the current system settings on the MViP II 6 1 2 General Settings Menu 6 1 2 1 Appearance Figure 6 3 General Settings Appearance Menu The Appearance section allows the user to Customize font family size and color Customize widget buttons to show ...

Page 40: ...o configurations section allows the user to set Error Regions and Warning Regions for Audio Level Bars 6 1 2 4 Firmware Upgrade This section allows the user to upgrade Firmware by using efp 6 1 2 5 About VUE Licensing This section allows the user to view the Firmware and licensing information See section 4 for more information 6 1 2 6 Display Configuration There are two display modes 1 Headless Mo...

Page 41: ...ust display configuration manually There are two options to select display layout Single display and Dual display In manual mode the user can see current resolution applied to both displays if there are two displays connected It is possible to apply separate resolution for both displays In Headless mode some of the standard resolutions will be available in this list In manual mode the user can sel...

Page 42: ... using 4K displays it is preferred to use cables that have enough bandwidth to support 4K output HDMI Like 1 4 2 0 2 1 and Display port Like 1 1 Any DVI to HDMI or Display port to HDMI conversion cables might affect display resolution Figure 6 6 General Settings Change Resolution Rotation ...

Page 43: ...ID video Intra period GOP size consecutive B Frames profile scan type Bitrate mode video bitrate pixel format and color range Audio settings This section allows the user to set the Audio PID UDP Output Settings This section allows the user to set IP address Port TTL Time To Live and Ethernet port for UDP HLS Settings If enabled the user can set Playlist size and chunk durations in seconds YouTube ...

Page 44: ...utions and frame rates that are supported Figure 6 9 Figure 6 9 Selecting Video Standard for the Encoded Output Video PID This section allows the user to choose a PID for video data Video Intra Period GOP SIZE This field allows the user to specify the Group of Pictures Size for the Encoder Consecutive B Frames This field allows the user to specify the number of consecutive B frames allowed during ...

Page 45: ...0 Display Encoder Audio settings Menu Audio PID This field allows the user to set the Program ID of the output audio stream UDP Output Settings This section allows the user to Enable Disable the Encoder Specify a Multicast Unicast address of the Encoded Stream and specify which Physical network interface the stream the mosaic outputs to Figure 6 11 UDP Output Settings Enabled The On Off switch all...

Page 46: ...his field allows the user to set the duration s of each TS segment or Chunk Default and recommended setting is 10 seconds 6 1 2 8 Network Settings The network settings section allows the user to configure IP address Netmask Netmask preset Gateway and DNS Nameservers for all Ethernet ports The user can also select Multicast interface from available Ethernet interfaces This section indicates link sp...

Page 47: ...authenticate with the proxy server If unused leave it blank HTTPS Proxy Settings If the application requires HTTPS communication the following settings must be set NOTE If the same Proxy server is used for both HTTP and HTTPS communication duplicate settings in fields below Address This field allows the user to set the IP address of the proxy server that is used for HTTPS requests Port This filed ...

Page 48: ...MViP II IP Based Multi Image Display Monitoring Solution Page 38 Revision 1 2 6 2 WIDGETS SIDEBAR Figure 6 14 Widget Sidebar Menu 6 2 1 AUDIO VIDEO WIDGET Figure 6 15 Audio Video Widgets ...

Page 49: ...o programs This widget can monitor Mono to 7 1 channels of program audio Up to 8 audio PID s per source Selected audio to speakers by clicking headphone icon This widget allows the user to assign source to audio bars by clicking on film reel icon And also allows the user to link to a video widget to display incoming data on the selected video source 6 2 1 3 Closed Captioning widget The closed capt...

Page 50: ...s to monitor their bit rate usage and also allows the user to link associate the Bit rate Monitor Widget to multiple Video Widgets to display the bandwidth usage from the selected video sources 6 2 1 6 Stat Mux Monitor widget The Stat Mux Monitor Widget is used to present the defined multicast source on the transport streams Figure 6 19 Stat Mux Monitor Widget It displays the total bandwidth usage...

Page 51: ...eas of the screen For example if all audio faults configured to one widget video alarms can be configured to second widget 6 2 1 8 Tally widget This widget will be used for tally tally state and status from discrete devices based on VGPIs Figure 6 21 Tally Settings menu Tally Settings Widget name This field allows the user to set a name for Tally widget For State1 State2 and State3 Enabled The use...

Page 52: ...d allows the user to select a service type Available types are Service or Group from Vistalink Service name This field allows the user to define a name for the Service which is created in Vistalink Maximum Alarm Count This field allows the user to set the maximum alarm to fetch from Vistalink For having a view of VistaLink Pro on the canvas select the icon for Alarm Log at the VistaLink Pro widget...

Page 53: ...ink Pro Host This field specifies the Multicast IP address Port This field allows the user to specify the port number of Multicast IP NOTE The Vistalink Web Client license is required for this operation Click on the widget tool icon on the Radial menu the related VistaLink Pro scene will be displayed on the canvas Figure 6 25 Figure 6 25 VistaLink Pro window on canvas How to use this ...

Page 54: ...Pro server Tools Server properties JSON RPC tab Locate JSON RPC PORT This port number should be added here After creating system now it is possible to drag and drop VistaLink Pro Alarm log to display Go to settings of Alarm Log Figure 6 26 Alarm log Settings In systems it is needed to select system that is created previously Select service type as o Service if the service has been created into the...

Page 55: ...ser to add a Label widget with static or dynamic text to customize the MVIP II layout or to provide additional information and allows using the Label widget as a UMD that can display the current source on a specified destination The user has to associate Label to the video widget of the source that want to use UMDs of To set UMD the user should go to label settings and set text entry mode to UMD F...

Page 56: ... the sources tab can be placed on the canvas using a drag and drop action In order to do it simply select the icon beside the defined source and drag it over to the canvas Figure 6 28 Drag and Drop a Source on to the canvas 6 3 1 Configure Sources 6 3 1 1 Sources Figure 6 29 Source Settings Select the Sources section and click on a Source Name This field allows the user to define the source name ...

Page 57: ...RTP and HTTP etc 6 3 1 2 Source Specific Figure 6 30 Source Specific Settings on the Ethernet Ports Host This field indicates the Multicast IP address Port This field indicates the port number which is used on the Multicast IP address Eth1 3 These fields allow the user to select the Ethernet ports to the assigned Multicast IP address IGMPv3Setting This field defines source specific Multicast setti...

Page 58: ...n the MPTS Settings Use First Available Program This mode will always use the first program in the MPTS Use Program Number This field allows the user to pick any program in the MPTS User can also click on the arrow and choose a program name from an interrogated list As seen on right image of Figure 6 31 ...

Page 59: ... is decided using the threshold and comparing change in the Luma Y pixel value The threshold controls how much motion or changes in Luma Y pixel is accepted before triggering a fault A Value of 0 means consecutive frames must have no motion changes to trigger a fault Strict Case A Value of 50 means that half of the frame may change or move to trigger a fault A Value of 100 means that consecutive f...

Page 60: ...ime of an error state condition to occur before a fault is set Reset Duration This field allows the user to set the amount of time for closed captioning to be presented before the fault condition is reset Loss of 708 Services 1 16 These fields allow the user to enable or disable faults for captioning Error Duration This field allows the user to set the amount of time of an error state condition to...

Page 61: ...the ability to record TS based on specified faults and store or upload directly to a remote FTP server Click on the Systems tab in edit mode Select the Compliance Recording for configuring the output as seen in Figure 6 34 Figure 6 34 Compliance Recording Configuration Tab Once selected the Compliance Recording menu will appear as seen in Figure 6 35 Figure 6 35 Compliance Recording Menu ...

Page 62: ... saved on the MViP II server and used for exporting Upload to FTP Server This control enables the recording to be uploaded automatically to a remote FTP server When enabled an FTP Server URL window will appear to set the address 6 4 2 Display Encoder ENC The MViP II when enabled with ENC provides the user with the ability to send out the mosaic views over IP in any of the four Data Ethernet ports ...

Page 63: ...can be selected for the encoded video output Figure 6 38 Figure 6 38 Selecting Video Standard for the Encoded Output UDP Output Settings This section allows the user to enable the output of the stream using UDP select the output multicast address and port number for the encoded stream and also select which Ethernet port to be used as shown in Figure 6 39 Figure 6 39 UDP Output Settings ...

Page 64: ... that a client computer is connected to eth2 192 168 3 214 with HLS player To stream out Display 1 video mosaic type the following URL in HLS player ex VLC player Display 1 Video Mosaic URL http 192 168 3 214 hls 0 playlist m3u8 Display 2 Video Mosaic URL http 192 168 3 214 hls 1 playlist m3u8 Limitation Display encoder frame rate is affected by Display configuration frame rate Example if Display ...

Page 65: ...r input coming in from any of the four Ethernet ports Configuration for the Source Cycle is on the Web Interface To access the web interface enter in the IP address configured for the control port on Ethernet 0 Select Input Settings on the MViP II main screen as seen in Figure 6 41 Figure 6 41 Web Interface MViP II Main Menu For Login and Password type root and evertz respectively to login on to t...

Page 66: ...ding on the number of sources in the cycle the amount of time for switching between the sources will change Source List For the 64 inputs Run Source Cycling This control is used for enabling the source cycling If not enabled the source selected in the Input Control will be used Cycle Speed This control is used to select the cycle speed Options are Slow Medium and Fast as configured in the Source C...

Page 67: ...thernet port used for the source Program ID This control is used to enter the Program ID on the stream Num Audio Streams This control is used to specify the number of audio streams on the source Figure 6 44 Source Cycle Tab Part 3 Audio Stream Enabled This control allows the user to enable disable Audio Stream Audio Stream PID This field allows the user to enter the Audio Stream PID 6 4 6 Umd Prot...

Page 68: ...MViP II IP Based Multi Image Display Monitoring Solution Page 58 Revision 1 2 This page left intentionally blank ...

Page 69: ...olution Revision 1 2 Page 59 7 WIDGET EDIT MODE 7 1 VIDEO WIDGET Follow below steps Go to Edit Mode Bring up the Redial Menu Open the Widget Setting by clicking the Video Setting Sidebar will open as shown in Figure 7 1 Figure 7 1 Video Settings Menu ...

Page 70: ...3 aspect ratios 7 1 3 Video Crop Figure 7 2 Video Crop Enable Cropping When Enabled Crop X Allows the input video image to be cropped horizontally by of active horizontal pixels Crop Y Allows the input video image to be cropped vertically by of active vertical pixels Crop Width Allows the horizontal width of the input video image to be cropped by of active horizontal pixels Crop Height Allows the ...

Page 71: ...Captions Captions On Off switch toggles Captioning on screen display service monitoring Closed Captioning Services Interrogates all current captioning services present in current transport stream and lists them User can check off which service is to be monitored If no captioning services are present there is no data PID present 7 2 2 Subtitles Subtitles On Off switch toggles Subtitle teletext DVB ...

Page 72: ...u on Audio Bar Open the Widget Setting by clicking the Audio Setting Sidebar will open as in Figure 7 4 Figure 7 4 Audio Bar Settings Menu 7 3 1 Audio Bar Settings This menu allows the user to enable and disable different settings on the audio bars Toggle Audio Playback Automatic Channel Count Audio Fault Settings Override Number of Channels Show Labels ...

Page 73: ...N OFF 7 3 3 Audio Streams Audio Streams Number This field is used to map audio streams for the audio bar Audio Streams 1 PID First This field allows the user to choose first audio PID for the audio bar 7 4 BITRATE MONITORING Figure 7 5 Bit Rate Monitor Settings Stat Mux This field allows the user to ON OFF statmux which monitors if bitrate all combined as one stream Plot Mode This field allows the...

Page 74: ...ast Protocol The options are UDP and RTP Host This field allows the user to set the IP address of multicast Port This field allows the user to set the Port number IGMPv3 Settings This field allows the user to set the block list of multicast or list of multicast that we need to add in Available Bandwidth This field allows setting the Maximum Bandwidth available for this StatMUX ...

Page 75: ...e fault widgets per video source 7 6 1 Fault Window Settings Widget Name User friendly name for widget Active Faults This menu allows the user to configure which faults will cause the widget to become active or in a faulting state 7 6 1 1 Active faults Menu This menu allows the user to configure which faults will cause the fault widget to become in an active state or faulting state when triggered ...

Page 76: ... Figure 7 8 Tally Settings Enabled On off switch toggles the tally active state When it is off VGPI s won t trigger the state VGPI Allows the user to set a unique VGPI ID to each of the 3 states Background Colour This field allows setting the default Colour of the Active tally state 7 8 GRAPHIC WIDGET Figure 7 9 Graphic Select Image Allows selecting a graphic image from the MViP II image library K...

Page 77: ...ting the color of the outer border of widget Width This field allows the user to set the width of border in pixels Style This field allows the user to set the Style of border Options are none solid dashed and dotted border decorations 7 8 2 Background Colour This field allows setting the color of the widget s background ...

Page 78: ...MViP II IP Based Multi Image Display Monitoring Solution Page 68 Revision 1 2 This page left intentionally blank ...

Page 79: ... opening an HTML 5 compatible web browser such as Google chrome recommended and typing http ipaddressofmvip user will enter the web interface Figure 8 1 MViP II Main Menu 8 1 MVIP II MAIN MENU 8 1 1 File Manager The file manager interface allows an easy user interface to the MViP II s file system ...

Page 80: ... new MViP II firmware directly from web interface Details are provided in section 3 3 1 8 1 3 Download system log Files If MViP II encounters problems Evertz may ask to download a copy of the system log files for debugging BY clicking this link a complete copy of these logs is downloaded directly from web browser Then user can forward them to Evertz for debugging 8 1 4 Display Configuration This L...

Page 81: ... 7 VNC Viewer This section allows the user to VNC into MVIP II unit NOTE The VNC Viewer will only be available if the ENC option is available and the encoded output settings for both displays have been configured 8 1 8 Download SNMP MIBs This section allows the user to download latest SNMP MIBs from this page 8 1 9 Multicast Interrogator This section allows the user to interrogate multicast from t...

Page 82: ...To Login to the MViP II server type root for username and evertz for password respectively Figure 8 2 WebEASY MViP II Login Menu 8 2 1 General Settings Figure 8 3 WebEASY General settings General Settings Enable Logging This field allows the user to Enables Disable the internal syslog server License Control Product License This field allows the user to apply a feature license to the MViP II server...

Page 83: ... to the VNC server 8 2 2 Video Info This menu displays video program information for each of the 64 configurable video inputs Figure 8 4 WebEASY Video Info Program Info Input Indicates the input slider controls selection of sources 1 64 Transport Stream Bitrate This field indicates the total bitrate of the subscribed transport Stream Program Bitrate This filed indicates the total Bitrate for the c...

Page 84: ...of each one of the configurable audio sources Figure 8 5 WebEASY Audio Info Audio Info Input slider This section allows all configurable inputs 1 64 to be selected Audio tabs This section shows settings for each of the 8 configurable audio services per Input Audio PID This filed shows subscribed audio Program ID Codec Name This field indicates the name of detected audio codec Language This field d...

Page 85: ... 1 64 to be selected Bitrate Low This section allows the user to configure the bitrate low alarm settings Bitrate High This section allows the user to configure bitrate high alarm settings PID Loss This section allows the user to configure the PID loss alarm settings 8 2 5 Video Monitoring This Menu allows for user to configure all Video Monitoring settings that are available through the MViP UI ...

Page 86: ...m settings DVB Subtitle loss This field allows the user to configure DVM subtitle loss alarm settings SCTE27 Subtitle Loss This field allows the user to configure SCTE27 subtitle Loss alarms Teletext Data Loss This field allows the user to configure Teletext Data loss alarms Loss of CC 1 4 This field allows the user to configure closed captioning service 1 4 alarms Loss of 708 Services 1 16 This f...

Page 87: ...Audio Loss This section allows the user to configure Audio Loss settings can be configured here Audio Scrambled This section allows the user to configure audio scramble detection settings 8 2 7 Channel Monitoring Figure 8 9 WebEASY Channel monitoring Input slider This section allows all configurable inputs 1 64 to be selected Audio tab This filed shows settings for each of the 8 configurable audio...

Page 88: ...e user to enable one or more inputs to allow cycling of up to 10 sources per channel Figure 8 10 WebEASY Source Cycle Part 1 Source Cycle Timing These settings are used to set the cycling interval speed duration in seconds There are three user configurable presets labeled Slow Medium or Fast Each source can be assigned one of the 3 presets depending on the speed of cycling desired Depending on the...

Page 89: ...ources This control is used to set the number of sources for the source cycle on the input and used for configurations in the Source List section Maximum of 10 sources can be cycled on each input Figure 8 11 WebEASY Source Cycle Tab Part 2 Source List For the 64 inputs Url This control is used to specify the URL multicast address for the input source Multicast Interface This control is used to spe...

Page 90: ... 10 possible cycling URL multicast addresses that can be set Audio Stream Selection 1 8 Each cycling address is capable of monitoring 8 audio services at once Audio Stream Enabled This status shows the user which services are enabled for audio monitoring To enable a service change num audio streams in source cycle tab Audio Stream PID This is the program ID of the audio stream to be monitored 8 2 ...

Page 91: ...ut Tab This section allows the user to select encoded Output 1 or Output 2 Video Standard This dropdown allows the user to set the desired standard of the output encoder UDP Output Enable This dropdown allows the user to enable UDP TS output of the encoder UDP Output IP Address This field allows the user to set the multicast unicast IP address of the UDP output encoder UDP Output Port This field a...

Page 92: ...s will toggle thumbnail sending on off Thumbnail Server IP This field allows the user to set the IP of the Vistalink Pro Thumbnail server Thumbnail Server Port This field allows the user to set the thumbnail port number of the Vistalink Pro server Thumbnail Size This dropdown allows the user to set the size of thumbnail image to send Thumbnail Bandwidth This field allows the user to send the total...

Page 93: ...ion Frames The Reset Duration control specifies how many pairs of frames that will be detected as frozen consecutively before the detection fault is cleared Threshold Control percentage The threshold controls how much motion or changes are accepted before triggering a fault o A Value of 0 means consecutive frames must have no motion changes to trigger a fault Strict Case o A Value of 50 means that...

Page 94: ...ation Seconds The error duration controls how many seconds of CC1 CC4 loss state must pass before the fault is triggered Reset Duration Seconds The error duration controls how many seconds of valid CC1 CC4 decodes must pass before the fault is cleared Loss Of 708 Service 1 16 This Fault is triggered when no valid Closed Captioning 708 services 1 16 are decoded Error Duration Seconds The error dura...

Page 95: ...ds of audio that cannot be decoded must elapse before the fault is cleared Audio Scrambled If audio is detected as scrambled or encrypted then the audio fault will trigger Error Duration Seconds The error duration controls how many seconds of audio that is detected as encrypted must elapse before the fault is triggered Reset Duration Seconds The error duration controls how many seconds of audio th...

Page 96: ...MViP II IP Based Multi Image Display Monitoring Solution Page 86 Revision 1 2 This page left intentionally blank ...

Page 97: ...mmand line 8 Login to Configshell username admin password admin Figure 10 1 Server Configuration Login 9 Navigate to Network Configuration eth0 eth1 eth2 eth3 control port data ports 1 to 3 Figure 10 2 Configuration Menu 10 Enter in the IP Address settings for all ports used navigate to bottom and select Save and Apply 11 User will be prompted to enter a password to confirm these settings Type adm...

Page 98: ...Logout 10 1 1 Multicast Interface NOTE These steps must be followed in order to receive multicast to the interfaces Specify which Ethernet port will be the primary port to receive multicast data eth1 usually is default This will not affect ability to receive streams on eth2 or eth3 Login to Configshell Navigate to Network scroll down and select Multicast Interface Select an interface select Save a...

Page 99: ...ark greenend org uk sgtatham putty 9 Install it on the PC from where you can ping the MVIP unit Run WinSCP Host name IP address of MVIP User name and Password mvip protocol can be SCP or SFTP NOTE If the MVIP is running default configuration the User Name mvip and password mvip Figure 10 4 WinSCP Login 10 Copy the efp file to the MVIP default directory 11 Run the PuTTY program Enter the IP address...

Page 100: ...ing Solution Page 90 Revision 1 2 Figure 10 5 PuTTY Configuration 12 Login is mvip and password is mvip 13 Type the following command sudo efpinstall firmware file name Figure 10 6 PuTTY Configuration 14 When the following appears reboot the MVIP ...

Page 101: ...MViP II IP Based Multi Image Display Monitoring Solution Revision 1 2 Page 91 Figure 10 7 PuTTY Configuration ...

Page 102: ...MViP II IP Based Multi Image Display Monitoring Solution Page 92 Revision 1 2 End Of Document ...

Reviews: