www.everik.com
TSP2B.BB1000.ME.102011.IM
Outils requis
• Tournevis Phillips
• Mèche de perceuse de 1/8 po (3/8 po pour le ci-
ment)
• Chercheur de montant
• Perceuse électrique
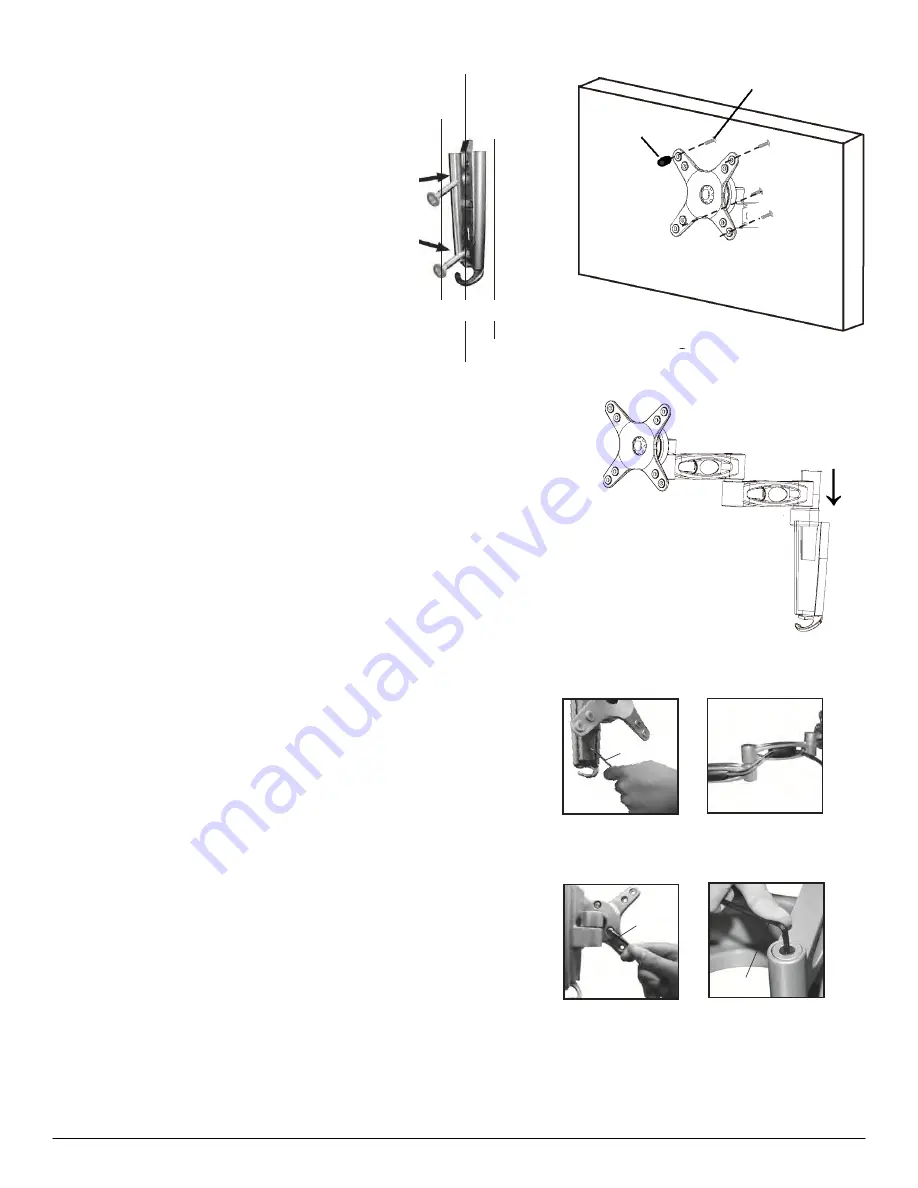
Étape 1 : Installer le support mural (schéma 1)
Installation dans un montant en bois
• Vérifiez la position du montant.
• Centrez le support mural sur le montant en bois
et marquez l’emplacement des trous de vis.
• Percez au préalable les trous à l’aide d’une
mèche de perceuse de 1/8 po.
• Vissez solidement le support mural à l’aide des
vis incluses (pièce E).
Installation dans une surface en ciment
• Marquez les emplacements des trous de vis.
• Percez au préalable les trous à l’aide d’une mèche de perceuse
de 5/8 po.
• Vissez solidement le support mural à l’aide des ancrages et des
vis pour murs de ciment (pièces E et F).
Étape 2 : Attacher l’écran d’affichage à l’assemblage de la
plaque/bras de fixation et au bras (schéma 2)
• Attachez l’assemblage de la plaque/bras de fixation à votre écran
en utilisant la bonne combinaison de vis et de cales d’espacement
(pièces A,B,C,D et H). Vous n’aurez pas à utiliser toute la quincail-
lerie incluse. Assurez-vous de serrer solidement les vis, mais pas
trop. Utilisez les cales d’espacement si les vis sont trop longues si
l’arrière de votre écran est incurvé.
Étape 3 : Assemblage final (schéma 3)
• Glissez l’assemblage de la plaque/bras de fixation, sur lequel est
attaché votre écran, dans le support mural. L’onglet de verrouillage
émettra un déclic. Serrez la vis de pression, située à l’avant de la
plaque de fixation, afin de solidifier le support (schéma 4). Pour
retirer, desserrez la vis de pression. Ensuite, retenez l’onglet de
verrouillage et glissez l’assemblage du bras vers le haut afin de le
libérer du support mural.
Gestion des câbles (schéma 5)
• Retirez les couvercles de plastique du (des) bras et acheminez
les câbles à travers le(s) bras et du crochet. Replacez les couver-
cles afin de conserver les câbles en place. Assurez-vous de laisser
un jeu suffisant au cas où vous voudriez repositionner l’écran.
Ajustement (schémas 6 et 7)
• Vous pouvez faire les ajustements à l’aide de la clé Allen incluse
(G), que vous devriez conserver pour toute utilisation ultérieure. •
Les trois vis de pression situées à l’arrière de la plaque de fixation
déterminent la rigidité avec laquelle vous pourrez déplacer l’écran.
Si l’écran est trop difficile à déplacer, desserrez uniformément, et
en petits incréments, les trois vis, jusqu’à ce que vous puissiez le
déplacer. Serrez uniformément les trois vis afin d’empêcher l’écran
de bouger trop facilement.
• Les vis de pression, situées dans les joints du (des) bras,
déterminent la facilité avec laquelle vous pourrez le(s) bouger.
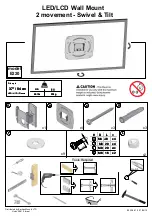
•Phillips screwdriver
•1/8" drill (3/8" for concrete)
•Stud finder
•Power drill
• erify stud position
•Centre wall bracket over wood stud
and mark screw hole locations
•Pre-drill holes using a 1/8"bit
•Secure the wall bracket with screws (part D)
•Mark screw hole locations
•Pre-drill holes using a 5/8"bit
•Secure the wall bracket using concrete
wall anchors and screws (parts and E)
•Attach the mounting plate/arm assembly to your display using the
appropriate combination of mounting screws and spacers (parts
A,B,C and G).
Not all the hardware provided will be used. Ensure
the screws are secure but do not over tighten. Use spacers if
the screws are too long or your display has a curved back.
•Slide the mounting plate/arm assembly with your display attached
into the wall bracket. The lock tab will click. ighten the set screw
in the front of the mounting plate to secure the mount (Figure 4).
o remove, loosen the set screw. Then hold back on the lock tab
and slide the arm assembly up and free from the wall bracket.
•Remove the plastic covers of the arm(s) and route cables through
the arm(s) and hook. Replace the covers to keep cables in place.
Make sure there is enough slack so that the display can be
repositioned if needed.
•Adjustments are made with the included Allen key which should
be retained for future use.
•The three set screws on the back of the mounting plate determine
how rigid the display will be. If the display is too difficult to reposi-
tion, loosen all three screws evenly and in small increments until
the display can be moved. ighten the three screws evenly to
prevent the display from moving easily.
•The set screws in the joints of the arm(s) determine how easily
the arms move.
•
Figure 1
Figure 2
G
A,B,C
Figure 3
Figure 4
Figure 5
Figure 7
Figure 6
2
F
F
F
ML042010
E
E
A, B, C, D
H
•Phillips screwdriver
•1/8" drill (3/8" for concrete)
•Stud finder
•Power drill
• erify stud position
•Centre wall bracket over wood stud
and mark screw hole locations
•Pre-drill holes using a 1/8"bit
•Secure the wall bracket with screws (part D)
•Mark screw hole locations
•Pre-drill holes using a 5/8"bit
•Secure the wall bracket using concrete
wall anchors and screws (parts and E)
•Attach the mounting plate/arm assembly to your display using the
appropriate combination of mounting screws and spacers (parts
A,B,C and G).
Not all the hardware provided will be used. Ensure
the screws are secure but do not over tighten. Use spacers if
the screws are too long or your display has a curved back.
•Slide the mounting plate/arm assembly with your display attached
into the wall bracket. The lock tab will click. ighten the set screw
in the front of the mounting plate to secure the mount (Figure 4).
o remove, loosen the set screw. Then hold back on the lock tab
and slide the arm assembly up and free from the wall bracket.
•Remove the plastic covers of the arm(s) and route cables through
the arm(s) and hook. Replace the covers to keep cables in place.
Make sure there is enough slack so that the display can be
repositioned if needed.
•Adjustments are made with the included Allen key which should
be retained for future use.
•The three set screws on the back of the mounting plate determine
how rigid the display will be. If the display is too difficult to reposi-
tion, loosen all three screws evenly and in small increments until
the display can be moved. ighten the three screws evenly to
prevent the display from moving easily.
•The set screws in the joints of the arm(s) determine how easily
the arms move.
•
Figure 1
Figure 2
G
A,B,C
Figure 3
Figure 4
Figure 5
Figure 7
Figure 6
2
F
F
F
ML042010
G
G
G
Schéma 1
Schéma 2
Schéma 3
Schéma 4
Schéma 5
Schéma 6
Schéma 7


