background image

Page 6 of 32 

Adjusting Frames  (2 of 2)

Adjust earpieces

If frames are not fitting, please call for assistance.

With glasses on, tilt head down. If glasses are slipping down nose, 

remove glasses and bend both earpieces as shown. Continue until 

glasses are snug on face.

Place thumb at 

corner here

Push toward other 

thumb to bend 

Bent earpiece

Summary of Contents for See Boost

Page 1: ... Evergaze LLC 2018 All Rights Reserved Rev D Getting Started ...

Page 2: ...2 Battery Pack Information 13 Installing Occulder Optional 14 Installing Alternate Nosepads Optional 15 Installing Glasses Keepers Optional 16 Powering on 17 Using the Control Knob 18 Powering off 22 Attaching Lanyard to Battery Pack 23 Removing Lanyard from Battery Pack 24 Storing in Clamshell Case 25 Cleaning 26 Precautions 28 ...

Page 3: ...Page 2 of 32 Support Information Visit us on the web at www seeboost com For technical support please call 972 643 8498 ...

Page 4: ...on loss due to macular degeneration or diabetes seeBOOST is intended for all day use and for various activities including Close up reading Object recognition labels signs Recognizing features on faces Watching television Crafts and games seeBOOST is not intended for Recognition of small objects at far distances Use in poorly lit environments Product Information ...

Page 5: ...ge 4 of 32 Accessories Included Lens Cleaning Wipes x6 Glasses Keepers Battery Pack Battery Pack Lanyard 6 foot Type C USB Cable Charger Occulder small and large Microfiber Cloth Clamshell Case Nose pads ...

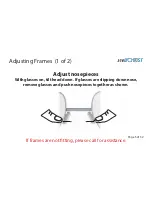
Page 6: ... Adjusting Frames 1 of 2 Adjust nosepieces If frames are not fitting please call for assistance With glasses on tilt head down If glasses are slipping down nose remove glasses and push nosepieces together as shown ...

Page 7: ...re not fitting please call for assistance With glasses on tilt head down If glasses are slipping down nose remove glasses and bend both earpieces as shown Continue until glasses are snug on face Place thumb at corner here Push toward other thumb to bend Bent earpiece ...

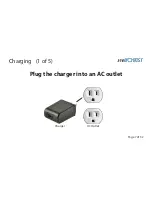
Page 8: ...Page 7 of 32 Charging 1 of 5 Plug the charger into an AC outlet Charger AC Outlet ...

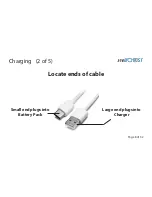
Page 9: ...Page 8 of 32 Charging 2 of 5 Small end plugs into Battery Pack Locate ends of cable Large end plugs into Charger ...

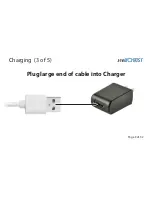
Page 10: ...Page 9 of 32 Charging 3 of 5 Plug large end of cable into Charger ...

Page 11: ...Page 10 of 32 Charging 4 of 5 Plug small end of cable into Battery Pack A bump located just above the connector will help guide connector into the port Battery Pack Location Bump ...

Page 12: ...Page 11 of 32 Check Charge Indication During Charge Charging 5 of 5 Charging Charge Completed Single Red Light 3 green lights ...

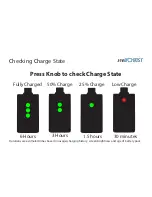
Page 13: ...te Fully Charged 50 Charge 25 Charge Low Charge Press Knob to check Charge State 6 Hours 3 Hours 1 5 hours 30 minutes Durations are estimated times based on usage charging history screen brightness and age of battery pack ...

Page 14: ...or up to 6 hours continuously from 100 charge It is recommended to charge seeBOOST every night depending on screen brightness Battery Pack Information Battery pack can be plugged in with device turned on Turning down brightness will increase battery life Charge state is displayed permanently when device is on Battery pack will remain charged for months if not used If no LEDs turn on connect to a c...

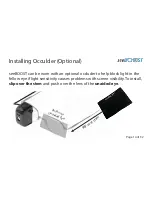
Page 15: ...OOST can be worn with an optional occluder to help block light in the fellow eye if light sensitivity causes problems with screen visibility To install slip over the stem and push over the lens of the unaided eye Slip over stem Push over Unaided Eye ...

Page 16: ...Page 15 of 32 Installing Alternate Nosepads Optional Remove existing nosepad by pushing out of snap Page 15 of 32 Snap Push in until click Push in new nosepad into snap ...

Page 17: ...Page 16 of 32 Installing Glasses Keepers Optional Glasses Keepers Slide Glasses Keepers over earpieces as shown Push Slide ...

Page 18: ...Powering on Plug magnetic connector into Battery Pack seeBOOST will power on automatically Charge State is shown on other side of Battery Pack Page 17 of 32 ...

Page 19: ...Page 18 of 32 Using the Control Knob 1 of 4 Adjust magnification Increase Magnification Turn Knob Clockwise Decrease Magnification Turn Knob Counterclockwise ...

Page 20: ...ll increase by approximately 1x magnification The first click has a larger jump in magnification Use the lowest magnification comfortable for the task If material is too hard to read at high magnification bring it closer Take breaks if using high magnification for long periods of time ...

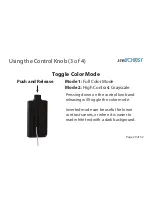
Page 21: ... Pressing down on the control knob and releasing will toggle the color mode Inverted mode can be useful for lower contrast scenes or when it is easier to read white text with a dark background Push and Release Mode 1 Full Color Mode Mode 2 High Contrast Grayscale ...

Page 22: ...Knob 4 of 4 Change Display Brightness Hold down knob while turning Increase brightness Decrease brightness This adjusts the overall screen brightness and light into the eye The last setting is remembered after seeBOOST is powered off ...

Page 23: ...Page 22 of 32 Powering off Do not disconnect by grabbing cable Remove magnetic connector from Battery Pack Use index finger to grab end of connector ...

Page 24: ...Page 23 of 32 Attaching Lanyard to Battery Pack Battery Pack Lanyard Install Lanyard Clip as shown Push through slot Pull clasp through ...

Page 25: ...Page 24 of 32 Removing Lanyard from Battery Pack Squeeze and pull out Squeeze clasp and pull to remove lanyard ...

Page 26: ...Page 25 of 32 Storing in Clamshell Case Place seeBOOST in Clamshell Case as shown Wrap cable gently Magnetic connector will stick to inside of case ...

Page 27: ...ge 26 of 32 seeBOOST requires periodic cleaning for optimal performance Clean regularly with the included microfiber cloth Do not clean with water Do not use excessive force while cleaning Cleaning 1 of 2 ...

Page 28: ... 27 of 32 Cleaning 2 of 2 Microfiber Cloth Gently wipe surfaces shown in light blue using Microfiber Cloth If lenses are very dirty use pre moistened cleaning wipes Lens Cleaning Wipes Front Side Back Side ...

Page 29: ...OOST Do not walk with seeBOOST Do not get seeBOOST wet or submerge in water Do not store in a hot or humid environment seeBOOST is a fragile optical instrument Handle with care Handle seeBOOST from the spectacle frames Do not touch seeBOOST directly Warning ...

Page 30: ...Page 29 of 32 Precautions Do not place seeBOOST upside down while turned on This will impede air flow required to function properly Warning Airflow ...

Page 31: ...ANY VEHICLE OR MACHINARY WHILE USING THE seeBOOST DEVICE WARNING DO NOT WALK WHILE WEARING SEEBOOST Walking or trying to move the user s person while using the seeBOOST device could be potentially dangerous and increase the user s chances of injury caused from a fall Do not attempt to walk or walk while using the seeBOOST device The user should remove the seeBOOST device before attempting to walk ...

Page 32: ...20 200 20 100 20 80 20 63 20 50 20 40 20 32 20 25 20 20 1 2 3 4 5 6 7 8 9 ...

Page 33: ...H LOO WKH YLVLW XV ZKHQ ZH GR QRW OLYH KHUH LOO RX FOLPE XS WR WKDW KLJK KLOO ZLWK PH W QLJKW ZH OLNH WR WDNH ZDONV LQ WKH ZRRGV RX VKRXOG ZDVK RXU VKLUW ZKHQ LW LV GLUW HU ELJ GRJ RIWHQ SOD V ZLWK WZR ROGHU FDWV 7KH KDYH FRPH D ORQJ ZD WR YLVLW RXU FLW H KDV EDNHG WZR ELJ FULVS SLHV ZLWK DSSOHV 7KH FKLOG PDGH D QLFH GUDZLQJ RI RXU KRXVH 7KH ER V ZHUH KLGLQJ XQGHUWKH GHQVH EXVKHV 7KH JDPH ZDV RYHU...

Reviews: