EverFocus EMD990F User Manual Download Page 2


Precautions 

1.


Do not install the camera near electric or magnetic fields.

 Install the camera away from 

TV/radio transmitters, magnets, electric motors, transformers and audio speakers since the 
electromagnetic fields generated from these devices may distort the video image or otherwise 
interfere with camera operation. 

2.


Never disassemble the camera beyond the recommendations in this manual nor introduce 
materials other than those recommended herein. 

Improper disassembly or introduction of 

corrosive materials may result in equipment failure or other damage. 

3.


Try to avoid facing the camera toward the sun

. In some circumstances, direct sunlight may 

cause permanent damage to the sensor and/or internal circuits, as well as creating unbalanced 
illumination beyond the capability of the camera to compensate. 

4.


Keep the power cable away from water and other liquids and never touch the power cord 
with wet hands. 

Touching a wet power cord with your hands or touching the power cord with 

wet hands may result in electric shock.


5.


Never install the camera in areas exposed to oil, gas or solvents. 

Oil, gas or solvents may result 

in equipment failure, electric shock or, in extreme cases, fire.


6.


Cleaning. 

For cameras with interchangeable lenses, do not touch the surface of the sensor 

directly with the hands. Use lens tissue or a cotton tipped applicator and ethanol to clean the 
sensor and the camera lens. Use a damp soft cloth to remove any dirt from the camera body. 
Please do not use complex solvents, corrosive or abrasive agents for cleaning of any part of the 
camera. 

7.


Do not operate the camera beyond the specified temperature, humidity or power source 
ratings.

 This camera is suitable for indoor operation only. Use the camera at temperatures 

within -20°C~50°C (-4°F~122°F) and humidity less than 80%; this device is not rated as 
submersible. The input power source is 12VDC. Be sure to connect the  / - polarity and 
voltage, as incorrect polarity or too high a voltage will likely cause the camera to fail, and such 
damage is not covered by the warranty. 

8.


Mounting.

 Use care in selecting a solid mounting surface which will support the weight of the 

camera plus any wind, snow, ice or other loading, and securely attach the camera to the 
mounting surface using screws and anchors which will properly support the camera. If 
necessary (e.g. when mounting to drop ceilings) use a safety wire to provide additional support 
for the camera. 


Summary of Contents for EMD990F

Page 1: ...lectronics Corp Release Date December 2018 All the images including product pictures or screen shots in this document are for example only The images may vary depending on the product and software ver...

Page 2: ...ts may result in equipment failure electric shock or in extreme cases fire 6 Cleaning For cameras with interchangeable lenses do not touch the surface of the sensor directly with the hands Use lens ti...

Page 3: ...vision reception which can be determined by turning the equipment off and on the user is encouraged to try to correct the interference by one of the following measures Reorient or relocate the receivi...

Page 4: ...tounding image Adopts Sony Starvis CMOS sensor delivering amazing high sensitivity Astounding image quality from the 2 8mm lens Extended IR range up to 10m 33ft with 6 LEDs depends on scene IR reflect...

Page 5: ...camera Drill three holes through the marks on the Installation Sticker and insert the supplied three Anchors Drill another hole within the area of the Installation Sticker only if you want to wire th...

Page 6: ...e using the supplied Hexagon Wrench You can wire the cables from the side of camera or through the surface Please see the image below Wire the Cables from the Side Wire the cables through of the camer...

Page 7: ...wer Pigtail Cable or power adapter Connect the video out cable to the monitor 6 Adjust the camera angle by rotating the camera body After adjusting the camera angle tighten the two screws on both side...

Page 8: ...0 1 2000 1 5000 1 10000 1 50000 X2 X4 X6 X8 X10 X15 X20 X25 X30 Auto AGC 0 15 Sens up Off Auto Sens up X2 X4 X6 X8 X10 X15 X20 X25 X30 Brightness 1 100 50 default D WDR Off On Level 0 8 Auto Defog Off...

Page 9: ...Off On 0123456789ABCDEFGHIJKLMNOPQRSTUVWXYZ _ D effect Freeze Off On Mirror Off Mirror V flip Rotate Neg Image Off On Motion Off On Select Area1 Area2 Area3 Area4 Display On Position Size Off Sensitiv...

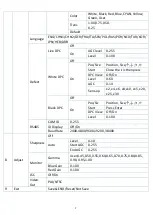
Page 10: ...ress DPC View Off On Level 0 60 AGC 0 14 Sens up x2 x4 x6 x8 x10 x15 x20 x25 x30 Black DPC Off On Pos Siz Position Size Start Press Enter DPC View Off On Level 0 100 RS485 CAM ID 0 255 ID Display Off...

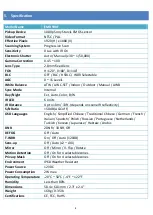
Page 11: ...s IR Distance Up to 10m 33ft depends on scene IR reflectivity S N Ratio 50dB AGC off OSD Languages English Simplified Chinese Traditional Chinese German French Italian Spanish Polish Russian Portugues...

Page 12: ...A 91010 USA TEL 1 626 844 8888 FAX 1 626 844 8838 www everfocus com sales everfocus com Your EverFocus product is designed and manufactured with high quality materials and components which can be recy...

Reviews: