EverFocus EAN Plus Series Quick Installation Manual Download Page 8


EAN Plus Series   


5.


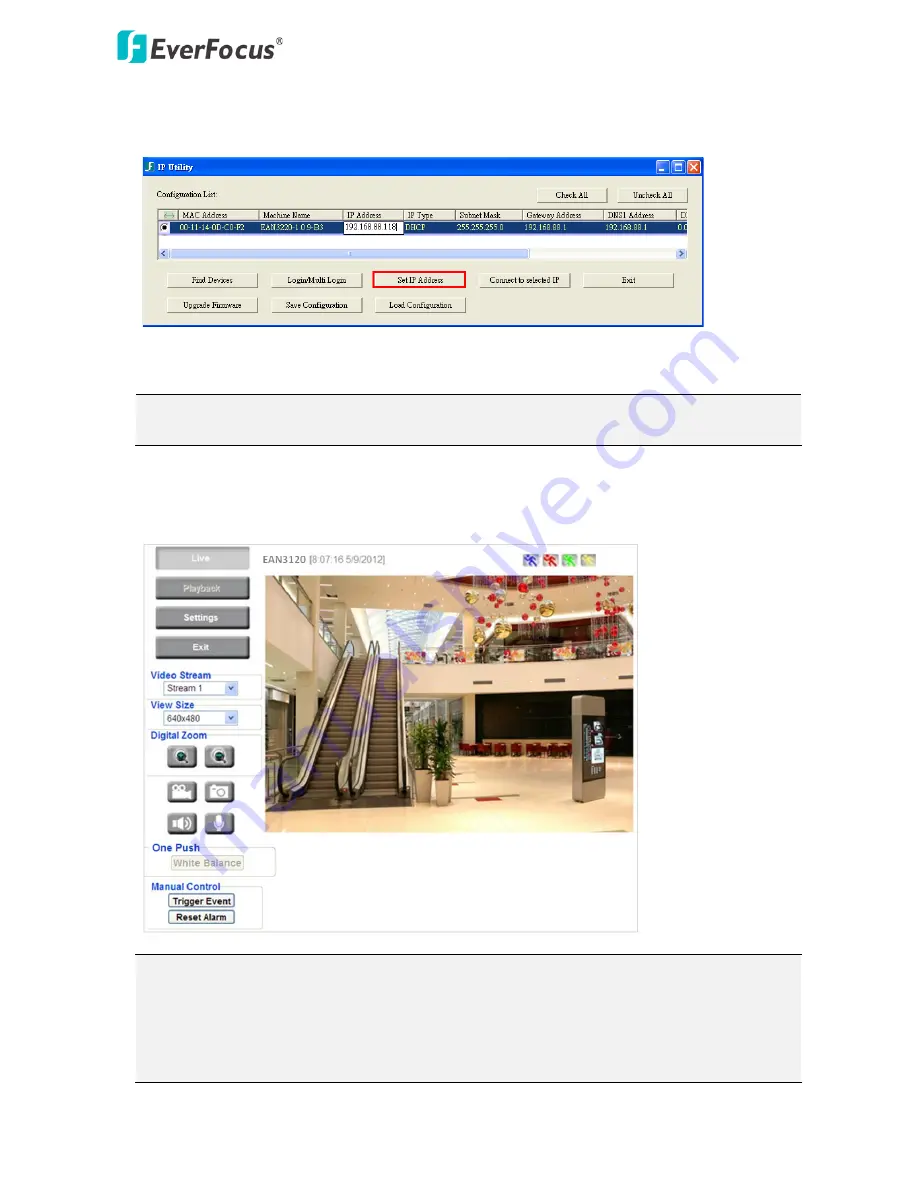
To change the IP address, double-click the IP Address of the camera. Type a new IP address and 
then click 

Set IP Address

 to save the settings. 


You can also change the other settings by double-clicking the values. After configuring the 
values, click 

Save Configuration

Note:

 Most networks uses DHCP to assign IP address, if you are unsure of your network 

settings, please consult your network administrators for configuration details.   

6.


To access the camera, highlight the camera and click 

Connect to Selected IP

. The Internet 

Explorer window pops up.   

7.


Type the user ID and password to log in. The Live View window of the camera appears. 


Note:


1.


You might be required to download 

ActiveX 

for viewing the camera feed. If asked, click 

Yes

2.


To enable Remove Live View, Firmware Upgrade and ActiveX Prompt on Internet Explorer, 
some settings have to be complete. Please refer to 5.2 Settings for Microsoft Internet 
Explorer
 in the User’s Manual.   

Summary of Contents for EAN Plus Series

Page 1: ...EAN Plus Series IP Box Camera Quick Installation Guide Lens not included Copyright EverFocus Electronics Corp Release Date October 2012...

Page 2: ...tes the power is supplied 3 DC 12V Port Connects to power 4 Ethernet PoE Connects to a 10 100 Ethernet or PoE 5 Reset Button Resets all configurations to factory default 6 I O Terminal Block Connects...

Page 3: ...color resolution Software DirectX 9 0c Microsoft Internet Explorer 7 or higher Packing List EAN Plus Series Camera lens not included x 1 Software CD x 1 Quick Installation Guide x 1 Tool Packet x 1 c...

Page 4: ...installing an EAN Plus box IP camera For details please refer to the User s Manual in the software CD 3 1 Lens Installation and Adjustment You can install either a CS mount or a C mount lens into the...

Page 5: ...ng the Focus Zoom Screws 5 Lock the Focus Screw and then remove the ND filter C Mount Lens 1 Remove the cover cap from the camera body 2 Install the lens into the camera body using the supplied C moun...

Page 6: ...ed power pigtail cable to the DC 12V port Using the PoE function and the power will be provided over the network cable 3 Optionally connect the camera to a speaker and microphone Note that microphones...

Page 7: ...g box appears 2 Click Find Devices to search the cameras connected in the LAN The default network values of the cameras will be displayed By default the network protocol of the camera is DHCP 3 To con...

Page 8: ...ings please consult your network administrators for configuration details 6 To access the camera highlight the camera and click Connect to Selected IP The Internet Explorer window pops up 7 Type the u...

Page 9: ...he IP camera on a LAN WAN Internet The camera must be assigned an IP address that is compatible with its LAN By setting up port forwarding on the router you can remotely access the cameras from outsid...

Page 10: ...tion may require that you use DDNS for a reliable connection Please refer to 7 3 2 DDNS in the User s Manual One to One Connection Directly from PC to IP Camera You can connect directly without using...

Page 11: ...the Camera to log in the camera 2 Highlight the camera and then click Upgrade Firmware A browsing window appears 3 Select the firmware file evb and then click Open The IP Utility will automatically u...

Page 12: ...w everfocus co jp info everfocus co jp EverFocus Europe UK Unit 12 Spitfire Business Park Hawker Road Croydon Surrey CR0 4WD UK TEL 44 20 8649 9757 44 845 430 9999 FAX 44 20 8649 9907 www everfocusuk...

Reviews: