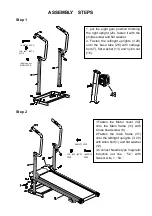
Everfit TFK110 MAG Instruction Download Page 5

ASSEMBLY    STEPS 

Step 1 

7# M8*35  4PCS

13# ¦ µ

8.5*¦ µ

20*1.5

4PCS

16# Nylon nut
M8*8H 4PCS

Step 2 

1# M10*50

2PCS

12# ¦ µ

10.5*¦ µ

22*2.0

2PCS

8# M5*12  4PCS

1.Fasten  the  Motor  cover  (32)
onto  the  Main  frame  (31)  with
Cross head screw (8) .
2.Fasten  the  main  frame  (31)
onto the left/right uprights (3, 20)
with Allen bolt (1) and flat washer
(12).
3.Connect Needle type magnetic
induction  out  line

52

with

Sensor wire 1

54

.

1. put  the  eight  gear  position  trimming
the  right  upright  (20),  fasten  it  with  the
philips screw and flat washer.
2. Fasten  the  left/right  uprights  (3,20)
onto  the  base  tube  (26)  with  carriage
bolt (7), flat washer (13) and nylon nut
(16).

Summary of Contents for TFK110 MAG

Page 1: ...Ed Rev INSTRUCTION 06 20 GRLDEVEFTFKMAG1 01 ...

Page 2: ...EXPLODED DIAGRAM ...

Page 3: ...knob 1 12 Flat washer Φ10 5 Φ22 1 5 2 38 Front roller spacer 2 13 Flat washer Φ8 5 Φ20 1 5 7 39 Rear roller spacer 2 14 Flat washer Φ6 5 Φ15 1 5 2 40 spout plug φ12 5 1 15 Arc washer D6 2 41 spout plug 23 18 12 9 1 16 Nylon nut M8 8H 7 42 Magnet positioning frame 1 17 Nylon nut M6 6H 1 43 Rectangle inner plug for tube 40 20 4 18 L wrench 1 44 Adjustable back foot 2 19 Cross complex wrench 1 45 pla...

Page 4: ...53 Heart rate slice 170mm 2 58 Heart rate slice Sensor wire 460mm 2 54 Sensor wire 1 1380mm 1 59 Ring insert pin 2 55 Sensor wire 2 460mm 1 56 Electronic watch stand 1 57 Adjustment U base 1 ...

Page 5: ...ad screw 8 2 Fasten the main frame 31 onto the left right uprights 3 20 with Allen bolt 1 and flat washer 12 3 Connect Needle type magnetic induction out line 52 with Sensor wire 1 54 1 put the eight gear position trimming the right upright 20 fasten it with the philips screw and flat washer 2 Fasten the left right uprights 3 20 onto the base tube 26 with carriage bolt 7 flat washer 13 and nylon n...

Page 6: ...58 2 Fasten the computer frame 56 onto the left right uprights 3 20 with Allen bolt 4 and arc washer 15 3 Fasten the main frame 31 with locking knob 37 by getting through the left upright 3 1 Fasten the Computer 51 onto the Computer frame 56 with Cross head screw 8 2 Connect Sensor wire 2 55 Heart rate slice Sensor wire 58 with Computer 51 out line ...

Page 7: ...Folding Images Image 1 Image 2 ...

Page 8: ...Running Belt Adjustment Image Add lube oil image ...

Page 9: ... TIME DISTANCE TOTAL DIST and CALORIES in sequence with a change every six seconds TIME Counts upward to 99 59 in one second increments Counts down from preset value SPEED Displays the current speed from zero to 999 9 Mile Hr DISTANCE Displays distance up to 99 99 miles in increments of 0 01 miles Counts down from preset value TOTAL DIST Displays the total accumulated distance you have taken from ...

Page 10: ...GARLANDO SPA Via Regione Piemonte 32 Zona Industriale D1 15068 Pozzolo Formigaro AL Italy www everfit it info everfit it ...

Reviews: