background image

ESM-2850 

28 ESM-2850 User’s Manual


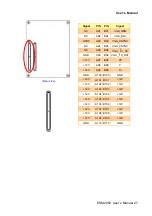
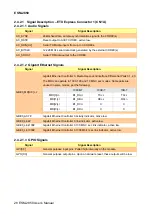
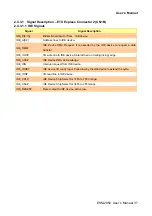
2.4.2.1  Signal Description – ETX Express Connector 1 (CN1A) 

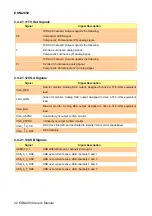
2.4.2.1.1 Audio Signals 

Signal 

Signal Description 

AC_SYNC 

48kHz fixed-rate, sample-synchronization signal to the CODEC(s) 

AC_RST# 

Reset output to AC97 CODEC, active low. 

AC_SDIN[0:2] 

Serial TDM data inputs from up to 3 CODECs. 

AC_BITCLK 

12.228 MHz serial data clock generated by the external CODEC(s) 

AC_SDOUT 

Serial TDM data output to the CODEC. 


2.4.2.1.2  Gigabit Ethernet Signals 

Signal 

Signal Description 

GBE0_MD[0:3] +/- 

Gigabit Ethernet Controller 0: Media Dependent Interface Differential Pairs 0,1,2,3. 

The MDI can operate in 1000, 100 and 10 Mbit / sec modes. Some pairs are 

unused in some modes, per the following: 


1000B-T 

100B-T 

10B-T 

MDI[0]+/- 

B1_DA+/


TX+/- 

TX+/- 

MDI[1]+/


B1_DB+/


RX+/- 

RX+/- 

MDI[2]+/


B1_DC+/


MDI[3]+/


B1_DD+/


GBE0_ACT# 

Gigabit Ethernet Controller 0 activity indicator, active low. 

GBE0_Link# 

Gigabit Ethernet Controller 0 link indicator, active low. 

GBE0_Link100# 

Gigabit Ethernet Controller 0 100 Mbit / sec link indicator, active low. 

GBE0_Lin1000# 

Gigabit Ethernet Controller 0 1000 Mbit / sec link indicator, active low. 


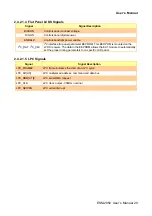
2.4.2.1.3 GPIO Signals 

Signal 

Signal Description 

GPI[0:3] 

General purpose input pins. Pulled high internally on the module. 

GPO[0:3] General 

purpose output pins. Upon a hardware reset, these outputs will be low. 


Summary of Contents for ESM-2850

Page 1: ...Part No 2047285001R ESM 2850 Intel Pentium M Celeron M ETXexpress Module User s Manual 2nd Ed 22 September 2006 ...

Page 2: ...NSTATLLED AND USED IN ACCORDANCE WITH THE INSTRUCTION MANUAL MAY CAUSE HARMFUL INTERFERENCE TO RADIO COMMUNICATIONS OPERATION OF THIS EQUIPMENT IN A RESIDENTIAL AREA IS LIKELY TO CAUSE HARMFUL INTERFERENCE IN WHICH CASE THE USER WILL BE REQUIRED TO CORRECT THE INTERFERENCE AT HIS OWN EXPENSE Notice This guide is designed for experienced users to setup the system within the shortest time For detail...

Page 3: ...echnology Inc As used herein 1 Life support devices or systems are devices or systems which a are intended for surgical implant into body or b support or sustain life and whose failure to perform when properly used in accordance with instructions for use provided in the labeling can be reasonably expected to result in significant injury to the user 2 A critical component is any component of a life...

Page 4: ...ne In addition free technical support is available from Evalue s engineers every business day We are always ready to give advice on application requirements or specific information on the installation and operation of any of our products Please do not hesitate to call or e mail us Headquarters Evalue Technology Inc 7F 228 Lian cheng Road Chung Ho City Taipei Taiwan Tel 886 2 8226 2345 Fax 886 2 82...

Page 5: ...nt materials service time and freight Please consult your dealer for more details If you think you have a defective product follow these steps 1 Collect all the information about the problem encountered For example CPU type and speed Evalue s products model name hardware BIOS revision number other hardware and software used etc Note anything abnormal and list any on screen messages you get when th...

Page 6: ...mory 20 2 3 Jumper and Connector List 22 2 4 Setting Jumpers Connectors 23 2 4 1 CPU Frequency Select Clear CMOS SW1 23 2 4 2 ETX Express Connector 1 CN1A 24 2 4 3 ETX Express Connector 2 CN1B 33 3 BIOS Setup 39 3 1 Starting Setup 40 3 2 Using Setup 41 3 3 Getting Help 42 3 4 In Case of Problems 42 3 5 Main Menu 43 3 5 1 Standard CMOS Features 44 3 5 2 Advanced BIOS Features 46 3 5 3 Advanced Chip...

Page 7: ...tion Checksum Error PLEASE RUN EISA CONFIGURATION UTILITY 78 8 EISA Configuration Is Not Complete PLEASE RUN EISA CONFIGURATION UTILITY 78 9 ERROR ENCOUNTERED INITIALIZING HARD DRIVE 78 10 ERROR INITIALIZING HARD DISK CONTROLLER 78 11 FLOPPY DISK CNTRLR ERROR OR NO CNTRLR PRESENT 78 12 Invalid EISA Configuration PLEASE RUN EISA CONFIGURATION UTILITY 79 13 KEYBOARD ERROR OR NO KEYBOARD PRESENT 79 1...

Page 8: ... reset failed 81 31 Hard Disk s fail 40 HDD controller diagnostics failed 81 32 Hard Disk s fail 20 HDD initialization error 81 33 Hard Disk s fail 10 Unable to recalibrate fixed disk 81 34 Hard Disk s fail 08 Sector Verify failed 81 35 Keyboard is locked out Unlock the key 81 36 Keyboard error or no keyboard present 81 37 Manufacturing POST loop 81 38 BIOS ROM checksum error System halted 81 39 M...

Page 9: ...PU card Modern electronic devices are very sensitive to static electric charges As a safety precaution use a grounding wrist strap at all times Place all electronic components in a static dissipative surface or static shielded bag when they are not in the chassis 1 2 Packing List Before you begin installing your single board please make sure that the following materials have been shipped z 1 x ESM...

Page 10: ... 10 ESM 2850 User s Manual 1 3 Document Amendment History Revision Date By Comment 1st Feb 2006 Vicky Lin Initial Release 2nd Sep 2006 Vicky Lin 1 2 4 2 Signals of CN1A modified 2 2 4 3 Signals of CN1B modified ...

Page 11: ...lly before attempting to interface with ESM 2850 series or change the standard configurations Whilst all the necessary information is available in this manual we would recommend that unless you are confident you contact your supplier for guidance Please be aware that it is possible to create configurations within the CMOS RAM that make booting impossible If this should happen clear the CMOS settin...

Page 12: ... GPI and 4 bit GPO Display Chipset Intel NQ82915GM GMCH integrated Extreme Graphics controller Display Memory Intel DVMT 3 0 supports up to 128 MB video memory Resolution CRT mode 2048 x 1536 32 bpp 85 Hz LCD Simultaneous mode 1600 x 1200 16 bpp 60 Hz Dual Display CRT LVDS LVDS Dual channel 18 bit LVDS TV Out Intel NQ82915GM GMCH integrated TV interface supports HDTV Audio Chipset Intel FW82801FBM...

Page 13: ...Manual 13 1 6 Architecture Overview 1 6 1 Block Diagram The following block diagram shows the architecture and main components of ESM 2850 series The following sections provide detail information about the functions provided onboard ...

Page 14: ...deployment of next generation platforms to maximize competitive advantage while minimizing development risks Intel 915GM chipset adds enhancements for the following areas System Memory PCI Express Based Graphics discrete graphics devices Intel Graphics enhancements DVMT 3 0 support Zone Rendering 2 0 support Quad pixel pipe rendering engine Pixel Shader 2 0 support 4x Faster Setup Engine TV Out Su...

Page 15: ...display is the defining portion of a graphics controller The display converts a set of source images or surfaces combines them and sends them out at the proper timing to an output interface connected to a display device Along the way the data can be converted from one format to another stretched or shrunk and color corrected or gamma converted The GMCH supports two SDVO ports multiplexed with PCI ...

Page 16: ...res Configurable 48 KB deep buffer Descriptor bursting and caching Message signalled interrupts TCP segmentation offload Large send support On chip VLAN insertion and removal TCP IP UDP Checksum offload Interrupt moderation Jumbo Frame support Compliant to 802 3x flow control support IEEE 802 1p and 802 1q support 10 100 1000 IEEE 802 3 compliant Automatic MDI MDIX crossover at all speeds Manageab...

Page 17: ...User s Manual ESM 2850 User s Manual 17 2 Hardware Configuration ...

Page 18: ...ESM 2850 18 ESM 2850 User s Manual 2 1 Product Overview ...

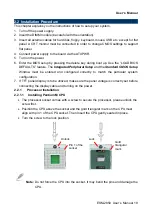
Page 19: ... Integrated Peripheral Setup and the Standard CMOS Setup Window must be entered and configured correctly to match the particular system configuration 7 If TFT panel display is to be utilized make sure the panel voltage is correctly set before connecting the display cable and turning on the power 2 2 1 Processor Installation 2 2 1 1 Installing Pentium M CPU The processor socket comes with a screw t...

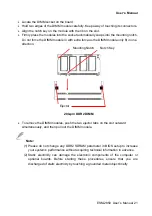
Page 20: ...steps of installing a CPU to change to another one 2 2 2 Main Memory ESM 2850 series provide two 200 pin SODIMM sockets to support DDR2 533 SDRAM The total maximum memory size is 1 GB Make sure to unplug the power supply before adding or removing DIMMs or other system components Failure to do so may cause severe damage to both the board and the components DIMM1 ...

Page 21: ...y fit in one direction To remove the DIMM modules push the two ejector tabs on the slot outward simultaneously and then pull out the DIMM module Note 1 Please do not change any DDR2 SDRAM parameter in BIOS setup to increase your system s performance without acquiring technical information in advance 2 Static electricity can damage the electronic components of the computer or optional boards Before...

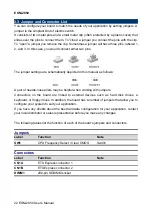
Page 22: ...y depicted in this manual as follows A pair of needle nose pliers may be helpful when working with jumpers Connectors on the board are linked to external devices such as hard disk drives a keyboard or floppy drives In addition the board has a number of jumpers that allow you to configure your system to suit your application If you have any doubts about the best hardware configuration for your appl...

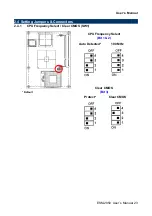
Page 23: ...r s Manual ESM 2850 User s Manual 23 2 4 Setting Jumpers Connectors 2 4 1 CPU Frequency Select Clear CMOS SW1 CPU Frequency Select Bit 1 2 Auto Detected 100 MHz Clear CMOS Bit 3 Default Protect Clear CMOS ...

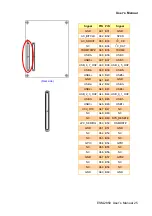
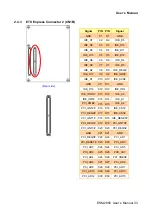
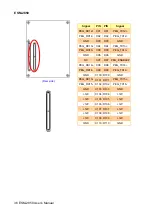
Page 24: ... LPC_DRQ1 GBE0_MD1 A10 B10 LPC_CLK GND A11 B11 GND GBE0_MD0 A12 B12 PWRBTN GBE0_MD0 A13 B13 SMB_CK 2 5V A14 B14 SMB_DTA SUS_S3 A15 B15 SMB_ALERT SATA0_TX A16 B16 SATA1_TX SATA0_TX A17 B17 SATA1_TX SUS_S4 A18 B18 SUS_STAT SATA0_RX A19 B19 SATA1_RX SATA0_RX A20 B20 SATA1_RX GND A21 B21 GND SATA2_TX A22 B22 SATA3_TX SATA2_TX A23 B23 SATA3_TX SUS_S5 A24 B24 PWR_OK SATA2_RX A25 B25 SATA3_RX SATA2_RX A2...

Page 25: ... USB_6_7_OC A38 B38 USB_4_5_OC USB4 A39 B39 USB5 USB4 A40 B40 USB5 GND A41 B41 GND USB2 A42 B42 USB3 USB2 A43 B43 USB3 USB_2_3_OC A44 B44 USB_0_1_OC USB0 A45 B45 USB1 USB0 A46 B46 USB1 VCC_RTC A47 B47 NC NC A48 B48 NC NC A49 B49 SYS_RESET LPC_SERIRQ A50 B50 RSMRST GND A51 B51 GND NC A52 B52 NC NC A53 B53 NC GPI0 A54 B54 GPO1 NC A55 B55 NC NC A56 B56 NC GND A57 B57 GPO2 NC A58 B58 NC NC A59 B59 NC ...

Page 26: ...RX0 GND A70 B70 GND Txout0 A71 B71 E_Txout0 Txout0 A72 B72 E_Txout0 Txout1 A73 B73 E_Txout1 Txout1 A74 B74 E_Txout1 Txout2 A75 B75 E_Txout2 Txout2 A76 B76 E_Txout2 DIGON A77 B77 NC NC A78 B78 NC NC A79 B79 ENBKL GND A80 B80 GND Txclk A81 B81 E_Txclk Txclk A82 B82 E_Txclk I 2 C_CLK A83 B83 BIASON I 2 C_DAT A84 B84 VCC_5V_SBY GPI3 A85 B85 VCC_5V_SBY KBE_RST A86 B86 VCC_5V_SBY KBD_A20GATE A87 B87 VCC...

Page 27: ...VGA_HSYNC NC A94 B94 VGA_VSYNC NC A95 B95 VGA_ I 2 C_CK GND A96 B96 VGA_ I 2 C_DAT 12V A97 B97 Pb 12V A98 B98 Y 12V A99 B99 Pr GND A100 B100 GND 12V A101 B101 12V 12V A102 B102 12V 12V A103 B103 12V 12V A104 B104 12V 12V A105 B105 12V 12V A106 B106 12V 12V A107 B107 12V 12V A108 B108 12V 12V A109 B109 12V GND A110 B110 GND ...

Page 28: ...ndent Interface Differential Pairs 0 1 2 3 The MDI can operate in 1000 100 and 10 Mbit sec modes Some pairs are unused in some modes per the following 1000B T 100B T 10B T MDI 0 B1_DA TX TX MDI 1 B1_DB RX RX MDI 2 B1_DC X X MDI 3 B1_DD X X GBE0_ACT Gigabit Ethernet Controller 0 activity indicator active low GBE0_Link Gigabit Ethernet Controller 0 link indicator active low GBE0_Link100 Gigabit Ethe...

Page 29: ... panel parameter EEPROM This EERPOM is mounted on the LVDS receiver The data in the EEPROM allows the EXT module to automatically set the proper timing parameters for a specific LCD panel 2 4 2 1 5 LPC Signals Signal Signal Description LPC_FRAME LPC frame indicates the start of an LPC cycle LPC_AD 0 3 LPC multiplexed address command and data bus LPC_DRQ 0 1 LPC serial DMA request LPC_CLK LPC clock...

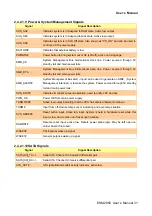
Page 30: ... A20GATE restricts the memory access to the bottom megabyte and is a legacy artifact of the PC AT Pulled low on the module 2 4 2 1 7 PCI Express Signals Signal Signal Description PCIE_TX 0 2 PCI Express Differential Transmit Pair 0 2 PCIE_RX 0 2 PCI Express Differential Receive Pair 0 2 PCIE0_CK_REF Reference clock output for PCI Express lanes 0 7 and for PCI Express Graphics lanes 0 15 2 4 2 1 8 ...

Page 31: ...n be used to generate an SMI System Management Interrupt or to wake the system Power sourced through 5V standby rail and main power rails SUS_STAT Indicates imminent suspend operation used to notify LPC devices PWR_OK Power OK from main power supply THRMTRIP Active low output indicating that the CPU has entered thermal shutdown THRM Input from off module temp sensor indicating and over temp situat...

Page 32: ...drive a 37 5 Ohm equivalent load VGA_GRN Green for monitor Analog DAC output designed to drive a 37 5 Ohm equivalent load VGA_BLU Blue for monitor Analog DAC output designed to drive a 37 5 Ohm equivalent load VGA_HSYNC Horizontal sync output to VGA monitor VGA_VSYNC Vertical sync output to VGA monitor VGA_ I 2 C_CK DDC clock line I2C port dedicated to identify VGA monitor capabilities VGA_ I 2 C_...

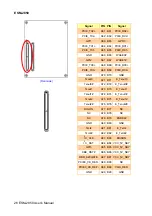
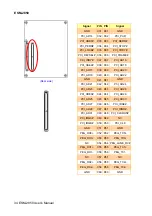
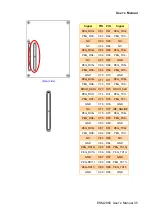
Page 33: ...C10 D10 IDE_ACK GND C11 D11 GND IDE_D14 C12 D12 IDE_IRQ IDE_IORDY C13 D13 IDE_A0 IDE_IOR C14 D14 IDE_A1 PCI_PME C15 D15 IDE_A2 PCI_GNT2 C16 D16 IDE_CS1 PCI_REQ2 C17 D17 IDE_CS3 PCI_GNT1 C18 D18 IDE_RESET PCI_REQ1 C19 D19 PCI_GNT3 PCI_GNT0 C20 D20 PCI_REQ3 GND C21 D21 GND PCI_REQ0 C22 D22 PCI_AD1 PCI_RESET C23 D23 PCI_AD3 PCI_AD0 C24 D24 PCI_AD5 PCI_AD2 C25 D25 PCD_AD7 PCI_AD4 C26 D26 PCI_CBE0 PCI_...

Page 34: ..._AD20 PCI_AD19 C40 D40 PCI_AD22 GND C41 D41 GND PCI_AD21 C42 D42 PCI_AD24 PCI_AD23 C43 D43 PCI_AD26 PCI_CBE3 C44 D44 PCI_AD28 PCI_AD25 C45 D45 PCI_AD30 PCI_AD27 C46 D46 PCI_IRQC PCI_AD29 C47 D47 PCI_IRQD PCI_AD31 C48 D48 PCI_CLKRUN PCI_IRQA C49 D49 NC PCI_IRQB C50 D50 PCI_CLK GND C51 D51 GND PEG_RX0 C52 D52 PEG_TX0 PEG_RX0 C53 D53 PEG_TX0 NC C54 D54 PEG_LANE_RV PEG_RX1 C55 D55 PEG_TX1 PEG_RX1 C56 ...

Page 35: ...TX5 GND C70 D70 GND PEG_RX6 C71 D71 PEG_TX6 PEG_RX6 C72 D72 PEG_TX6 SDVO_DATA C73 D73 SDVO_CLK PEG_RX7 C74 D74 PEG_TX7 PEG_RX7 C75 D75 PEG_TX7 GND C76 D76 GND NC C77 D77 IDE_CBLID PEG_RX8 C78 D78 PEG_TX8 PEG_RX8 C79 D79 PEG_TX8 GND C80 D80 GND PEG_RX9 C81 D81 PEG_TX9 PEG_RX9 C82 D82 PEG_TX9 NC C83 D83 NC GND C84 D84 GND PEG_RX10 C85 D85 PEG_TX10 PEG_RX10 C86 D86 PEG_TX10 GND C87 D87 GND PEG RX11 C...

Page 36: ...4 D94 PEG_TX13 PEG_RX13 C95 D95 PEG_TX13 GND C96 D96 GND NC C97 D97 PEG_ENABLE PEG_RX14 C98 D98 PEG_TX14 PEG_RX14 C99 D99 PEG_TX14 GND C100 D100 GND PEG_RX15 C101 D101 PEG_TX15 PEG_RX15 C102 D102 PEG_TX15 GND C103 D103 GND 12V C104 D104 12V 12V C105 D105 12V 12V C106 D106 12V 12V C107 D107 12V 12V C108 D108 12V 12V C109 D109 12V GND C110 D110 GND ...

Page 37: ...ed by the IDE device to request a data transfer IDE_IOW I O write line to IDE device Data latched on trailing rising edge IDE_ACK IDE Device DMA Acknowledge IDE_IRQ Interrupt request from IDE device IDE_IORDY IDE device I O ready input Pulled low by the IDE device to extend the cycle IDE_IOR I O read line to IDE device IDE_CS1 IDE Device Chip Select for 1F0h to 1FFh range IDE_CS3 IDE Device Chip S...

Page 38: ...parity PCI_SERR System Error SERR can be pulsed active by any PCI device that detects a system error condition PCI_STOP PCI bus STOP control line active low driven by cycle initiator PCI_TRDY PCI bus Target Ready control line active low PCI_FRAME PCI bus Frame control line active low PCI_CLKRUN Bidirectional pin used to support PCI clock run protocol for mobile systems PCI_CLK PCI 33MHz clock outp...

Page 39: ...User s Manual ESM 2850 User s Manual 39 3 BIOS Setup ...

Page 40: ...of two ways By pressing Del immediately after switching the system on or By pressing the Del key when the following message appears briefly at the bottom of the screen during the POST Power On Self Test Press DEL to enter SETUP If the message disappears before you respond and you still wish to enter Setup restart the system to try again by turning it OFF then ON or pressing the RESET button on the...

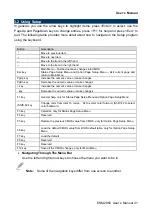
Page 41: ...es PgDn key Decrease the numeric value or make changes key Increase the numeric value or make changes key Decrease the numeric value or make changes F1 key General help only for Status Page Setup Menu and Option Page Setup Menu Shift F2 key Change color from total 16 colors F2 to select color forward Shift F2 to select color backward F3 key Calendar only for Status Page Setup Menu F4 key Reserved ...

Page 42: ...ng and saving system changes with Setup you discover that your computer no longer is able to boot the AwardBIOS supports an override to the CMOS settings which resets your system to its defaults The best advice is to only alter settings which you thoroughly understand To this end we strongly recommend that you avoid making any changes to the chipset defaults These defaults have been carefully chos...

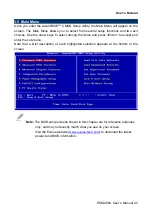
Page 43: ...es Use the arrow keys to select among the items and press Enter to accept and enter the sub menu Note that a brief description of each highlighted selection appears at the bottom of the screen Note The BIOS setup screens shown in this chapter are for reference purposes only and may not exactly match what you see on your screen Visit the Evalue website www evalue tech com to download the latest pro...

Page 44: ...S Set the system time IDE Channel 0 Master IDE Channel 0 Slave IDE Channel 1 Master IDE Channel 1 Slave Options are in 3 5 1 2 Press Enter to enter the sub menu of detailed options Drive A Drive B None 360K 5 25 in 1 2M 5 25 in 720K 3 5 in 1 44M 3 5 in 2 88M 3 5 in Select the type of floppy disk drive installed in your system Video EGA VGA CGA 40 CGA 80 MONO Select the default video device Halt On...

Page 45: ...hows the IDE primary master sub menu Use the following table to configure the hard disk Item Options Description IDE HDD Auto detection Press Enter Press Enter to auto detect the HDD on this channel If detection is successful it fills the remaining fields on this menu IDE Channel 0 Master IDE Channel 0 Slave IDE Channel 1 Master IDE Channel 1 Slave None Auto Manual Selecting manual lets you set th...

Page 46: ...section allows you to configure your system for basic operation You have the opportunity to select the system s default speed boot up sequence keyboard operation shadowing and security 3 5 2 1 CPU Feature This item allows you to setup the CPU thermal management function ...

Page 47: ...hard disk partition table Disabled No warning message will appear when anything attempts to access the boot sector or hard disk partition table 3 5 2 4 CPU L1 L2 L3 Cache The item allows you to speed up memory access However it depends on CPU design Item Description Enabled Enable cache Disabled Disable cache 3 5 2 5 Quick Power On Self Test This category speeds up Power On Self Test POST after yo...

Page 48: ... Gate A20 3 5 2 11 Typematic Rate Setting Key strokes repeat at a rate determined by the keyboard controller When enabled the typematic rate and typematic delay can be selected Item Description Enabled Enable typematic rate delay setting Disabled Disable typematic rate delay setting 3 5 2 12 Typematic Rate Chars Sec Sets the number of times a second to repeat a key stroke when you hold the key dow...

Page 49: ...lect the operating system that is running with greater than 64MB of RAM on the system Item Description Non OS2 Disable OS for over 64 MB DRAM OS2 Enable OS for over 64 MB DRAM 3 5 2 18 Report No FDD For WIN95 The original Windows95 requires the presence of a floppy Unless the BIOS tells it to disregard the absence of the drive it will generate an error message For other operating systems as Win98 ...

Page 50: ...e first chipset settings deal with CPU access to dynamic random access memory DRAM The default timings have been carefully chosen and should only be altered if data is being lost Such a scenario might well occur if your system had mixed speed DRAM chips installed so that greater delays may be required to preserve the integrity of the data held in the slower memory chips 3 5 3 1 DRAM Timing Selecta...

Page 51: ...basically how long after activation can the access cycle be started again This influences row activation time which is taken into account when memory has hit the last column in a specific row or when an entirely different memory location is requested The choices Auto 4 5 6 7 8 9 10 11 12 13 14 15 3 5 3 6 System Memory Frequency This item is to determine the maximum performance and reliability of m...

Page 52: ...CI E Compliancy Mode v1 0a v1 0 Allows to select the PCI E Compliancy mode 3 5 3 11 PEG Onchip VGA Control This item is enabled to set the device of Onchip VGA or PCI Express X16 the system used The choices Onchip VGA PEG Port Auto 3 5 3 12 PEG Force X1 This item is used to set PCI Express X16 slot to PCI Express X1slot This item will be shown and modified when you use PCI Express X16 device or On...

Page 53: ...User s Manual ESM 2850 User s Manual 53 3 5 3 15 DVMT FIXED Memory Size This item allows to select DVMT FIXED memory size The choices 64MB 128MB ...

Page 54: ... Use this menu to specify your settings for integrated peripherals 3 5 4 1 OnChip IDE Device The chipset contains a PCI IDE interface with support for two IDE channels Select Enabled to activate the primary IDE interface Select Disabled to deactivate this interface ...

Page 55: ...e 1 Mode 2 Mode 3 Mode 4 The IDE PIO Programmed Input Output fields let you set a PIO mode 0 4 for each of the four IDE devices that the onboard IDE interface supports Modes 0 through 4 provide successively increased performance In Auto mode the system automatically determines the best mode for each device IDE Primary Master UDMA IDE Primary Slave UDMA IDE Secondary Master UDMA IDE Secondary Slave...

Page 56: ... USB Controller USB 2 0 Controller Disabled Enabled This item allows you to set the USB 2 0 Controller USB Keyboard Support Enabled Disabled This item allows you to set the system s USB keyboard to Enabled Disabled AC97 Audio Auto Disabled This item allows you to decide to Auto disable the Codec chip to support AC97 Audio 3 5 4 3 Super IO Device ...

Page 57: ...Delay UR2 Duplex Mode Half Full Select the value required by the IR device connected to the IR port Full duplex mode permits simultaneous two direction transmission Half duplex mode permits transmission in one direction only at a time Use IR Pins RxD2 TxD2 IR Rx2Tx2 This item allows you to determine the pin definition Onboard Parallel Port Disabled 378 IRQ7 278 IRQ5 3BC IRQ7 Select a matching addr...

Page 58: ...S if resumed from S3 state This is only necessary for older VGA drivers select Auto if in doubt The choices Auto Yes No 3 5 5 4 Power Management This category allows you to select the type or degree of power saving and is directly related to the following modes 3 5 5 4 1 HDD Power Down There are three selections for Power Management Option both of them have fixed mode settings Item Description Min...

Page 59: ...ode settings The choices Disabled 1 2 3 4 5 6 7 8 9 10 11 12 13 14 15 Min 3 5 5 11 Soft Off by PWR BTTN Pressing the power button for more than 4 seconds forces the system to enter the Soft Off state when the system has hung Only could working on ATX Power supply The choices Delay 4 Sec Instant Off 3 5 5 12 Wake Up by PCI LAN This will enable the system to wake up through PCI LAN peripheral The ch...

Page 60: ... 17 FDD COM LPT Port System can be awaked by Floppy Drive COM or LPT port The choices Enabled Disabled 3 5 5 18 PCI PIRQ A D This function will cause the system waking up completely from the power management mode The choices Enabled Disabled ...

Page 61: ...board PCI Ex 3 5 6 2 Reset Configuration Data Normally you leave this field Disabled Select Enabled to reset Extended System Configuration Data ESCD when you exit Setup if you have installed a new add on and the system reconfiguration has caused such a serious conflict that the operating system cannot boot The choices Enabled Disabled 3 5 6 3 Resources Controlled By The Award Plug and Play BIOS ha...

Page 62: ...A bus architecture The choices PCI Device Reserved 3 5 6 5 PCI VGA Palette Snoop Leave this field at Disabled The choices Enabled Disabled 3 5 6 6 INT Pin 1 2 3 4 5 6 7 8 Assignment This item is used to name the interrupt request IRQ line assigned to a device connected to the PCI interface on the system The choices Auto 3 4 5 7 9 10 11 12 14 15 3 5 6 7 Maximum Payload Size This item allows to set ...

Page 63: ...or the most stable minimal performance system operations 3 5 9 Load Optimized Defaults Use this menu to load the BIOS default values that are factory settings for optimal performance system operations While Award has designed the custom BIOS to maximize performance the factory has the right to change these defaults to meet their needs Press Y to load the default values setting for optimal performa...

Page 64: ...p to eight characters in length and press Enter The password typed now will clear any previously entered password from CMOS memory You will be asked to confirm the password Type the password again and press Enter You may also press Esc to abort the selection and not enter a password To disable a password just press Enter when you are prompted to enter the password A message will confirm the passwo...

Page 65: ...rmine when the password is required within the BIOS Features Setup Menu and its Security option see Section 3 If the Security option is set to System the password will be required both at boot and at entry to Setup If set to Setup prompting only occurs when trying to enter Setup 3 5 11 Save Exit Setup Save CMOS value changes to CMOS and exit setup Enter Y to store the selection made in the menus i...

Page 66: ...ESM 2850 66 ESM 2850 User s Manual 3 5 12 Exit Without Save Abandon all CMOS value changes and exit setup and the system is restarted after exiting ...

Page 67: ...ser s Manual ESM 2850 User s Manual 67 4 Drivers Installation Note Installation procedures and screen shots in this section are for your reference and may not be exactly the same as shown on your screen ...

Page 68: ...te Index htm and choose the product from the menu left or link to Driver_Chipset Intel 915GM Note The installation procedures and screen shots in this section are based on Windows XP operation system Step 3 Click Yes to accept the agreement Step1 Locate Driver_Chipset Intel 915GM infinst_autol exe Step 4 Click Next to complete setup Step 2 Click Next Step 4 Click Finish to complete setup and reboo...

Page 69: ... If not locate Index htm and choose the product from the menu left or link to Driver_Video Intel 82915GM Note The installation procedures and screen shots in this section are based on Windows XP operation system Step 3 Click Next Step 1 Locate Driver_Video Intel 82915GM win2k_xp1415 exe Step 4 Click Yes to accept the agreement Step 2 Click Next Step 5 Click Finish to complete setup and reboot the ...

Page 70: ...se the product from the menu left or link to Driver_Audio VIA VT1616 Note The installation procedures and screen shots in this section are based on Windows XP operation system Step 3 Select Install Driver and click Next to the following step Step 1 Locate Driver_Audio VIA VT1616 A1u590b setup exe Step 4 Click Continue Anyway to run the setup Step 2 Click Next Step 5 Click Finish to complete the se...

Page 71: ...d choose the product from the menu left or link to Driver_Gigabit Marvell 88E8053 Note The installation procedures and screen shots in this section are based on Windows XP operation system Step 3 Double click Ethernet Controller Step 1 Click Start of the task bar then the System of Performance and Maintenance in Control Panel Step 4 Click Update Driver Step 2 Click Device Manager of Hardware Step ...

Page 72: ...ser s Manual Step 6 Select the specific location to Next Step 9 Repeat the Step 1 Step 3 to confirm the Generic Marvell is ready Step 7 The wizard runs the setup automatically Step 8 Click Finish to complete the installation ...

Page 73: ...User s Manual ESM 2850 User s Manual 73 5 Measurement Drawing ...

Page 74: ...ESM 2850 74 ESM 2850 User s Manual Unit mm ...

Page 75: ...User s Manual ESM 2850 User s Manual 75 Appendix A BIOS Revisions BIOS Rev New Features Bugs Problems Solved Known Problems ...

Page 76: ...ESM 2850 76 ESM 2850 User s Manual Appendix B AWARD BIOS POST Messages ...

Page 77: ... during the POST This list includes messages for both the ISA and the EISA BIOS 1 CMOS BATTERY HAS FAILED CMOS battery is no longer functional It should be replaced 2 CMOS CHECKSUM ERROR Checksum of CMOS is incorrect This can indicate that CMOS has become corrupt This error may have been caused by a weak battery Check the battery and replace if necessary 3 DISK BOOT FAILURE INSERT SYSTEM DISK AND ...

Page 78: ...e slot 8 EISA Configuration Is Not Complete PLEASE RUN EISA CONFIGURATION UTILITY The slot configuration information stored in the EISA non volatile memory is incomplete Note When either of these errors appears the system will boot in ISA mode which allows you to run the EISA Configuration Utility 9 ERROR ENCOUNTERED INITIALIZING HARD DRIVE Hard drive cannot be initialized Be sure the adapter is i...

Page 79: ... can use this location along with the memory map for your system to find and replace the bad memory chips 15 Memory parity Error at Indicates a memory parity error at a specific location You can use this location along with the memory map for your system to find and replace the bad memory chips 16 MEMORY SIZE HAS CHANGED SINCE LAST BOOT Memory has been added or removed since the last boot In EISA ...

Page 80: ...en either of these errors appears the system will boot in ISA mode which allows you to run the EISA Configuration Utility 24 Should Have EISA Board But Not Found PLEASE RUN EISA CONFIGURATION UTILITY The board installed is not responding to the ID request or no board ID has been found in the indicated slot Note When either of these errors appears the system will boot in ISA mode which allows you t...

Page 81: ...ialization error 33 Hard Disk s fail 10 Unable to recalibrate fixed disk 34 Hard Disk s fail 08 Sector Verify failed 35 Keyboard is locked out Unlock the key BIOS detect the keyboard is locked P17 of keyboard controller is pulled low 36 Keyboard error or no keyboard present Cannot initialize the keyboard Make sure the keyboard is attached correctly and no keys are being pressed during the boot 37 ...

Page 82: ...ry refresh function is working properly C1 Memory Presence First block memory detect OEM Specific Test to size on board memory Early chip set initialization Memory presence test OEM chip set routines clear low 64K of memory Test first 64K memory C2 Early Memory Initialization OEM Specific Board Initialization C3 Extend Memory DRAM select OEM Specific Turn on extended memory Initialization Cyrix CP...

Page 83: ... Check Check Cmos Circuitry and reset CMOS 13 Reserved 14 Chipset Default load Program the chipset registers with CMOS values 15 Reserved 16 Clock Init Init onboard clock generator 17 Reserved 18 Identify the CPU Check the CPU ID and init L1 L2 cache 19 Reserved 1A Reserved 1B Setup Interrupt Vector Table Initialize first 120 interrupt vectors with SPURIOUS_INT_HDLR and initialize INT 00h 1Fh acco...

Page 84: ...erved 2F Reserved 30 Reserved 31 Reserved 32 Reserved 33 PS2 Mouse setup Setup PS2 Mouse and reset KB 34 Reserved 35 Test DMA Controller 0 Test DMA Controller 0 36 Reserved 37 Test DMA Controller 1 Test DMA Controller 1 38 Reserved 39 Test DMA Page Registers Test DMA Page Registers 3A Reserved 3B Reserved 3C Test Timer Counter 2 Test 8254 Timer 0 Counter 2 3D Reserved 3E Test 8259 1 Mask Bits Veri...

Page 85: ...d 4E Test Base and Extended Memory Test base memory from 256K to 640K and extended memory above 1MB using various patterns NOTE This test is skipped in EISA mode and can be skipped with ESC key in ISA mode 4F Reserved 50 USB init Initialize USB controller 51 Reserved 52 Memory Test Test all memory of memory above 1MB using Virtual 8086 mode page mode and clear the memory 53 Reserved 54 Reserved 55...

Page 86: ...up Entering Enter setup check and auto configuration check up 6C Reserved 6D Initialize Floppy Drive Controller Initialize floppy disk drive controller and any drives 6E Reserved 6F FDD install Install FDD and setup BIOS data area parameters 70 Reserved 71 Reserved 72 Reserved 73 Initialize Hard Drive Controller Initialize hard drive controller and any drives 74 Reserved 75 Install HDD IDE device ...

Page 87: ...itialize Option ROMs Initialize any option ROMs present from C8000h to EFFFFh NOTE When FSCAN option is enabled ROMs initialize from C8000h to F7FFFh 86 Reserved 87 Reserved 88 Reserved 89 Reserved 8A Reserved 8B Reserved 8C Reserved 8D Reserved 8E Reserved 8F Reserved 90 Reserved 91 Reserved 92 Reserved 93 Boot Medium detection Read and store boot partition head and cylinders values in RAM 94 Fin...

Page 88: ...t Verifies CMOS is working correctly detects bad battery If failed load CMOS defaults and load into chipset Final Initial KBC and setup BIOS data area 68 Video Init Read CMOS location 14h to find out type of video in use Detect and Initialize Video Adapter Test video memory write sign on message to screen Setup shadow RAM Enable shadow according to Setup 69 8259 Init Init 8259 channel 1 and mask I...

Page 89: ... Display POST error Check POST error and display them and ask for user intervention Ask password security optional 78 CMOS and Option ROM Init Write all CMOS values back to RAM and clear screen Enable parity checker Enable NMI Enable cache before boot Initialize any option ROMs present from C8000h to EFFFFh NOTE When FSCAN option is enabled ROMs initialize from C8000h to F7FFFh 79 Reserved 7A Rese...

Page 90: ...rrectly detects bad battery If failed load CMOS defaults and load into chipset 60 KBC final Init Final Initial KBC and setup BIOS data area 61 Initialize Video Interface Read CMOS location 14h to find out type of video in use Detect and Initialize Video Adapter 62 Video memory test Test video memory write sign on Test video memory write sign on message to screen Setup shadow RAM Enable shadow acco...

Page 91: ...memory test Clear base memory area 0000 0000 9000 ffffh 5 KB init Initialized KBC 12 Install interrupt vectors Install int vector 0 77 and initialized 00 1fh to their proper place 0D Init Video Video initializing 41 Init FDD Scan floppy and media capacity for onboard superIO FF Boot Load boot sector ...

Reviews: