EUROM XVT-16 Instruction Manual Download Page 22


22 


Thanks 

Thank  you  very  much  for  choosing  for  a  EUROM  product.  You  have  made  a  good 
choice! We hope you will be satisfied about its functioning. 
To  get  maximum  profit  from  your  product,  it  is  important  to  read  this  manual 
attentive and totally before use, and to understand what is written. Read especially 
the safety instructions: they are there to protect you and your environment.  
Keep the manual in a safe place for future reference. Store also the package: that 
is  the  best  protection  for  your  heater  in  times  of  no-use.  And  if  you  at  any  time 
pass the appliance on, pass on the manual and package too. 
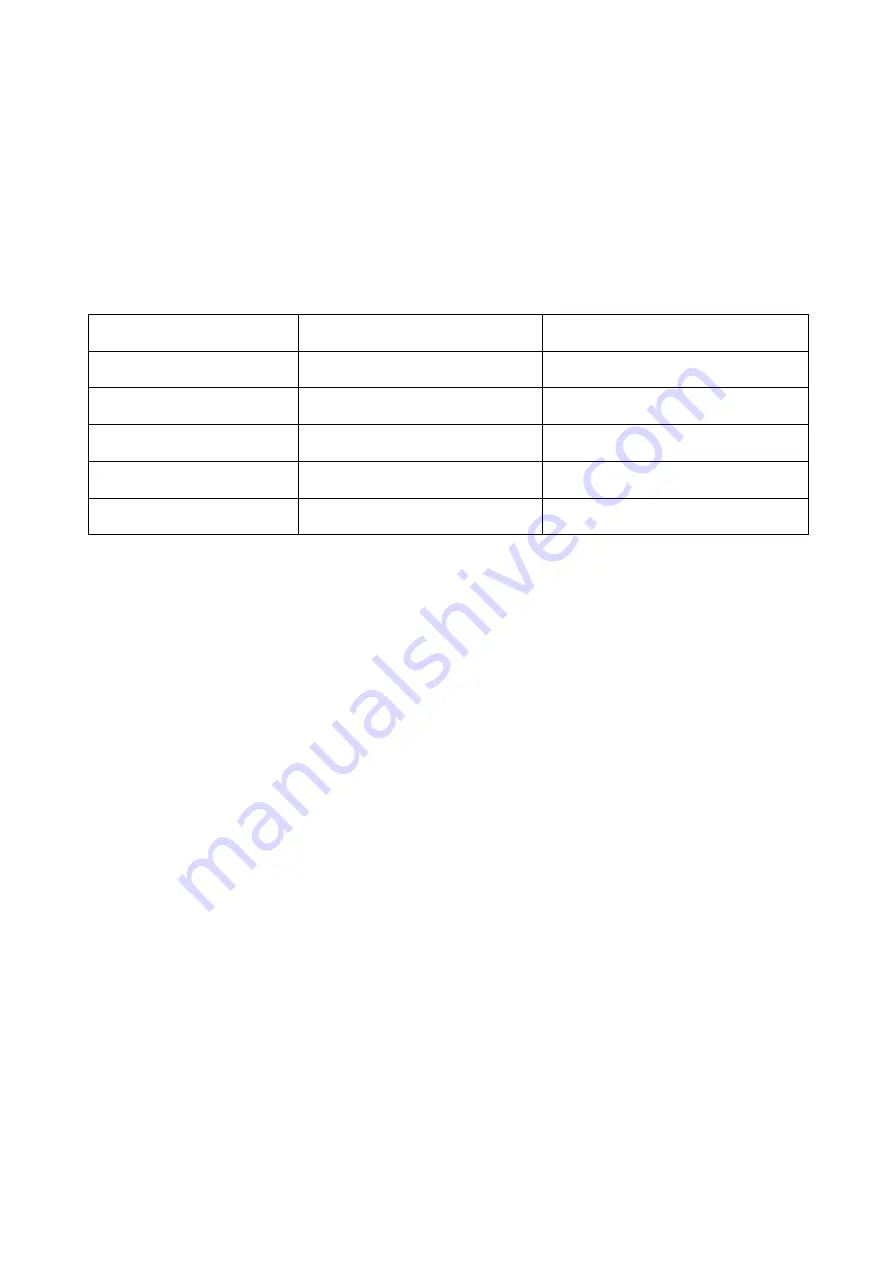
 

Model 

XVT-16 

XVT-16S 

Connected power 

220-240V~50Hz 

220-240V~50Hz 

Output capacity 

60W 

60W 

Ø blades 

16” 

16” 

Weight  

2,9 kg 

6,2 kg 

Dimensions  

33 x 45x 60 cm 

43 x 45 x 149 cm 


General safety guidelines 


This device is only to be used indoors. 


Before  using  the  fan,  assemble  it  completely.  Always  keep  the  plug 

out of the socket when assembling/dissembling. 


This  device  should  only  be  used  for  the  purposes  (ventilating  a 

domestic space) and in the way as set out in the booklet. Any other 

usage  may  be  dangerous  (could  cause  fire,  injury,  damage,  electric 

shock etc.), will invalidate the guarantee  


Check fan, plug and cable for damage before use Do not turn on the 

appliance  if  you  have  discovered  damage  to  the  appliance,  cord  or 

plug,  if  the  appliance  is  malfunctioning,  if  it  has  been  dropped  or  if 

there  are  signs  of  any  other  defect.  Return  the  complete  product  to 

the  vendor  or  to  a  certified  electrician  for  inspection  and/or  repair. 

Always ask for original parts. The appliance (incl. cord and plug) may 

only be opened and/or repaired by properly authorised and qualified 

persons. 


If you hear strange noises, smell something or see smoke, switch off 

the fan immediately and remove the plug from the socket. 


Before  every  use,  check  that  the  voltage  on  the  socket  to  be  used 

matches  the  voltage  indicated  on  the  device’s  specification  plate: 

220/240V~50Hz.  


Avoid  the  use  of  extension  cables.  If  unavoidable,  use  an  approved 

cable with sufficient power. Completely unroll the cable. 

Summary of Contents for XVT-16

Page 1: ...Gebruiksaanwijzing 2 Bedienungsanleitung 12 Instruction manual 22 Livret d instructions 31 XVT 16 XVT 16S Art nr 38 487 1 Art nr 38 488 8 Ventilatoren L fter Fans Ventilateurs 09 01 2019...

Page 2: ...voorschriften 3 Samenstelling en montage 5 Onderdelentekening XVT 16 5 Samenstelling XVT 16 6 Onderdelentekening XVT 16S 7 Samenstelling XVT 16S 7 Werking XVT 16 8 Werking XVT 16S 8 Schoonmaak en onde...

Page 3: ...en van een huishoudelijk ruimte en op de wijze zoals in dit boekje beschreven Elk ander gebruik kan gevaarlijk zijn en kan brand verwondingen schade elektrische schok enz veroorzaken en doet de garant...

Page 4: ...paraat niet in een open raam i v m regen niet op natte oppervlakken en voorkom dat er vocht op wordt gemorst Hang niets over of aan de ventilator en gebruik hem niet in de nabijheid van gordijnen kled...

Page 5: ...gens of gebrek aan ervaring en kennis als ze toezicht hebben gekregen of instructies over het gebruik van het apparaat op een veilige manier en begrijpen de gevaren die ermee gepaard gaan Kinderen mog...

Page 6: ...an het motorhuis met de draaggreep op het beschermrooster naar boven gericht Zorg ervoor dat de positioneerpennen op het motorhuis correct in de sleuven van het beschermrooster zijn geplaatst Stap 8 D...

Page 7: ...abel met snoer 19 Schroef met kunststof handgreep Samenstelling XVT 16S Stap 1 Verwijder het verpakkingsmateriaal en houd het buiten bereik van kinderen Stap 2 Controleer voordat u verder gaat of de s...

Page 8: ...ten en de Ledverlichting gaat branden Druk indien gewenst de oscillatie zwenk knop 6 in de ventilator zal nu in een hoek van 45 gaan zwenken Door deze knop weer uit te trekken schakelt u de oscillatie...

Page 9: ...m de stekker uit het stopcontact wanneer u hem wilt reinigen of onderhoud wilt uitvoeren De ventilator vraag alleen wat algemeen uitwendig onderhoud Stof hem regelmatig af met een zachte doek of plume...

Page 10: ...llen Verwijdering Binnen de EU betekent dit symbool dat dit product niet met het normale huishoudelijke afval mag worden afgevoerd Afgedankte apparaten bevatten waardevolle materialen die hergebruikt...

Page 11: ...eitsvorschriften 12 Zusammensetzung und Montage 15 Teilezeichnung XVT 16 15 Montage XVT 16 15 Teilezeichnung XVT 16S 16 Montage XVT 16S 17 Betrieb XVT 16 17 Betreib XVT 16S 18 Reinigung und wartung 19...

Page 12: ...ontieren Sie den L fter zuerst vollst ndig bevor Sie ihn verwenden Ziehen Sie bei der Montage Demontage immer den Stecker aus der Steckdose Verwenden Sie dieses Ger t ausschlie lich f r den in dieser...

Page 13: ...gt Dieses Ger t ist nicht geeignet f r die Anwendung in nassen oder feuchten R umen wie Badezimmern Waschr umen usw Stellen Sie das Ger t nicht in der N he von Wasserh hnen Badewannen Duschen Schwimmb...

Page 14: ...n R umen Den Ventilator vor dem Umsetzen Reinigung oder Wartung erst ausschalten und den Stecker aus der Steckdose ziehen Tun Sie dies auch wenn der Ventilator nicht verwendet wird Nehmen Sie den Stec...

Page 15: ...e St nder F hren Sie das Stromkabel mit Stecker durch die ffnung im Kunststofffu und befestigen Sie mit den drei mitgelieferten Schrauben den Kunststofffu Schritt 4 F hren Sie das Stromkabel durch die...

Page 16: ...Kunststoffschraubkappe Ventilatorfl gelbefestigung entgegen dem Uhrzeigersinn fest auf die Motorwelle um den Ventilatorfl gel zu sichern Schritt 12 Kontrollieren Sie ob sich der Ventilatorfl gel einw...

Page 17: ...ewichtsfu mit einer runden Scheibe fest am St nderrohr montieren Schritt 6 Das Motorgeh use inclusive Displaygeh use auf den montierten Fu mit St nderrohr platzieren und mit der Schraube mit Kunststof...

Page 18: ...den Display leuchten f r alle Funktionen die dazu geh rigen Leuchten auf Schalttafel Wahlm glichkeiten Fernbedienung sind identisch Funktion Beschreibung ON OFF Ein Ausschalten Wenn man auf den ON OF...

Page 19: ...ngeschaltet ist Ist der Stecker gut in die Steckdose eingesteckt F hrt die Steckdose Strom Ist der Schaltknopf I II oder III eingeschaltet Wird der Fl gel irgendwo blockiert z B durch eine Besch digun...

Page 20: ...die nachstehend angef hrten Anforderungen erf llen XVT 16 XVT 16S LVD 2014 35 EU LVD 2014 35 EU EN 60335 2 80 2003 A1 2004 A2 2009 EN 60335 2 80 2003 A2 2009 EN 60335 1 2012 A11 2014 EN 60335 1 2012 A...

Page 21: ...Putting together and assembling 24 Assembling the XVT 16 24 Drawing of the parts of XVT 16S 25 Assembling XVT 16S 26 Operating the XVT 16 26 Operating the XVT 16S 27 Cleaning and maintenance 28 Proble...

Page 22: ...mbling dissembling This device should only be used for the purposes ventilating a domestic space and in the way as set out in the booklet Any other usage may be dangerous could cause fire injury damag...

Page 23: ...things and other materials do not come into the vicinity of the fan Watch out that long hair is not sucked into the fan Keep the suction and extraction grill clean and free from dust and make sure tha...

Page 24: ...g Drawing of the parts of XVT 16 1 Fan blade 2 Motor axle 3 Lock for the protective grill 4 Plastic base 5 Rear protective grill 6 Oscillation swivel knob 7 Motor housing 8 Tilt support plate 9 Tilt a...

Page 25: ...e grill firmly clockwise onto the screw thread of the motor housing Step 9 Remove the PVC sleeve of the motor axle Step 10 Place the fan blade onto the motor axle Important Make sure that the pins of...

Page 26: ...ipe using the L screw Step 6 Place the motor housing including the display housing onto the support pipe attached to the assembled base and secure it with the screw with the plastic handgrip For mount...

Page 27: ...Controlpanel choice options in the remote controle are identical Function Description ON OFF On Off switch When pressing ON OFF the fan starts at the lowest speed Speed Setting the fan speed low L me...

Page 28: ...the socket Is the blade blocked e g by damage a deformity on the grille or a foreign object There is strange noise when starting Check to ensure the blades are placed as far over the motor axle as pos...

Page 29: ...orrespond to the following norms XVT 16 XVT 16S LVD 2014 35 EU LVD 2014 35 EU EN 60335 2 80 2003 A1 2004 A2 2009 EN 60335 2 80 2003 A2 2009 EN 60335 1 2012 A11 2014 EN 60335 1 2012 A11 2014 EN 62233 2...

Page 30: ...de s curit importantes 31 Assemblage et montage 34 Sch ma des composants XVT 16 34 Assemblage XVT 16 34 Sch ma des composants XVT 16S 35 Assemblage XVT 16S 36 Fonctionnement XVT 16 36 Fonctionnement X...

Page 31: ...5 x 149 cm Consignes de s curit importantes Cet appareil est destin uniquement une utilisation l int rieur Assemblez d abord enti rement le ventilateur avant de l utiliser Retirez toujours la fiche de...

Page 32: ...isse p n trer dans l appareil Si l appareil tombe n anmoins dans l eau retirez d abord la fiche de la prise de courant N utilisez plus un appareil si ses composants internes sont humides mais portez l...

Page 33: ...jours enlever la fiche de la prise apr s utilisation Cet appareil ne doit pas tre utilis par des enfants ou des personnes souffrant d une limitation physique sensorielle ou mentale ou manquant l exp r...

Page 34: ...ique sur le bloc moteur y compris le support Passez le cordon lectrique avec fiche par l ouverture dans le pied en plastique que vous fixez avec les trois vis fournies tape 4 Passez le cordon lectriqu...

Page 35: ...n filet en plastique fixation de pale de ventilateur dans le sens antihoraire sur l axe du moteur pour bloquer la pale de ventilateur tape 12 Contr lez si la pale de ventilateur tourne correctement ta...

Page 36: ...de la hauteur en le serrant tape 5 Avec la vis L montez le pied lest avec une disque rond fermement sur le tube de support tape 6 Placez le bloc moteur y compris le bo tier d cran sur le pied mont av...

Page 37: ...utes les fonctions les t moins correspondants s allument sur l cran Panneau de commande les options sur la t l commande sont identiques Fonction Description ON OFF Allumer teindre En appuyant sur la t...

Page 38: ...nt Les ailettes ne sont ils pas bloqu es ou endommag es quelque part par une d formation de la grille de protection ou par un corps tranger Le d marrage s accompagne d un bruit anormal V rifiez que le...

Page 39: ...ective EMC et r pondent aux normes suivantes XVT 16 XVT 16S LVD 2014 35 EU LVD 2014 35 EU EN 60335 2 80 2003 A1 2004 A2 2009 EN 60335 2 80 2003 A2 2009 EN 60335 1 2012 A11 2014 EN 60335 1 2012 A11 201...

Page 40: ...40 EUROM Kokosstraat 20 8281 JC Genemuiden NL info eurom nl www eurom nl...

Reviews: