background image

- 21 - 


  The  entire gas  system, hose  regulator,  pilot  light  and  burner must  be  checked  before  use,  after the 

gas bottle has been changed and afterwards at least once each month. 

All checks for leaks must 

be  carried  out  with  a  soapy  solution;  never  with  a  naked  flame!

  Never  use  the  heater  until  all 

connections and leaks have been checked. Do not smoke when carrying out these checks. 

  Shut the valve on the gas bottle if you smell gas. Gas is flammable, explosive and heavier than air; it 

will therefore remain low. In its natural state, propane gas does not smell; an odour, which smells like 
rotten cabbage, has however been added for your safety. 

  Never move the patio heater while it is on. Shut the gas bottle and allow the patio heater to cool down 

before moving the device. 

  If the patio heater is not being used, shut the gas bottle and switch the device to OFF. 

  Regularly check whether the connections on the gas regulator are suitable and in good condition. 

  The  operating  panel,  burner  and  the  air  passage  must  be  cleaned  regularly.  Ensure  that  all  of  the 

components removed for cleaning are replaced again afterwards! 

  Do not paint the flame screen, operating panel or reflector cap. 

  Make  sure  that  the  gas  regulator  and  hose  are  always  situated  in  a  location  where  they  cannot  be 

damaged and where nobody can trip over them. 

  Use the heater for its intended purpose only, i.e. heating a patio or a similar location. It is not intended 

to be used to heat halls, greenhouses, bars or similar or for drying textiles or other damp objects.  

  Keep flammable materials out of the vicinity of the heater. 

  The patio heater can produce intense heat. Never expose people (particularly children or the elderly) 

to the direct heat of the patio heater. Be careful to avoid burns or clothing damage! 

  Gas can cause injuries as a result of freezing if it comes into contact with exposed skin. 

  Children,  less  able  people,  pets  etc  must  be  monitored  closely  when  they  are  in  the  vicinity  of  the 

patio heater. 

  If there are high winds, measures must be taken to avoid the heater being blown over. 

  Switch  off  the  patio  heater  immediately  and  check  it  or  have  it  checked  in  the  event  of  any  of  the 

following: 

  If the heater fails to get sufficiently hot. 

  If the burner makes popping noises when in use (a slight noise when going out is normal). 

  If the flames are extremely yellow and you can smell gas. 


Summary of Contents for THG14000

Page 1: ...n Manual Manual d instructions Art Nr THG14000 32 402 0 Art Nr THG14000RVS 32 405 1 THG14000 RVS terrasstraler op gas THG14000 Edelstahl Gas Terrassenheizstrahler THG14000 Stainless steel Gas powered...

Page 2: ...huis en in ruimten die tijdens het gebruik goed geventileerd worden Niet voor gebruik in caravans campers boten enz Een goed geventileerde ruimte is wanneer 25 van het oppervlak van de wanden open is...

Page 3: ...gasdrukregelaar passend en in goede conditie zijn Bedieningspaneel brander en de luchtcirculatiegang moeten regelmatig worden gereinigd Zorg er wel voor alle voor de reiniging verwijderde beveiliging...

Page 4: ...bruik buitenshuis Warmteafgifte via reflecterende kap Aansluitingen op gastoevoer voorzien van wartelmoeren Gasflescontainer standaard bedieningspaneel brander en vlammenscherm van powdercoating plaat...

Page 5: ...bouten M6 x 35mm met moeren om de standaard op het frame te monteren D standaard E moer F bout Stap 3 3 1 Plaats de gasflescontainer over het frame G gasflescontainer Stap 4 4 1 Draai de drie pennen...

Page 6: ...t de beide bouten de vier ringen en de twee moeren op de basis van de terrasstraler 6 2 Til de gasflescontainer op en laat deze rusten op het frame 6 3 Sluit de drukregelaar aan op de gasfles en draai...

Page 7: ...adigde gasfles kan gevaarlijk zijn en moet gecontroleerd worden door uw gasleverancier Gebruik nooit een gasfles met een beschadigd ventiel Venbind nooit een gastank die niet aan de voorschriften vold...

Page 8: ...p ingedrukt houdt drukt u nu enkele malen op de ontstekingsknop igniter tot de waakvlam ontsteekt Houd de bedieningsknop nog 30 seconden ingedrukt om het thermokoppel te activeren Nu kunt u de bedieni...

Page 9: ...lang van de gasfles Controleer de gasfles op beschadigingen en de drukregelaar op een feilloze afsluiting Als u schade of hapering vermoedt wissel de gasfles dan om bij uw gasleverancier Bewaar een ga...

Page 10: ...Brander gaan niet aan Lage gasdruk fles bijna leeg Nozzle verstopt Bedieningsknop uit Thermokoppel slecht Waakvlam nozzle niet goed gemonteerd Terrasstraler staat niet horizontaal Verwisselen laten Sc...

Page 11: ...er darf nicht in Wohnw gen Wohnmobilen Booten usw verwendet werden Bei einem gut bel fteten Raum m ssen mindestens 25 der Umschlie ungsfl che offen sein Die Umschlie ungsfl che ist die Summe aller Wan...

Page 12: ...OFF stehen berpr fen Sie regelm ig ob die Anschl sse auf dem Gasdruckregler passend und in einem guten Zustand sind Bedienungseinheit Brenner und Luftzirkulationskanal m ssen regelm ig gereinigt werd...

Page 13: ...ter Nur f r Au enaufstellung geeignet W rmeausstrahlung vom Reflektor Gasanschluss mit berwurfmuttern Gasflaschenbeh lter Standrohr Bedienungseinheit Brenner und Strahlungskopf aus pulverbeschichtetem...

Page 14: ...Bolzen Schritt 2 2 1 Das Standrohr mit der Befestigungsplatte oben auf den Geh userahmen stellen 2 2 Das Standrohr mit sechs M6 x 35 mm Bolzen und Muttern am Geh userahmen befestigen D Standrohr E Mut...

Page 15: ...der wenn gew nscht mit den beiden Bolzen den vier Ringen und den beiden Muttern auf dem St nder des Terrassenheizers 6 2 Das Gasbeh ltergeh use hochheben und auf dem Rahmen ruhen lassen 6 3 Den Gasdr...

Page 16: ...alen Vorschriften entsprechen und mit einer Schraubenkupplung ausgestattet sein Die Installation muss entsprechend den gesetzlichen Vorschriften zur Handhabung und Lagerung von fl ssigen Petroleumgase...

Page 17: ...en Stecker herausziehen und auf keinen Fall das Telefon benutzen Warnen Sie Personen in der Umgebung der Gasquelle und sorgen Sie f r Durchzug damit das Gas entweichen kann Bleiben Sie in dieser Zeit...

Page 18: ...anziehen die Dichtung darf nicht lecken aber sollte auch nicht durch zu starkes Anziehen besch digt werden Eine komplette Dichtheitspr fung durchf hren Den Gasbeh lter in den Rahmen einsetzen Das Geh...

Page 19: ...tausch Brenner startet nicht Leerer Gasdruck Flasche fast leer D se versteckt Steuerknopf aus Thermoelement schlecht Steuerd se nicht richtig installiert Terrassenheizer steht nicht horizontal Austaus...

Page 20: ...om is one where 25 of the wall surface area is open The surface area of the walls is the sum of the total surface area Use in enclosed spaces is dangerous and is FORBIDDEN This device must be installe...

Page 21: ...ng are replaced again afterwards Do not paint the flame screen operating panel or reflector cap Make sure that the gas regulator and hose are always situated in a location where they cannot be damaged...

Page 22: ...utdoor use Heat issued via reflective cap Connection to gas supply equipped with swivel nuts Gas bottle container stand operation panel burner and flame screen made of powder coated plate steel Alumin...

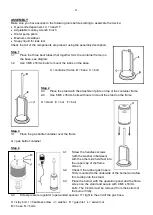
Page 23: ...r frame 2 4 Use 6 M6 x 35mm bolts with nuts to mount the stand on the frame D stand E nut F bolt Step 3 3 1 Place the gas bottle container over the frame G gas bottle container Step 4 4 1 Screw the he...

Page 24: ...on the frame 6 3 Close the pressure regulator on the gas bottle and screw the fastener on securely with the adjustable monkey wrench see connecting and exchanging gas cylinder 6 4 Place the gas bottl...

Page 25: ...leaks in the factory before shipping To prevent damage during transport or due to excess pressures wear etc a full leakage test must always be carried out during installation after exchanging the gas...

Page 26: ...ff and wait 5 minutes before a new attempt to inflame will be made Turn the control button to the lowest setting and leave the patio heater to burn for five minutes You can then turn the control butto...

Page 27: ...Always store the patio heater clean and ensure that it is dust and dirt free when you wish to use it again CLEANING AND MAINTENANCE Clean the smooth surfaces with a soft cloth and a little steel clea...

Page 28: ...e product below gas powered patio heater known under the brand EUROM type THG14000 gas THG14000RVS gas power 14 0 kW fulfils the European directive 2009 142EEC for devices with gaseous fuels and corre...

Page 29: ...our usage ext rieur et dans des espaces bien ventil s pendant l utilisation Ne convient pas une utilisation dans des caravanes camping cars bateaux etc Un espace bien ventil est un espace o au moins 2...

Page 30: ...n adapt s et en bon tat Le panneau de commande le br leur et le circuit de circulation d air doivent tre r guli rement nettoy s N oubliez pas de remettre en place tous les l ments de s curit d pos s p...

Page 31: ...ement de chaleur par d me r flecteur Raccords l alimentation de gaz avec presse toupes Cache bouteille m t panneau de commande br leur et prot ge flamme en t le rev tement en poudre D me r flecteur en...

Page 32: ...tilisez 6 boulons M6 x 35mm avec des crous pour fixer le m t au cadre D m t E crou F boulon tape 3 3 1 Placez le cache bouteille sur le cadre G cache bouteille de gaz tape 4 4 1 Ins rez pr sent les ti...

Page 33: ...atre rondelles et des deux vis sur le socle du chauffage de terrasse 6 2 Soulevez le cache bouteille et posez le sur le cadre 6 3 Raccordez le d tendeur la bouteille de gaz et serrez fermement le racc...

Page 34: ...tane propane et conforme aux normes nationales en vigueur Il doit en outre tre quip d un raccord filet L installation doit tre effectu e en conformit avec les prescriptions l gales pour le stockage et...

Page 35: ...n allumez pas de briquet etc et n utilisez pas votre t l phone loignez toutes les personnes de la source de gaz et laissez largement le temps au gaz de se disperser Pendant ce temps tenez vous l cart...

Page 36: ...mer Proc dez un contr le complet de la pr sence de fuites Placez la bouteille de gaz dans le cadre Laissez redescendre le cache bouteille sur le cadre STOCKAGE V rifiez que le d tendeur de la bouteill...

Page 37: ...Laisser remplacer V rifier et fermer ou remplacer change Le br leur ne d marre pas Pression de gaz vide bouteille presque vide Buse cach e Bouton de commande teint Thermocouple mauvais La buse pilote...

Page 38: ...38...

Page 39: ...39...

Page 40: ...40 EUROM Kokosstraat 20 8281 JC Genemuiden info euromac nl www euromac nl...

Reviews: