EuroLite DMX LED EASY Operator Deluxe User Manual Download Page 14


14 

 EN 

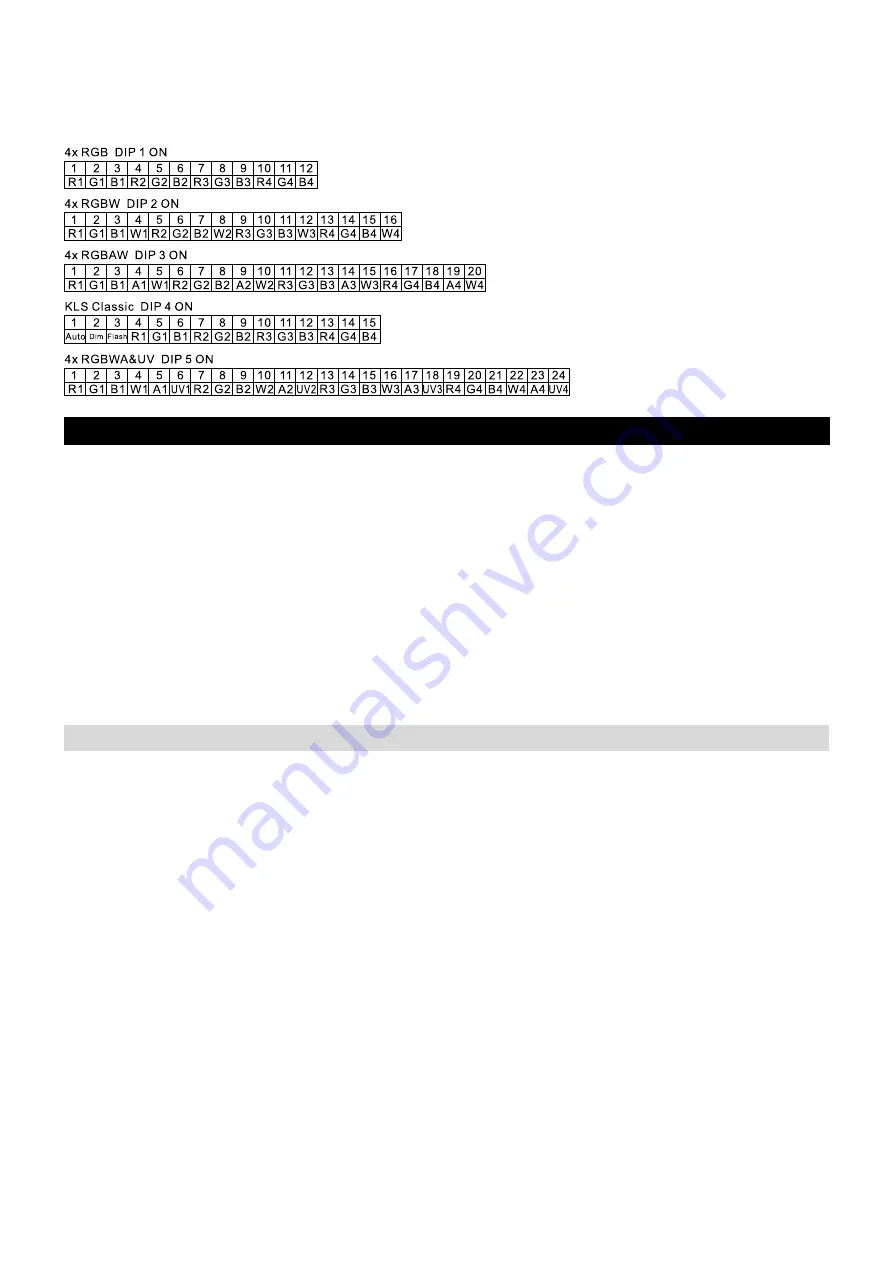
DMX addressing of KLS compact light sets 

Set the DMX start mode switch (17) to position 

MULTI

. You can also control KLS compact systems consisting of 

four  LED  fixtures.  Select  your  desired  DMX  channel  assignment  using  switch  (18).  See  below  for  code  setting. 
Switch on the DMX controller with the POWER button (22). Assign the KLS compact system to the address A001. 
The internal spots 1 to 4 of the compact system can now be controlled via the DMX controller. 


OPERATION 


The controller uses three different operation modes: 

Manual, Auto 

and 

Sound Control

. When you switch on the 

device, it will automatically operate in the previously used mode (if it was active for at least 10 seconds before the 
device was switched off). By pressing button (13) 

Auto 

mode will be active, button 

Music 

(14) switches to 

Sound 

Control

  mode.  The  buttons  light  up  to  indicate  the  active  mode.  If  you  press  any  of  the  two  buttons  again,  the 

illumination goes out and the device switches to 

Manual

 mode. 

 
The 

Blackout

  button  (11)  remains  active  in  each  mode.  If  you  press  (11)  all  LED  spots  go  out  (standby  mode). 

The red LED of the button flashes. You can go back to the previous state by pressing the Blackout button again. 
Master dimmer control (7) remains active in all modes too. You can adjust overall brightness of all spots from 0% 
to 100%. 
 

Strobe effect 

By pressing the Strobe button (15) you activate the strobe effect. The red LED lights up. Strobe can be used in all 
modes and means that the spot lights start to flash. You can adjust the speed with the rotary control (10). 
 

Manual Mode 


Manual 

mode is primarily used to create and save your own scenes. Your scenes (or the preset scenes) will be 

played  as  a  chase  in 

Auto 

or 

Sound  Control 

mode.  Switch  the  controller  to 

Manual 

mode  (see  above).  Press 

button (4) to select User/Bank. The yellow LED lights. Use controls as shown below to create your scene: 
 
- Set colors of spots 1-4 with rotary controls (1) 
- Adjust brightness of spots 1-4 with dimmer faders (2) 

Note: 

Master dimmer (7) is permanently active.


- Fade time control (9) is active as well. Turn (9) to the left to immediately apply changes (e.g. a different color). 
Turn (9) to the right to increase fade time. 


Save a scene 

The DMX controller has 12 memory banks. Press button (4) and select Fader/Preset. The green LED lights. With 
rotary control (5) you can choose a scene number, with rotary control (3) you select a chase (bank). Shortly press 
the Save/Delete button (6). The green LED lights up. Your scene has now been memorized.  
 

Select / Edit / Delete a scene 

Press  button (4) until yellow User/Bank  LED is on. With rotary control (5) you can choose  a scene number, with 
rotary  control  (3)  you  select  a  chase  (bank).  You  now  see  the  currently  selected  scene.  You  can  now  make 
changes  and  memorize  them  as  described  above.  If  you  want  to  delete  a  scene,  press  button  (4)  and  select 
Fader/Preset, then keep the Save/Delete button (6) pressed for approx. 2 seconds. All LEDs shortly light up. The 
scene has now been deleted. 
 

(e.g. KLS-50 in 12-channel mode) 

(e.g. KLS-30/40 in 16-channel mode) 

(e.g. KLS-2500 in 20-channel mode) 

(e.g. KLS-200/400/401/1001 in 15-channel mode) 
 

Summary of Contents for DMX LED EASY Operator Deluxe

Page 1: ......

Page 2: ... UND WARTUNG 8 TECHNISCHE DATEN 8 D00113864 Version 1 0 Stand 24 05 2018 Produkt Updates Dokumentation Software und Support erhalten Sie unter www eurolite de Die neueste Version der Bedienungsanleitung finden Sie im Downloadbereich des Produkts 2018 Eurolite Alle Rechte vorbehalten Dieses Dokument darf ohne schriftliche Genehmigung des Copyrightinhabers weder ganz noch teilweise reproduziert werd...

Page 3: ...h und andere keinen Gefahren aussetzen beachten Sie bitte unbedingt alle Sicherheitshinweise und verwenden das Produkt nur wie in dieser Anleitung beschrieben Bitte bewahren Sie diese Bedienungsanleitung für weiteren Gebrauch auf und geben Sie sie ggf an nachfolgende Besitzer weiter Produktmerkmale DMX Controller zur Ansteuerung von gängigen LED Scheinwerfern Einfache Bedienung 4 Scheinwerfer mit ...

Page 4: ...ich liegt bei 5 bis 45 C Vor der Reinigung den Netzstecker aus der Steckdose ziehen Zur Reinigung nur ein weiches Tuch und niemals Lösungsmittel verwenden Niemals das Netzkabel und den stecker mit nassen Händen berühren da die Gefahr eines Stromschlags besteht Das Produkt ist kein Spielzeug Halten Sie es vor Kindern und Haustieren fern Lassen Sie Verpackungsmaterial nicht achtlos liegen Das Gerät ...

Page 5: ...nktionstaste Stroboskop Effekt 5 Wahlschalter für Szenen 12 stufig 16 XLR Anschluss für DMX Leitung 6 Funktionstaste Save Delete 17 Auswahl DMX Modus Multi Single 7 Drehregler für Master Helligkeit 18 Auswahl DMX Kanalbelegung 8 Drehregler Lauflichtgeschwindigkeit 19 Auswahl int Mikrofon ext Audiosignal 9 Drehregler Überblendgeschwindigkeit 20 Cinchbuchse für externes Audiosignal 10 Drehregler Ges...

Page 6: ...stärkt werden um eine fehlerfreie Datenübertragung zu gewährleisten Steckerbelegung Stromversorgung herstellen Verbinden Sie das beiliegende Netzteil mit der Anschlussbuchse am Gerät und stecken Sie es in eine Steckdose Nach dem Gebrauch den Netzstecker wieder trennen um unnötigen Stromverbrauch zu vermeiden Musiksteuerung Zum musikgesteuerten Ablauf von einer Lauflichtsequenz Chase kann ein Audio...

Page 7: ...ckt gehen alle LED Scheinwerfer aus Standby Die LED der Taste blinkt rot Erneutes Drücken stellt den letzten Zustand wieder her Ebenfalls in allen Betriebsarten ist der Master Dimmer Helligkeitsregler aktiv 7 Dieser wirkt auf alle Spots mit 0 100 Helligkeit Strobe Effekt Durch Drücken der Taste 15 aktivieren Sie die Strobe Funktion Diese ist allen Betriebsarten überlagert und erwirkt einen Strobos...

Page 8: ...geschwindigkeit und der Drehregler 9 steuert die Überblendzeit User Chases Gehen Sie wie bei den Preset Chases vor nur wählen Sie vorab über die Taste 4 die User Bank aus Der Controller spielt Ihre gespeicherten Szenen ab Haben Sie eine Szene in einem Lauflicht nicht belegt oder nicht alle 12 möglichen abgespeichert werden diese einfach übersprungen Funktionen der Drehregler 7 bis 9 siehe oben Son...

Page 9: ...13864 version 1 0 publ 24 05 2018 For product updates documentation software and support please visit www eurolite de You can find the latest version of this user manual in the product s download section 2018 Eurolite All rights reserved No part of this document may be reproduced in any form without the written permission of the copyright owner The contents of this document are subject to revision...

Page 10: ...anual will show you how to install set up and operate your new Eurolite product Users of this product are recommended to carefully read all warnings in order to protect yourself and others from damage Please keep this manual for future needs and pass it on to further owners Product features DMX controller for standard LED spotlights Easy operation DMX channels for red green blue amber white UV str...

Page 11: ...ater The recommended temperature range is 5 to 45 C To clean the unit disconnect it from the power source Only use a soft cloth never use any solvent Do not touch the power cord and connectors with wet hands as it may cause electric shock This product is not a toy Keep it out of the reach of children and pets Do not leave packaging material lying around carelessly This unit corresponds to all requ...

Page 12: ... Mode button Music sound control 4 Preset User bank select 15 Mode Strobe 5 Scene select 12 settings 16 XLR DMX output 6 Save Delete 17 DMX mode Multi Single 7 Master Dimmer 18 DMX channel settings 8 Chaser speed control 19 Internal mic external audio select 9 Fade time control 20 RCA input external audio 10 Strobe speed control 21 Input ext power adaptor 11 Blackout standby all LEDs off 22 Power ...

Page 13: ...ins socket After the operation disconnect the mains plug unit from the socket to prevent unnecessary power consumption Sound control For sound controlled run of a chase it is possible to connect an audio unit with line output e g CD player mixer to the jack AUDIO IN When connecting the audio unit to the jack set the selector switch 19 to position LINE DMX ADDRESSING DMX addressing of individual LE...

Page 14: ... and means that the spot lights start to flash You can adjust the speed with the rotary control 10 Manual Mode Manual mode is primarily used to create and save your own scenes Your scenes or the preset scenes will be played as a chase in Auto or Sound Control mode Switch the controller to Manual mode see above Press button 4 to select User Bank The yellow LED lights Use controls as shown below to ...

Page 15: ...led via rotary control 8 can also be defined by shortly pressing the Tap Tempo button 12 twice Sound Control Mode In Sound Control mode the scenes of each chase your user scenes or factory presets will be played one after another controlled by sound impulses from internal microphone or external audio source RCA input 20 Set fader 19 on rear panel of controller to the respective audio source Keep t...

Page 16: ...Eurolite is a brand of Steinigke Showtechnic GmbH Andreas Bauer Str 5 97297 Waldbüttelbrunn Germany D00113864 Version 1 0 Publ 24 05 2018 ...

Reviews: