background image


00133326, Version 1.0 


30/36

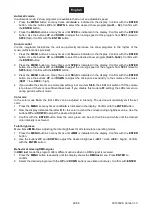
Interconnecting several devices (master/slave operation) 

Several devices may be interconnected (max. 32). Then all slave units can be synchronized and controlled 
with  the  master  unit  without  the  need  for  a  DMX  controller.  The  devices  must  be  set  to  the  corresponding 
operating modes.  

1  Configure all slave units before connecting the master unit: Press the 

MENU

 button so many times until 

SLAV

 is indicated on the display. Confirm with the 

ENTER

 button. 

2  Connect  the  DMX  output  of  the  master  unit  to  the  DMX  input  of  the  first  slave  unit.  Then  connect  the 

DMX output of the first slave unit to the DMX input of the second slave unit, etc. until all units have been 
connected in a chain. Make sure the master unit is the first in the chain. Do not connect a DMX controller 
to the DMX input of the master unit. 

3  Set the master unit to the desired operating mode. The interconnected devices will now operate in sync. 


Energy-saving mode 

The 

ECo

 mode offers the possibility to adjust the battery life. 

1  Press  the 

MENU 

button  so  many  times  until 

ECo

  is  indicated  in  the  display.  Confirm  with  the 

ENTER


button.  

2  Use  the  buttons 

UP

  and 

DOWN

  to  choose  energy  saving  mode 

on

  or 

oFF.

  Confirm  with  the 

ENTER


button 

Remote control IR-7 

The device must be activated for remote control. For this, set menu item 

INFRARED

 to 

ON

. When actuating 

a button, always direct the remote control towards the sensor. There must be no obstacles between remote 
control and the sensor.  


Button 

Function 

BLACKOUT 

LEDs off  

AUTO 

Automatic mode; program selection with (+)/(‒) 

SOUND 

Sound control; program selection with (+)/(‒) 

STROBE 

Strobe effect for automatic mode and sound control;


flash rate setting with (+)/(‒) 

SPEED


Running speed in 

automatic mode and sound control;


setting with (+)/(‒) 

SENSITIVITY 

Microphone sensitivity, 

setting with (+)/(‒)


DMX 

DMX mode 

MANUAL 

Color mode; select colors with R/G/B/W 
setting with (+)/(‒) 

FADE


Color fade mode, press the FADE key again to turn 
off the FADE function, use (+)/(‒) to set the FADE 
program speed 

1-9


Total brightness;


1 = dark, 9 = bright 


Notes: 

• 

The remote control is supplied with a battery inserted. An insulating foil between the battery and the battery 
contacts prevents the battery from being discharged during storage. Prior to the first operation remove the 
foil  from  the  battery  support  on  the  rear  side  of  the  remote  control.  Otherwise  operation  of  the  remote 
control is not possible. 

• 

If the range of the remote control decreases, replace the battery. For this purpose, 
on  the  rear  side  of  the  remote  control  press  the  small  bar  with  the  groove  to  the 
right  and  at  the  same  time  remove  the  battery  support.  For  operation,  one  3  V 
button  cell  type  CR  2025  is  required.  When  inserting,  pay  attention  that  the 
positive pole of the button cell shows upwards in the support. 

• 

Remove the battery from the remote control as a precaution if the device is not used for a longer period of 
time.DMX operation 

Summary of Contents for 41700575

Page 1: ...AKKU Uplight mit 4 x 8 W 4in1 LED und IR Fernbedienung Battery powered uplight with 4 x 8 W 4in1 LED and IR remote control No 41700575 www eurolite de AKKU UP 4 Entry QCL Spot MASTER SLAVE STAND ALONE STROBE BATTERY POWERED REMOTE CONTROL RGBW optional USB 17 ...

Page 2: ... 9 Befestigung an einer Traverse 9 DMX512 ANSTEUERUNG 10 Via DMX Kabel 10 Drahtlose DMX Übertragung mit QuickDMX 10 NETZANSCHLUSS 11 Akku aufladen 11 Ladezustand 11 BEDIENUNG 12 Menüstruktur 12 Standalone Betrieb 13 Fernbedienung IR 7 14 DMX gesteuerter Betrieb 15 REINIGUNG UND WARTUNG 17 Sicherungswechsel 17 UMWELTSCHUTZ 18 TECHNISCHE DATEN 18 Zubehör 19 ...

Page 3: ... Battery status 27 OPERATION 28 Menu structure 28 Stand alone mode 28 Remote control IR 7 30 DMX controlled operation 31 CLEANING AND MAINTENANCE 33 Replacing the fuse 33 PROTECTING THE ENVIRONMENT 34 TECHNICAL SPECIFICATIONS 34 Accessories 35 Diese Bedienungsanleitung gilt für die Artikelnummer This user manual is valid for the article number 41700575 Das neueste Update dieser Bedienungsanleitung...

Page 4: ... der Aufstellung Inbetriebnahme Bedienung Wartung und Instandhaltung dieses Gerätes zu tun haben müssen entsprechend qualifiziert sein diese Bedienungsanleitung genau beachten die Bedienungsanleitung als Teil des Produkts betrachten die Bedienungsanleitung während der Lebensdauer des Produkts behalten die Bedienungsanleitung an jeden nachfolgenden Besitzer oder Benutzer des Produkts weitergeben si...

Page 5: ...Schäden kommt Verwendungszweck Das Produkt dient zur mobilen Beleuchtung im Innenbereich Es darf im Betrieb im Innenbereich montiert und betrieben werden und ist nicht dimmbar Das Gerät ist für professionelle Anwendungen im Bereich der Veranstaltungstechnik vorgesehen z B auf Bühnen Es ist nicht für die Raumbeleuchtung in Haushalten geeignet Die Spannungsversorgung erfolgt über einen integrierten ...

Page 6: ...ende physische sensorische und geistige Fähigkeiten sowie über entsprechendes Wissen und Erfahrung verfügen Andere Personen dürfen das Gerät nur benutzen wenn sie von einer für ihre Sicherheit zuständigen Person beaufsichtigt oder angeleitet werden Warnung vor Verbrennung und Brand Der zulässige Umgebungstemperaturbereich Ta beträgt 5 bis 45 C Verwenden Sie das Gerät niemals außerhalb dieses Tempe...

Page 7: ... ab Bei Kälte reduziert sich die Laufzeit deutlich Laden Sie den Akku vor dem ersten Einsatz vollständig auf Der enthaltene Li Ionen Akku unterliegt den Anforderungen des Gefahrgutrechts Der Akku kann durch den Benutzer ohne weitere Auflagen auf der Straße transportiert werden Beim Versand durch Dritte z B Lufttransport oder Spedition sind besondere Anforderungen an Verpackung und Kennzeichnung zu...

Page 8: ...ste 6 ENTER Bedientaste 7 Mikrofon 8 USB Buchse für QuickDMX Funkempfänger 9 Gewinde für die Montage 10 DMX Eingang 11 ON OFF Schalter 12 Klappfuß 13 DMX Ausgang 14 Netzanschluss 15 Sicherungshalter 16 Netzausgang 17 Infrarotsensor für Fernbedienung 18 8 W RGBW LED 4n1 19 Tragegriff 1 2 3 4 5 6 7 8 9 17 18 19 10 12 13 14 16 15 11 ...

Page 9: ...er Traverse Das Gerät lässt sich über eine geeignete TPC Klammer an Ihrem Traversensystem befestigen Verwenden Sie eine Klammer mit einer M10 Schraube prüfen Sie das Montageloch an der Geräteseite siehe Grafik 1 Stecken Sie die M10 Schraube in das Montageloch an der Seite des Gerätes und schrauben Sie diese dann zusammen mit der TPC Klammer fest 2 Hängen Sie die TPC Klammer in die Traverse ein und...

Page 10: ...d Signal ein 120 Ω Widerstand eingelötet ist 4 Ab einer Kabellänge von 300 m oder nach 32 angeschlossenen DMX Geräten sollte das Signal mit Hilfe eines DMX Aufholverstärkers verstärkt werden um eine fehlerfreie Datenübertragung zu gewährleisten Belegung der XLR Verbindung Drahtlose DMX Übertragung mit QuickDMX Das Gerät verfügt über einen weiteren DMX Eingang für einen QuickDMX Empfänger separat e...

Page 11: ...t hängt vom Betriebsmodus und der Umgebungstemperatur ab maximal 14 Stunden Schalten Sie das Gerät nach dem Betrieb aus 2 Zum Aufladen des Akkus schließen Sie das Gerät über das Netzkabel an eine Steckdose an Die Ladezeit beträgt 4 Stunden Während des Ladevorgangs kann das Gerät weiter betrieben werden 3 Dank der integrierten Ladeschutzschaltung kann der Akku nicht überladen werden Trennen Sie den...

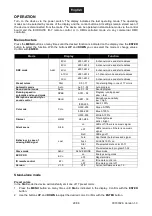
Page 12: ...tadresse 4 1CH d001 d512 4 1 Kanal Modus und Startadresse 3CH d001 d512 3 Kanal Modus und Startadresse Farbvoreinstellungen Stat S 01 17 Konstantes Leuchten in einer von 17 Farben Automatikbetrieb Auto Au 01 02 Auto Programm Musiksteuerung Soun So 01 02 Musikgesteuerte Programme Ablaufgeschwindigkeit für den Automatikbetrieb und Musiksteuerung SPEE SP 01 09 Ablaufgeschwindigkeit langsam schnell Mi...

Page 13: ...m bis SP09 schnell ein Bestätigen Sie mit der Taste ENTER 3 Drücken Sie die Taste MENU so oft bis das Display SEnS anzeigt Bestätigen Sie mit der Taste ENTER Passen Sie mit den Tasten UP und DOWN die Mikrofonempfindlichkeit an die Lautstärke der Musik an SE01 niedrig SE09 hoch 4 Wenn Sie im Menüpunkt SILE die Einstellung on wählen werden die LEDs bei zu geringer Lautstärke oder fehlendem Bassschla...

Page 14: ... die Fernbedienung immer in Richtung des Sensors auf der Gerätevorderseite Zwischen Fernbedienung und Sensor muss Sichtverbindung bestehen In der DMX und der Slave Betriebsart sind die Funktionen der Fernbedienung deaktiviert Taste Funktion BLACKOUT LEDs aus AUTO Automatikbetrieb Programmwahl mit SOUND Musiksteuerung Programmwahl mit STROBE Strobe Effekt für Automatikbetrieb und Musiksteuerung Bli...

Page 15: ...le 6 CH 6 DMX Kanäle oder 8 CH 8 DMX Kanäle an Wählen Sie mit den Tasten UP und DOWN den gewünschten DMX Kanal Modus Bestätigen Sie mit der Taste ENTER 3 Das Menü für die DMX Startadresse wird aufgerufen Stellen Sie die Adresse mit den Tasten UP und DOWN ein Bestätigen Sie mit der Taste ENTER 4 Beim Empfang von DMX Steuersignalen blinkt das Display nicht Fehlen die DMX Steuersignale blinkt das Dis...

Page 16: ...au 160 169 Dunkelblau 170 255 Pink CH4 Auto und Musikgesteuertes Programm 000 009 Keine Funktion 010 069 Farbüberblendung mit zunehmender Geschwindigkeit 070 129 Farbwechsel mit zunehmender Geschwindigkeit 130 189 Musikgesteuerte Farbüberblendung mit zunehmender Geschwindigkeit 190 255 Musikgesteuerter Farbwechsel mit zunehmender Geschwindigkeit 6 Kanal Modus Kanal Wert Funktion CH1 000 255 Rot 0 ...

Page 17: ...den Insbesondere die Linsen sollten sauber sein damit das Licht mit maximaler Helligkeit abgestrahlt werden kann 1 Trennen Sie das Gerät vom Netz und lassen Sie es abkühlen bevor Sie mit der Reinigung beginnen 2 Reinigen Sie die Oberflächen mit einem fusselfreien angefeuchteten Tuch Verwenden Sie auf keinen Fall Alkohol oder irgendwelche Lösungsmittel da sonst die Gehäuseoberflächen beschädigt wer...

Page 18: ...den abgeben Mit der Verwertung von Altgeräten und der ordnungsgemäßen Entsorgung von Batterien und Akkus leisten Sie einen wichtigen Beitrag zum Schutz unserer Umwelt TECHNISCHE DATEN Spannungsversorgung 100 240 V AC 50 60 Hz Schutzart IP20 Schutzklasse SK I Stromausgang Kaltgeräte W Einbauversion Sicherung T 1 A Sicherung auswechselbar Akkutyp 1 x Lithium Ion 11 1 V 4400 mAh Akku Betriebsdauer bi...

Page 19: ...l A 3x600mm bis 5kg silber Best Nr 58010310 EUROLITE QuickDMX USB Funksender Empfänger Best Nr 70064704 EUROLITE DMX Kabel XLR 3pol 3m schwarz Best Nr 3022785H PSSO DMX Kabel XLR 3pol 3m schwarz Neutrik Best Nr 30227810 EUROLITE QuickDMX Funksender Best Nr 70064700 Technische Änderungen ohne vorherige Ankündigung und Irrtum vorbehalten 27 04 2021 USB ...

Page 20: ...the product Every person involved with the installation operation and maintenance of this device has to be qualified follow the instructions of this manual consider this manual to be part of the total product keep this manual for the entire service life of the product pass this manual on to every further owner or user of the product download the latest version of the user manual from the Internet ...

Page 21: ...use This product is designed to light indoor areas It can be mounted and operated in indoor areas and is not dimmable This device is designed for professional use in the field of event technology e g on stage It is not suitable for household lighting The product is supplied with power via the built in rechargeable battery that can be charged via the power cable Only use the device according to the...

Page 22: ... is 5 to 45 C Do not operate the device outside of this temperature range The housing temperature Tc can be up to 55 C during use Avoid contact by persons and materials Do not illuminate surfaces within 10 cm of the device This value is indicated on the device by the symbol Do not use the device near highly flammable materials Always place the device at a location where sufficient air circulation ...

Page 23: ...sport or forwarding agency special requirements on packaging and labelling must be observed For preparation of the item being shipped consulting an expert for hazardous material is required Dispatch battery only when the housing is undamaged Tape or mask off open contacts and pack up the battery in such a manner that it cannot move around in the packaging Please also observe possibly more detailed...

Page 24: ...tton 6 ENTER button 7 Microphone 8 USB port for QuickDMX wireless receiver 9 Mounting thread 10 DMX input 11 on off switch 12 Folding foot 13 DMX output 14 Power input 15 Fuseholder 16 Power output 17 Infrared sensor for the remote control 18 8 W RGBW LED 4in1 19 Carrying handle 1 2 3 4 5 6 7 8 9 10 12 13 14 16 15 11 17 18 19 ...

Page 25: ...uss The device can be attached to your truss system using a suitable TPC coupler Use a coupler with an M10 screw check the mounting hole on the side of the device see graphic 1 Insert the M10 screw into the mounting hole on the side of the truss light and then tighten it together with the TPC coupler 2 Hook the TPC coupler into the truss and tighten the locking screw 3 Always secure the installati...

Page 26: ...Signal in the DMX output of the last unit 4 If the cable length exceeds 300 m or the number of DMX devices is greater than 32 it is recommended to insert a DMX level amplifier to ensure proper data transmission XLR connection Wireless DMX transmission with QuickDMX The device features an alternative DMX input for a QuickDMX receiver sold separately This connector allows for wireless transmission o...

Page 27: ...ing mode and the ambient temperature max 14 hours After the operation switch the device off 2 For charging the battery connect the device to a power outlet via the power cable provided Charging time is 4 hours The device may be operated during the charging procedure 3 The device features a protective circuit for charging which prevents overload of the rechargeable battery However disconnect the de...

Page 28: ...olors Automatic mode Auto Au 01 02 Auto program Sound control mode Soun So 01 02 Sound program Running speed in automatic and sound mode SPEE SP01 09 Program running speed slow fast Microphone sensitivity for sound control SEnS SE01 09 Microphone sensitivity low high Color mix Colo r000 255 Red 0 100 G000 255 Green 0 100 b000 255 Blue 0 100 U000 255 White 0 100 Dimmer dIMM dl01 dl09 Total brightne...

Page 29: ...P and DOWN to Adjust the microphone sensitivity to the volume of the music SE01 low SE09 high 4 If you enable the silent scene mode on setting in menu item SILE the LEDs will switch off if the volume is too low or if there is no sufficient bass beat If you disable this mode oFF setting the LEDs remain on during periods without music Color mix In the color mode Colo the 4in1 LEDs can be adjusted in...

Page 30: ...ctuating a button always direct the remote control towards the sensor There must be no obstacles between remote control and the sensor Button Function BLACKOUT LEDs off AUTO Automatic mode program selection with SOUND Sound control program selection with STROBE Strobe effect for automatic mode and sound control flash rate setting with SPEED Running speed in automatic mode and sound control setting...

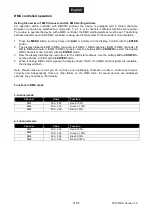
Page 31: ...nnels 6 CH 6 DMX channels or 8 CH 8 DMX channels Use the buttons UP and DOWN to select the desired DMX channels mode Confirm with the ENTER button 3 Now the display indicates the menu item for the DMX start address Use the buttons UP and DOWN to set the address Confirm with the ENTER button 4 When receiving DMX control signals the display doesn t flash If no DMX control signals are available the d...

Page 32: ...39 Orange 140 149 Lavender 150 159 Light blue 160 169 Dark blue 170 255 Pink CH4 Auto and sound program 000 009 No function 010 069 Color fading with increasing speed 070 129 Color change with increasing speed 130 189 Sound control color fading with increasing speed 190 255 Sound control color change with increasing speed 6 channel mode Channel Value Function CH1 000 255 Red 0 100 CH2 000 255 Gree...

Page 33: ...ts such as dust etc The lenses in particular should be clean to ensure that light will be emitted at maximum brightness 1 Disconnect the device from power and allow it to cool before cleaning 2 Clean the surface with a soft lint free and moistened cloth Never use alcohol or solvents as these may damage the surface Make sure that no liquids can enter the device 3 The device must be dry before reapp...

Page 34: ...e environment TECHNICAL SPECIFICATIONS Power supply 100 240 V AC 50 60 Hz IP classification IP20 Protection class Class I Power output IEC connector F mounting version Fuse T 1 A Fuse replaceable Battery pack type 1 x lithium ion 11 1 V 4400 mAh Battery pack Battery operation up to 14h depending on program used Recharging time 4h Lamp type LED lamp LED 4 x high power 8 W 4in1 QCL RGBW homogenous c...

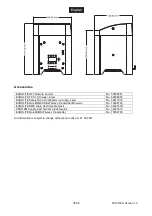
Page 35: ...ety Bond A 3x600mm up to 5kg silver No 58010310 EUROLITE QuickDMX USB Wireless Transmitter Receiver No 70064704 EUROLITE DMX cable XLR 3pin 3m black No 3022785H PSSO DMX cable XLR 3pin 3m black Neutrik No 30227810 EUROLITE QuickDMX Wireless Transmitter No 70064700 All information is subject to change without prior notice 27 04 2021 USB ...

Page 36: ...Eurolite is a brand of Steinigke Showtechnic GmbH Andreas Bauer Str 5 97297 Waldbüttelbrunn Germany D00128658 Version 1 0 Publ 27 04 2021 ...

Reviews: