background image

Funzioni di risparmio energetico - 157

Guida Rapida per l'Utente

Italiano

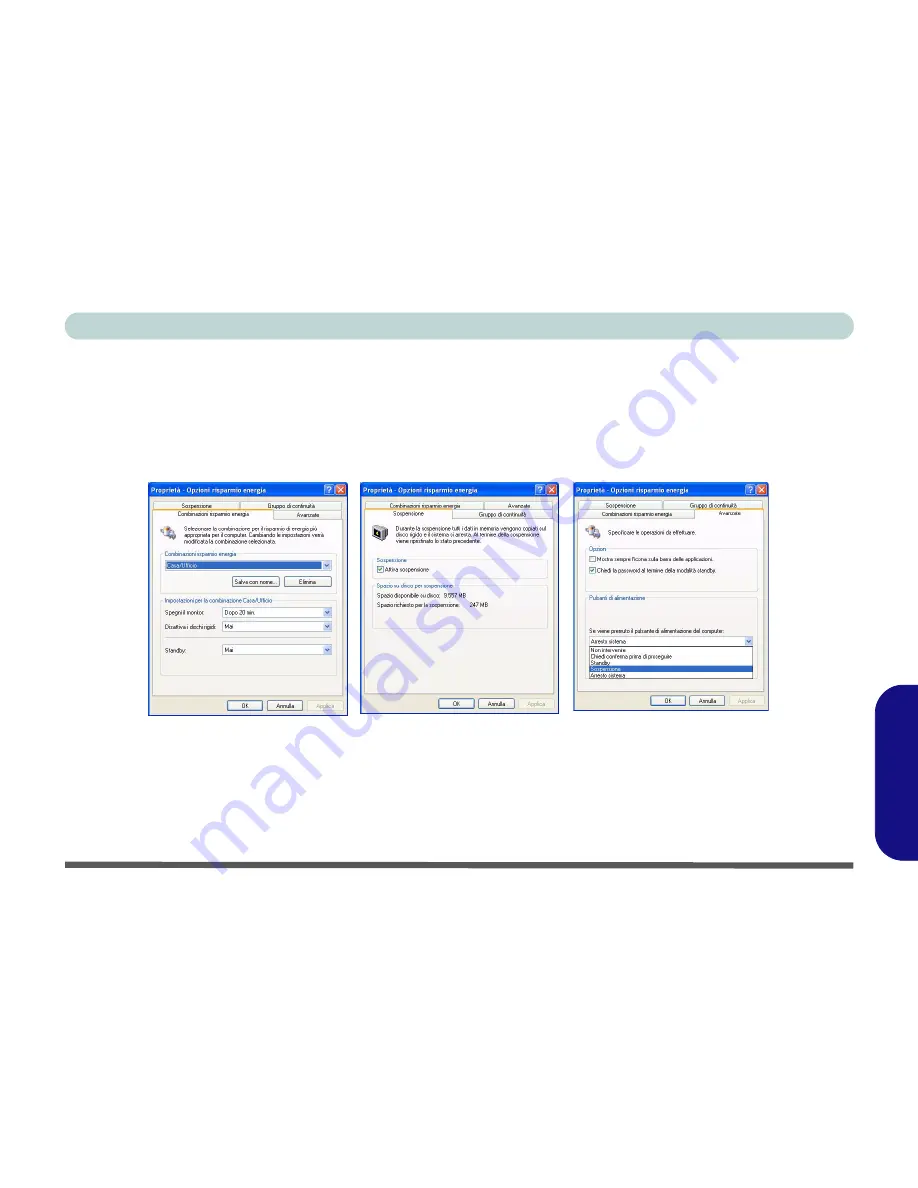
Funzioni di risparmio energetico

Il pannello di controllo delle 

Opzioni risparmio energia

 di 

Windows

 consente la configurazione delle funzioni di

risparmio energetico del computer. È possibile risparmiare energia attraverso componenti singoli, come il monitor o il
disco rigido, oppure utilizzare la modalità di 

Standby

 o 

Sospensione

 per conservare energia in tutto il sistema (attivare il

supporto di sospensione dal Pannello di controllo come illustrato nella 

Figura 12

).

Per portare il computer in modalità di 

Standby

 o di 

Sospensione

, è possibile impostare il pulsante di alimentazione.

Figura 12

Opzioni risparmio energia

Summary of Contents for LP295UB

Page 1: ......

Page 2: ......

Page 3: ...a version française de ce guide commence à la page 69 Le Manuel de l Utilisa teur complet se trouve sur le CD ROM de Pilotes Uti litaires Manuel de l Utilisateur CD ROM Device Drivers Utilities User s Manual Introducción Español Esta Guía del Usuario Concisa le presenta las caracterís ticas principales de su ordenador La versión española de esta guía comienza en la página 103 El Manual del usua ri...

Page 4: ...nd Betrieb 37 Schnellstart 40 Nicht enthalten 41 Modell Typen und unterschiedliche Designs 42 Systemübersicht Ansicht von vorne 43 Systemübersicht Ansicht von links 45 Optisches CD DVD Gerät 47 Systemübersicht Ansicht von rechts 48 Systemübersicht Rückansicht 49 Tastatur und Maus 50 Setup des drahtlosen wireless Netzwerks 51 Grafikfunktionen 52 Energieverwaltungsfunktionen 55 Installation der Trei...

Page 5: ...Teclado Mouse 118 Configuración de la red inalámbrica 119 Parámetros de vídeo 120 Funciones de administración de energía 123 Instalación de controladores 124 Utilidades de la BIOS 128 Hyper Threading 129 Solución de problemas 130 Especificaciones 132 Sommario Avvertenza 137 Informazioni sulla Guida Rapida per l Utente 138 Istruzioni per la manutenzione e l uso 139 Guida di avvio rapido 142 Non com...

Page 6: ...IV ...

Page 7: ... or creators of this pub lication except for copies kept by the user for backup purposes Brand and product names mentioned in this publication may or may not be copyrights and or registered trademarks of their respective companies They are mentioned for identification purposes only and are not intended as an endorse ment of that product or its manufacturer August 2004 Trademarks This product incor...

Page 8: ...ur computer This CD ROM also contains the drivers and utilities necessary for the proper operation of the computer Some or all of the computer s features may already have been setup If they aren t or you are planning to re configure or re install portions of the system refer to the expanded User s Manual The Device Drivers Utilities User s Manual CD ROM does not contain an operating system Regulat...

Page 9: ...r and power supply away from any kind of heating element This is an electrical appliance If water or any other liquid gets into it the computer could be badly damaged 3 Avoid interference Keep the computer away from high capacity transformers electric motors and other strong magnetic fields These can hinder proper performance and damage your data 4 Follow the proper working procedures for the comp...

Page 10: ...ot by its wire Make sure the socket and any extension cord s you use can support the total current load of all the connected devices Before cleaning the computer make sure it is disconnected from any external power supplies Power Safety Warning Before you undertake any upgrade proce dures make sure that you have turned off the power and disconnect ed all peripherals and cables including tele phone...

Page 11: ...uter to electric shock Refer all servicing to authorized service personnel Unplug the computer from the power sup ply Then refer servicing to qualified service personnel under any of the following conditions When the power cord is damaged or frayed If the computer has been exposed to rain or other liquids If the computer does not work normally when you follow the operating instructions If the comp...

Page 12: ...king materials 2 Securely attach any peripherals you want to use with the computer e g keyboard and mouse to their ports 3 Attach the AC power cord to the AC power In port on the right of the computer Then plug the AC power cord into an outlet 4 Push the power button to turn the computer on Peripheral Devices Please note that peripherals printers digital cameras etc which at tach to your computer ...

Page 13: ...e consult the ap propriate manuals System Software Your computer may already come with system software pre installed Where this is not the case or where you are re configuring your computer for a different system you will find this manual refers to the Microsoft Windows XP op erating system Further information on installing the drivers and utilities is available in Chapter 4 of the expanded User s...

Page 14: ...d below in this LCD PC series The model types differ in physical appearance Model A s optical CD DVD device bay is located on the left side of the computer Model B s is at the front and their specifications In addition Model A has two different designs Model A Design I Model A Design II Figure 1 Model Types Design Differences Model B ...

Page 15: ...ystem Map Front View 2 4 3 1 2 Model A Design I Model A Design II 2 4 3 5 1 2 Figure 2 Front View 1 LCD Panel 2 Speakers 3 LED Activity indicators 4 Power Button 5 Reset Button Model A Design II only 6 Optical CD DVD Device Model B only 6 3 4 1 2 2 Model B ...

Page 16: ...em is in the Standby power saving mode the light will flash orange When the system is in Hibernate power saving mode the light will be off Reset Button Model A Design II only Press this button to restart your computer This button is equivalent to pressing Ctrl Alt Del and only avail able on Model A Design II Figure 2 Shutdown Please note that you should always shut your computer down by choosing t...

Page 17: ...ional module will re place the floppy disk drive module in the slot at point 1 Figure 3 Left View 1 Floppy Disk Drive 2 Hard Disk Drive HDD Bay 3 Optical CD DVD Device Model A only Drive Warning Don t try to remove the hard disk HDD while the system is on This could cause data loss or damage Unauthorized removal or tampering with the HDD may violate your warranty If you are in doubt consult your s...

Page 18: ...sh Types I II MD IBM Microdrive Video Capture Card The optional video capture card allows you to watch TV video conference and capture still images and video on your PC If your purchase includes the video capture card it will replace the floppy disk drive assembly on the left side of the computer The card has an S Video In port and Audio Video ports The video capture card is ideal for capturing vi...

Page 19: ...that may break and become lodged in the hole DVD Regional Codes DVD region detection is device dependent not OS dependent You can select your module s region code 5 times The fifth selection is permanent This cannot be altered even if you change your operating system or you use the module in another computer Media Warning Don t try to remove a CD DVD while the system is accessing it This may cause...

Page 20: ... 3 Dual PC Card Slots 4 PC Card Eject Buttons 5 Dual USB Ports 6 AC Power In Port 7 Security Lock Slot Sound Volume Adjustment How high the sound volume can be set using the volume control knob depends on the setting of the volume control within Windows Click the Volume icon on the taskbar or go to Start Programs All Programs Accessories Entertainment Volume Control to check the setting ...

Page 21: ...In Jack 5 RJ 45 LAN Jack 6 RJ 11 Phone Jack 7 Dual USB Ports 8 IEEE 1394 Port unpowered optional with Mini PCI IEEE 1394 Module 9 PS 2 Mouse Keyboard Ports 10 Printer Parallel Port 11 Serial Port 12 External Monitor VGA Port 13 Vents Port Warning The computer can only accept one keyboard mouse at a time Don t try to install a USB and a PS 2 keyboard mouse at the same time Doing so may cause resour...

Page 22: ...tabil ity 1 2 2 3 Mouse Driver If you are using an ex ternal mouse your oper ating system may be able to auto configure your mouse during its in stallation or only enable its basic functions Be sure to check the de vice s user documenta tion for details Special Characters Some software applications al low the number keys to be used with Alt to produce spe cial characters These special characters c...

Page 23: ...he optional Wireless LAN module you will need to install the driver for it see Wire less LAN WinXP on page 25 You can then configure the options from the Wireless Configuration Utility by clicking the icon in the Windows control panel or in the taskbar Figure 8 WLAN Config Utility Network Connection Properties ...

Page 24: ... and Themes 2 Double click Display icon 3 In the Display Properties dialog box click Settings tab 4 In Screen resolution move the slider to the preferred setting for resolution 5 In Color quality click the arrow and scroll to the preferred setting for color depth 6 Click the Advanced button to bring up the options tabs 7 You can click Graphics Properties button in the Intel R Extreme Graphics tab ...

Page 25: ...ng Enabling Displays With the video driver installed you can use its built in controls to switch between the displays as follows 1 Plug the VGA monitor into the external monitor VGA port at the rear of the computer 2 Go to the Intel R 82865G Graphics Controller Properties control panel see Video Driver Controls on page 18 and select Devices tab 3 Choose the display option from the list on the left...

Page 26: ...nitor VGA port 2 Go to the Intel R 82865G Graphics Controller Properties control panel see Video Driver Controls on page 18 and select Devices tab 3 Click the Intel R Dual Display Clone icon in the Devices tab Note this option is only available when you have attached the monitor 4 Choose one device to be the Primary Secondary display 5 Adjust the settings by clicking the Device Settings button if ...

Page 27: ...your computer You may conserve power through individual components such as the monitor or hard disk or you may use either Standby or Hibernate mode to conserve power throughout the system enable Hibernate support from the Control Panel as pictured in Figure 12 The computer s power button may be set to send the computer in to either Standby or Hibernate mode Figure 12 Power Options ...

Page 28: ...ers and utilities is available in Chapter 4 of the expanded User s Manual on the Device Drivers Utilities User s Man ual CD ROM Authorized Driver Message If you receive a message telling you that the driver you are installing is not authorized Digital Signature Not Found just click Yes or Continue Anyway to ignore the message and continue the installation procedure Version Conflict Message During ...

Page 29: ...ontrol Panel Double click System icon and then click Hardware tab Device Manager button 2 Double click the device you wish to update reinstall the driver for you may need to click 3 Look for the Update Driver button check the Driver tab and follow the on screen prompts Windows XP Service Pack 1 1a Make sure you install Windows XP Service Pack 1 1a or a Windows XP version which includes Service Pac...

Page 30: ...You can also go to the Sounds and Audio Devices control panel Start Menu and point to Settings and click Control Panel then double click the Sounds and Audio Devices icon for further configuration options Note If you are in the Category View choose Sounds Speech and Audio Devices Sounds and Audio Devic es Video WinXP 1 Click Start menu Run 2 Navigate Browse to D Drivers Video Graphics Setup exe an...

Page 31: ...Start menu Run 2 Navigate Browse to D Drivers Modem WINXP Setup exe and click OK 3 Click button 4 Click 5 The modem is ready for dial up configuration Wireless LAN WinXP 1 Click Start menu Run 2 Navigate Browse to D Drivers WLAN Setup exe and click OK 3 Click Next 4 Click Finish and restart the computer 5 The settings can now be configured Modem Country Selection Be sure to check if the modem coun...

Page 32: ...er Select Sub Menu F10 Save and Exit Item Specific Help Select the operating system installed on your system which you will use most commonly Note An incorrect setting can cause some operating systems to display unexpected behavior Note WinME can not support USB 2 0 Setup Warning Setting itmes on this menu to incorrect values may cause your system to malfunction Installed O S Reset Configuration D...

Page 33: ...ports Hyper Threading Hyper Threading is only supported in Windows XP OS or Windows 2000 with Service Pack 4 installed If you have updated the Flash ROM BIOS from a previous version which did not have the Hyper Threading Tech nology option you must reinstall Windows and any Service Packs necessary after the BIOS update Once you have enabled Hyper Threading DO NOT disable the option or the computer...

Page 34: ... appropriately from the Control Panel See Video WinXP on page 24 for instructions on installing the driver and Video Driver Controls on page 18 for instructions on configuring the driver The computer takes longer during Startup Data saved on the hard disk drive may be lost or damaged Operate the scan disk or disk defragmenter to check for any lost or damaged data The computer is waking up from Hib...

Page 35: ...stalled a new external keyboard or mouse but cannot use all of the listed functions You have not installed the driver to enable any extra functions Make sure you read the documentation which comes with any new external device and make sure you install the driver for it as this will allow you to access any extra functions which come with your device The compact disc tray will not open when there is...

Page 36: ...pecification Information The specifications listed in this Appendix are correct at the time of going to press Certain items particularly processor types speeds may be changed or updated due to the manufacturer s release schedule Check with your service center for details ...

Page 37: ... GHz Intel Pentium 4 Processor FC PGA2 Package 478 pin 130nm 130 Nanometer Process Technology 512KB L2 Cache 533MHz Front Side Bus 2 8 GHz Intel Celeron D Processor 325 330 335 340 345 350 FC PGA2 Package 478 pin 90nm 90 Nanometer Process Technology 256KB L2 Cache 533MHz Front Side Bus 2 53 2 66 2 80 2 93 3 06 3 2 GHz Intel Celeron Processor FC PGA2 Package 478 pin 130nm 130 Nanometer Process Tech...

Page 38: ...r block level transfers of data integrating an extensive set of instructions for 3D Audio AC97 Compatible SoundBlaster and Windows Sound System Compatible Two Built In Speakers 3W Three Audio Jacks for Headphone Out Line In and Microphone In Feature Model A Model B Video Memory The system allocates or shares a portion of system memory for video use See Dynamic Video Memory Technology on page I 19 ...

Page 39: ...bond W83627HF PC Card Sockets Supports Two Type II Slots or One Type III PCMCIA Slot Cardbus Support Storage One 3 5 1 44MB 3 Mode Floppy Disk Drive Exchangeable With 6 in 1 Card Reader Module or Video Capture Module One 3 5 25 4mm Height Hard Disk Drive Ultra 66 100 I F Support One Optical Device Bay for the Optional 12 7mm Height ATAPI CD ROM or CD RW or DVD ROM or DVD ROM CD RW Combo or DVD RW ...

Page 40: ...418mm W 179mm D Weight 8 9Kg 10 2Kg Fan Bearing Type Two Ball Bearings Security BIOS Password Security Lock Slot for Kensington Type Locks Other Features Tilt 0 15 Swivel 270 Optional Mini PCI IF for IEEE 802 11b or 802 11g Wireless LAN Module Mini PCI IF for IEEE 1394 Module Internal 56K MDC Data Fax Modem Module 6 in 1 Card Reader Module Factory Option Video Capture Card Module Supporting S Vide...

Page 41: ... Form umgewan delt werden abgesehen von Kopien die für Archivzwecke erstellt werden In dier Publikation erwähnte Marken und Produktnamen können Copyrights und oder eingetragene Warenzeichen ihrer jeweiligen Firmen in Sie werden nur zu Identifikationszwecken erwähnt und sind nicht als Werbung für die Produkte oder ihre Hersteller gedacht August 2004 Warenzeichen Dies Produkt beinhaltet durch Urhebe...

Page 42: ...e CD ROM enthält auch die Treiber und Utility Programme die für einen einwandfreien Betrieb des Computers notwendig sind Einige oder alle Funktionen des Computers sind bereits eingerichtet worden Falls das nicht der Fall ist oder wenn Sie ein zelne Teile des Systems neu konfigurieren oder neu installieren möchten finden Sie eine Anleitung im erweiterten Be nutzerhandbuch Die CD ROM Device Drivers ...

Page 43: ...omputer und Netzteil dürfen nicht in der Nähe von Wärmequellen stehen oder gelagert werden Dies ist ein elektrisches Gerät Wenn Wasser oder andere Flüssigkeiten eindringen kann der Computer stark beschädigt werden 3 Vermeiden Sie Interferenzen mit anderen Geräten Halten Sie den Computer fern von magnetischen Feldern die von Stromquellen Monitoren Magneten etc erzeugt werden Die können die Leistung...

Page 44: ...öchten Achten Sie darauf daß die Steckdose und alle verwendeten Verlängerungskabel die Gesamt stromlast aller angeschlossenen Geräte trägt Trennen Sie den Computer vor dem Reinigen von allen externen Stromquellen Warnung zur Stromsicherheit Bevor Sie Schritte zum Aufrüsten des Computers unternehmen müssen Sie zunächst das Gerät ausschalten und alle Peri pheriegeräte und Kabel einschließlich Telefo...

Page 45: ...t und an der eigenen Gesundheit verursachen Überlassen Sie alle Reparaturen autorisiertem Fachpersonal Trennen Sie den Computer vom Stromnetz Unter den folgenden Umständen sollten Sie das Gerät zur Reparatur geben Wenn das Netzkabel beschädigt oder zerschlissen sind Wenn der Computer Regen ausgesetzt war oder mit Flüssigkeiten in Berührung gekommen ist Wenn der Computer unter Beachtung der Bedienu...

Page 46: ... Sie mit dem Computer verwenden wollen z B Tastatur und Maus an die entsprechenden Schnittstellen an 3 Schließen Sie das AC Netzkabel an die AC Netzeingangsbuchse an die sich an der rechten Seite des Computers befindet Schließen Sie dann das AC Netzkabel an eine Netzsteckdose an 4 Drücken Sie dann auf den Netzschalter um das Gerät einzuschalten Peripheriegeräte Bitte beachten Sie daß Sie Peripheri...

Page 47: ...entsprechenden Handbüchern nach Systemsoftware Ihr Computer wird möglicherweise schon mit vorinstallierter Systemsoftware geliefert Ist das nicht der Fall oder wenn Sie Ihren Computer für ein anderes System neu konfigurieren möchten finden Sie dazu eine Anleitung in diesem Hand buch zum Betriebssystem Microsoft Windows XP Weitere Informationen zur Installation der Treiber und Hilfsprogramme finden...

Page 48: ...ten angeboten Die Modelle unterscheiden sich in ihrem Aufbau der optische CD DVD Laufwerkschacht befindet sich bei Modell A befindet sich an der linken Seite des Computers bei Modell B ist es an der Vorderseite und den technischen Daten Modell A verfügt zusätzlich über zwei verschiedene Designs Modell A Design I Modell A Design II Abb 1 Modell Typen und unterschiedliche Designs Modell B ...

Page 49: ...temübersicht Ansicht von vorne 2 4 3 1 2 Modell A Design I Modell A Design II 2 4 3 5 1 2 Abb 2 Ansicht von vorne 1 LCD Bildschirml 2 Lautsprecher 3 LED Aktivitätsanzeigen 4 Netzschalter 5 Reset Taste nur Modell A Design II 6 Optisches CD DVD Gerät nur Modell B 6 3 4 1 2 2 Modell B ...

Page 50: ...rün Im Standbymodus blinkt die Lampe orange Wenn sich das System im Ruhezustand ist ist die Lampe aus Reset Taste nur Modell A Design II Drücken Sie auf diese Taste um den Computer neu zu star ten Die Betätigung dieser Taste entspricht der Tastenkom bination Strg Alt Entf und ist nur bei Modell A Design II verfügbar Abb 2 Herunterfahren Bitte beachten Sie daß der Computer immer mit dem Be fehl Bee...

Page 51: ...op tionale Modul das Disket tenlauferk Modul im Steckplatz bei Punkt 1 Abb 3 Ansicht von links 1 Diskettenlaufwerk 2 Schacht für das Festplatten laufwerk HDD 3 Optisches CD DVD Gerät nur Modell A Warnung zum Laufwerk Entnehmen Sie die Fest platte HDD nur bei aus geschaltetem System da sonst Daten verloren ge hen können Auch uner laubtes Hantieren an der Festplatte kann die Ga rantiebestimmungen ve...

Page 52: ... Video Capture Karte Mit der optionalen Video Capture Karte können Sie fern sehen Videokonferenzen halten und Fotos Videos auf dem PC aufzeichnen Wenn Ihr Gerät eine Video Capture Karte hat ist diese anstelle des Diskettenlauferks eingesetzt und befindet sich an der linken Seite des Computers Die Karte hat einen S Video Eingangsanschluß und Audio Video Anschlüsse Die Video Capture Karte ist sehr g...

Page 53: ...chen und darin steckenbleiben könnten DVD Regionalcodes Die DVD Regionserkennung hängt vom Gerät nicht vom Betriebssystem ab Sie können den Regionalcode für Ihr Modul 5mal wählen Die fünfte Wahl ist nicht mehr änderbar Sie kann auch bei Wechsel des Betrie bssystems oder bei Verwendung des Moduls in einem anderen Computer verändert werden Warnung zu Datenträgern Entnehmen Sie keine Diskette CD DVD ...

Page 54: ...m 2 Lautstärkeregler 3 Zwei PC Card Steck platze 4 PC Card Auswurfta sten 5 Zwei USB Anschlüsse 6 AC Netzeingangs buchse 7 Sicherheitsschloß Buchse Lautstärkeeinstellung Die Höhe der Lautstärke hängt von der Lautstärkeeinstellung bei Windows ab Überprüfen Sie die Einstellung indem Sie in der Taskleiste auf das Lautstärke Symbol klicken oder zu Start Alle Programme Programme Zubehör Unterhaltungsme...

Page 55: ...E 1394 Der optionale IEEE 1394 Anschluss unterstützt nur SELBSTVERSORG TE SELF POWERED IEEE 1394 Geräte Abb 6 Rückansicht Alle Modelle 1 Tragegriff 2 Kopfhörer Ausgangsbuchse 3 Audio Eingangsbuchse 4 Mikrofon Eingangsbuchse 5 RJ 45 LAN Buchse 6 RJ 11 Telefonbuchse 7 Zwei USB Anschlüsse 8 IEEE 1394 Anschluss Nicht versorgte optional mit Mini PCI IEEE 1394 Modul 9 Anschlüsse für PS 2 Maus und Tastat...

Page 56: ... 3 Maustreiber Wenn Sie eine externe Maus benutzen kann Ihr Betriebsystem die Maus während der Installation automatisch konfigurie ren oder nur seine grund legenden Funktionen aktivieren Lesen Sie die Details im Benutzerhand buch für das Gerät nach Sonderzeichen Bei einigen Programmen können die Nummern Tasten zur Erzeu gung von Sonderzeichen zusam men mit der Taste Alt gedrückt werden Diese Sonde...

Page 57: ...üssen Sie den Treiber dafür installieren siehe Wireless LAN WinXP auf Seite 59 Dann können Sie die Optionen im Wireless Confituration Utility Konfigurationspro gramm für das drahtlose konfigurieren Klicken Sie dazu in der Systemsteuerung von Windows oder in der Taskleiste auf das entsprechende Symbol Abb 8 WLAN Config Utility und Eigenschaften von Drahtlose Netz werkverbindungen ...

Page 58: ...alogfeld Eigenschaften von Anzeige klicken Sie auf Einstellungen Registerkarte 4 Wählen Sie bei Bildschirmauflösung den Schieberegler auf die gewünschte Einstellung bei der Auflösung 5 Bei Farbqualität klicken Sie auf den Pfeil und stellen den gewünschten Wert für die Farbtiefe 6 Klicken Sie auf Erweitert um die Optionen anzuzeigen 7 Sie haben Zugriff auf weitere Optionen wenn Sie auf der Register...

Page 59: ...dert werden Wechseln Aktivieren Anzeigen Sie können mit Hilfe der integrierten Funktionen des Grafiktreibers zischen den Anzeigen folgen dermaßen wechseln 1 Schließen Sie den VGA Monitor an die Schnittstelle für externen Monitor VGA an 2 Gehen Sie in das Einstellfenster Eigenschaften von Intel R 82865G Graphics Controller siehe Einstellungen des Grafiktreibers auf Seite 52 und wählen Geräte Regist...

Page 60: ...2 Gehen Sie zum Einstellfenster Eigenschaften von Intel R 82865G Graphics Controller siehe Einstellungen des Grafiktreibers auf Seite 52 und wählen die Option Geräte Registerkarte 3 Klicken Sie auf das Symbol Intel R Dual Display Clone in der Registerkarte Geräte Hinweis Diese Option ist nur verfügbar wenn Sie den VGA Monitor angeschlossen haben 4 Wählen Sie das Primäre Sekundäre Gerät aus 5 Klick...

Page 61: ...ie können durch einzelne Komponenten wie dem Monitor oder der Festplatte oder mit der Standby Funktion oder dem Ruhezustand mit dem gesamten System Strom sparen die Unterstützung des Ruhezustands wird in der System steuerung wie in Abb 12 aktiviert Der Netzschalter des Computers kann so konfiguriert werden daß ihre Betätigung den Computer entweder in den Standbymodus oder in den Ruhezustand verset...

Page 62: ...me in Kapitel 4 des ausführlichen Benutzerhandbuchs das sich auf der CD ROM Device Drivers Utilities User s Ma nual befindet Meldung Autorisierte Treiber Wenn Sie eine Meldung erhalten die Ihnen mitteilt daß die von Ihnen installierten Treiber nicht autorisiert sind Digi tale Signatur nicht gefunden klicken Sie Ja Installati on fortsetzen um die Meldung zu ignorieren und mit dem Installationsvorga...

Page 63: ...Systemsteuerung Doppelklicken Sie System Symbol und klicken dann Hardware Geräte Manager 2 Klicken Sie doppelt auf das Gerät für das der Treiber aktualisiert neu installiert werden soll klicken Sie auf das neben dem Gerät 3 Klicken Sie auf die Schaltfläche Aktualisieren wählen Sie die Registerkarte Treiber und befolgen Sie die Anweisungen auf dem Bildschirm Windows XP Service Pack 1 1a Bevor Sie d...

Page 64: ...n zu öffnen 5 Sie können sich auch in der Systemsteuerung bei Sounds und Audiogeräte zeigen Sie im Start Menü auf Einstellungen klicken auf Systemsteuerung und klicken dann doppelt auf das Sounds und Audiogeräte Symbol weitere Konfigurationsoptionen anzeigen lassen Hinweis Wählen Sie in der Kategroie Ansicht Sounds Sprachein ausgabe und Audiogeräte Sounds und Au diogeräte Video WinXP 1 Klicken Sie...

Page 65: ...führen 2 Wechseln Sie Durchsuchen zum Verzeichnis D Drivers Modem WINXP Setup exe und klicken auf OK 3 Klicken Sie Schaltfläche 4 Klicken Sie 5 Ihr Modem ist nun bereit zur Konfiguration Wireless LAN WinXP 1 Klicken Sie Start Menü Ausführen 2 Wechseln Sie Durchsuchen zum Verzeichnis D Drivers WLAN Setup exe und klicken auf OK 3 Klicken Sie auf Ja Next 4 Klicken Sie auf Finish und starten Sie den C...

Page 66: ...ecurity Power Boot Exit F1 Help Select Item Change Values F9 Setup Defaults Esc Exit Select Menu Enter Select Sub Menu F10 Save and Exit Item Specific Help Select the operating system installed on your system which you will use most commonly Note An incorrect setting can cause some operating systems to display unexpected behavior Note WinME can not support USB 2 0 Setup Warning Setting itmes on th...

Page 67: ... Windows 2000 mit installiertem Service Pack 4 untersützt Wenn Sie das Flash ROM BIOS einer älteren Version aktualisiert haben die nicht über die Option Hyper Threading Technology verfügt müssen Sie nach dem BIOS Update Windows neu installieren und allen notwendigen Service Packs Sobald Sie Hyper Threading aktiviert haben DÜRFEN SIE DIESE OPTION NICHT WIEDER DEAKTIVEREN da der Computer sonst nicht...

Page 68: ...ellungen des Grafiktreibers auf Seite 52 Der Grafiktreiber ist nicht installiert oder er wurde in der Systemsteuerung nicht richtig konfiguriert Die Anleitung zur Installation des Treibers finden Sie unter Video WinXP auf Seite 58 und zur Konfigurierung des Grafiktreibers unter Einstellungen des Grafiktreibers auf Seite 52 Der Computer braucht länger als normal zum Hochfahren Daten auf dem Festpla...

Page 69: ...te 49 Der Lautstärkeregler ist zu leise eingestellt siehe Lautstärkeeinstellung auf Seite 48 Ich habe eine neue externe Tastatur oder Maus installiert kann aber nicht alle der aufgelisteten Funktionen benutzen Sie haben die Treiber zur Aktivierung der Zusatzfunktionen nicht installiert Bitte lesen Sie die Dokumentation Ihres neuen externen Geräts und vergewissern Sie sich daß Sie den Treiber dafür...

Page 70: ...diesem Anhang aufgeführten technischen Daten sind zum Zeitpunkt der Druckstellung richtig Bestimmte Elemente insbesondere Prozessortypen geschwindigkeiten können im Rahmen des Entwicklungsplans des Herstellers zwischenzeitlich geändert oder aktuali siert werden Detailinformationen erhalten Sie bei Ihrem Servicezentrum ...

Page 71: ...Hz Systembus FSB 2 8 3 0 3 2 GHz Intel Pentium 4 Prozessor FC PGA2 Paket 478 pin 130nm 130 Nanometer Prozesstechnologie 512 KB L2 Cache 533 MHz Systembus FSB 2 8 GHz Intel Celeron D Prozessor 325 330 335 340 345 350 FC PGA2 Paket 478 pin 90nm 90 Nanometer Prozesstechnologie 256 KB L2 Cache 533 MHz Systembus FSB 2 53 2 66 2 8 2 93 3 06 3 2 GHz Intel Celeron Prozessor FC PGA2 Paket 478 pin 130nm 130...

Page 72: ...2D Hardwarebeschleuniger für Blocktransfers von Daten mit einer Vielzahl an Anweisungen für 3D Audio AC 97 kompatibles Interface Kompatibel mit SoundBlaster und Windows Sound System 2 eingebaute Lautsprecher Drei Audio Buchsen Kopfhörer Ausgang Audio Eingang Mikrofon Eingang Funktion Modell A Modell B Hinweis zum Grafikspeicher Der Grafik Funktion wird ein Teil des Systemspeichers zugewiesen bzw d...

Page 73: ...Card Unterstützt zwei Steckplätze Typ II PCMCIA oder einen Steckplatz Typ III CardBus Unterstützung Speicher Ein 3 5 1 44 MB Diskettenlaufwerk unterstützt 3 Modi austauschbar durch ein 6 in 1 Kartenlesermodul oder ein Video Capture Modul Ein 3 5 Festplattenlaufwerk 25 4 mm Höhe Ultra 66 100 I F Unterstützung Geräteschacht 12 7 mm Höhe für EINE der folgenden Laufwerkskonfigurationen CD ROM Laufwerk...

Page 74: ...S Paßwort Öffnung für Sicherheitsschloß Typ Kensington Weitere Leistungs merkmale Neigungswinkel 0 15 Schwenkwinkel 270 Optional IEEE 802 11b oder 802 11g Wireless LAN Modul mit Mini PCI Schnittstelle IEEE1394 Modul mit Mini PCI Schnittstelle Internes 56K MDC Daten Faxmodem Modul 6 in 1 Kartenleser Modul als werkseitig vorgefertigte Option erhältlich Video Capture Karte unterstützt Sie Video Einga...

Page 75: ... cette publication à l exception de copies conservées par l utilisateur pour archive Les noms de marques ou de produits mentionnés dans cette publication peuvent ou pas être protégés et ou être des marques déposées par leur compagnies respectives Ils sont mentionnés dans un but d identification seulement et ne signifient pas l approbation de ce produit ou de son fabricant Août 2004 Marques Déposée...

Page 76: ...ntient aussi les pilotes et utilitaires nécessaires au fonctionnement correct de votre ordinateur Certains ou tous les éléments de l ordinateur peuvent avoir été déjà installés Si ce n est pas le cas ou si vous avez l intention de reconfigurer ou réinstaller des portions du système reportez vous au Manuel de l Utilisateur complet Le CD ROM Device Drivers Utilities User s Manual ne contient pas de ...

Page 77: ...e chaleur Il s agit d un appareil électrique Si de l eau ou tout autre liquide venait à pénétrer à l intérieur de votre ordinateur il pourrait être sérieusement endommagé 3 Evitez les interférences Tenez l ordinateur à distance de transformateurs à haute capacité moteurs électriques et autres appareils générateurs de champs magnétiques importants Ceux ci peuvent gêner ses performances normales et ...

Page 78: ...ssurez vous que la prise murale et la les rallonge s que vous utilisez peuvent supporter la consommation électrique de tous les appareils qui y sont reliées Avant de nettoyez votre ordinateur assurez vous qu il n est relié à aucune source de courant Mise en Garde pour le Sécurité Electrique Avant d entreprendre des procédures de mise à ni veau assurez vous d avoir éteint l ordina teur et déconnect...

Page 79: ...agrées Débranchez votre ordinateur de toute source d alimentation Puis adressez vous à des professionnels agréés si vous rencontrez l une des situations suivantes Si le cordon d alimentation est endommagé abimé ou effiloché Si votre ordinateur a été exposé à la pluie ou tout autre liquide Si votre ordinateur ne fonctionne pas normalement bien que vous ayez suivi les instructions de mise en marche ...

Page 80: ...ériques que vous souhaitez utiliser avec votre ordinateur par ex clavier et souris à leurs ports respectifs 3 Branchez le cordon d alimentation CA au port d entrée d alimentation CA situé sur le côté droit de l ordinateur Puis branchez le cordon d alimentation CA à une prise de courant 4 Pressez le bouton de mise en marche pour allumer Périphériques Veuillez remarquer que les périphériques imprima...

Page 81: ...me veuillez vous reporter au manuel approprié Logiciel Système Votre ordinateur peut être livré avec un logiciel système pré installé Si ce n est pas le cas ou si vous re configurez votre ordinateur pour un système différent vous constaterez que ce manuel fait référence au système d exploitation Microsoft Windows XP De plus amples informations sur l installation des pilotes et utilitaires sont dis...

Page 82: ... cette série de LCD PC Les types de modèles diffèrent en apparence physique La baie du lecteur CD DVD optique du Modèle A est située sur le côté gauche de l ordinateur celle du Modèle B se trouve à l avant et au niveau de leurs spécifications De plus le Modèle A a deux designs différents Modèle A Design I Modèle A Design II Figure 1 Différences entre les Types de Modèles et Aspects Modèle B ...

Page 83: ... de Face 2 4 3 1 2 Modèle A Design I Modèle A Design II 2 4 3 5 1 2 Figure 2 Vue De Face 1 Écran LCD 2 Haut Parleurs 3 Indicateurs d Activité LED 4 Bouton de Mise en Marche 5 Bouton Redémarrage Modèle A Design II seulement 6 Lecteur CD DVD Optique Modèle B seulement 6 3 4 1 2 2 Modèle B ...

Page 84: ...onomie d énergie la lumière clignotera en orange Quand le système est en mode Veille prolongée d économie d énergie la lumière sera éteinte Bouton Redémarrage Modèle A Design II seulement Appuyez sur ce bouton pour redémarrer votre ordinateur Ce bouton est équivalent à la combinaison de touches Ctrl Alt Suppr et est seulement disponible sur le Modèle A Design II la Figure 2 Arrêt Veuillez noter qu...

Page 85: ...teur de disquette dans le loge ment au point 1 Figure 3 Vue Gauche 1 Lecteur de Disquettes 2 Baie de Disque Dur HDD 3 Lecteur CD DVD Optique Modèle A seulement Mise en Garde Concernant le Disque Dur N essayer pas d enlever le disque dur pendant que le système est allumé Vous pourriez perdre des don nées ou causer des dom mages Des manipulations ou modifications non auto risés de votre disque dur p...

Page 86: ...ure Vidéo La carte de capture vidéo optionnelle vous permet de regarder la TV de faire de la conférence vidéo et de capturer des images fixes et de la vidéo sur votre PC Si votre achat comprend la carte de capture vidéo elle remplacera le lecteur de disquette sur le côté gauche de l ordinateur La carte possède un port d Entrée S Vidéo et des ports Audio Vidéo La carte de capture vidéo est idéale p...

Page 87: ...rou Codes Régionaux des DVD La détection de codes régionaux est liée à l appareil pas au système d exploitation Vous pouvez changer le code régional de votre module 5 fois La cinquième sé lection est permanente Elle ne peut pas être changée même si vous changez votre système d exploitation ou si vous utilisez le module dans un autre ordinateur Mise en Garde Média N essayer pas d enlever une disque...

Page 88: ...ts Carte PC 4 Boutons d Ejection Carte PC 5 2 Ports USB 6 Port d Entrée d Alimentation 7 Fente de Verrouillage de Sécurité Réglages du Volume Sonore Le niveau maximum du volume sonore avec le bouton de volu me dépend du réglage du volu me sonore dans Windows Cliquez sur l icône Volume dans la barre des tâches ou cliquez sur Démarrer Pro grammes Tous les program mes Accessoires Divertissements Cont...

Page 89: ...e système instable IEEE 1394 Le port IEEE 1394 optionnel ne supporte que des périphériques IEEE 1394 A ALIMENTATION AUTONOME Figure 6 Vue Arrière Tous les Modèles 1 Poignée de Transport 2 Prise Casque 3 Prise d Entrée Ligne 4 Prise Microphone 5 Prise Réseau RJ 45 6 Prise Téléphone RJ 11 7 2 Ports USB 8 Port IEEE 1394 sans Alimentation optionnel avec le Module Mini PCI IEEE 1394 9 Ports Souris et C...

Page 90: ...ris externe votre système d exploitation sera peut être en mesure de confi gurer votre souris auto matiquement durant son installation ou il ne pourra qu activer ses fonctions de base Assurez vous de bien vérifier la docu mentation de l appareil pour plus de détails Caractères Spéciaux Certaines applications permet tent que les touches du pavé nu mérique soient utilisées avec Alt pour produire des...

Page 91: ...z installer le pilote correspondant reportez vous à LAN Sans Fil WinXP à la page 93 Vous pouvez configurer ensuite les options à partir de l Utilitaire de Configuration Sans Fil Wireless Configuration Utility en cliquant sur l icône dans le panneau de configuration de Windows ou dans la barre des tâches Figure 8 Utilitaire de Configuration WLAN Propriétés de Connexion Réseau ...

Page 92: ...ence et thè mes 2 Double cliquez sur l icône Affichage 3 Dans la boîte de dialogue Propriétés de Affichage cliquez sur l onglet Paramètres 4 Dans Résolution de l écran déplacez le curseur jusqu à la valeur désirée pour la résolution 5 Dans Qualité couleur cliquez sur la flèche et faites défiler jusqu à la valeur désirée de profondeur de couleur 6 Cliquez sur Avancé pour faire apparaître les onglet...

Page 93: ...fichages Vous pouvez utiliser les commandes intégrées du pilote vidéo pour basculer entre les affichages comme suit 1 Branchez le moniteur VGA au port du moniteur externe VGA 2 Allez au panneau de contrôle de Propriétés de Intel R 82865G Graphics Controller reportez vous à Contrôles du Pilote Vidéo à la page 86 et sélectionnez Périphériques onglet 3 Choisissez l option d affichage dans la liste su...

Page 94: ...de contrôle de Propriétés de Intel R 82865G Graphics Controller reportez vous à Contrôles du Pilote Vidéo à la page 86 et sélectionnez Périphériques onglet 3 Cliquez sur l icône Intel R Dual Display Clone dans l onglet Périphériques Remarque cette option est disponible seulement quand vous avez branché le moniteur VGA 4 Choisissez un périphérique comme affichage Principal Secondaire 5 Ajustez les ...

Page 95: ... Vous pouvez économiser de l énergie par éléments individuels tels que le moniteur ou le disque dur ou vous pouvez utiliser les modes Veille et Veille prolongée pour économiser l énergie au niveau système activez le mode Veille prolongée à partir du panneau de configuration tels qu illustré sur la Figure 12 Le bouton de mise en marche de l ordinateur peut être paramétré pour mettre l ordinateur da...

Page 96: ...sont disponibles dans le Chapitre 4 du Manuel de l Utilisateur complet sur le CD ROM Device Drivers Utilities User s Manual Message Lecteur Autorisé Si vous recevez un message vous disant que le lecteur que vous installez n est pas autorisé Signature Numérique Introuvable cliquez juste sur Oui ou Continuer pour ignorer le message et continuer la procédure d installation Message de Conflit de Versi...

Page 97: ...z Panneau de configuration Double cliquez l icône Système puis cliquer sur l onglet Matériel Ges tionnaire de périphériques 2 Double cliquez sur le périphérique dont vous souhaitez mettre à jour réinstaller le pilote si nécessaire cliquez sur 3 Cliquez sur le bouton Mettre à jour le pilote dans l onglet Pilote et suivez les instructions à l écran Windows XP Service Pack 1 1a Prenez soin d installe...

Page 98: ...onfiguration audio 5 Vous pouvez aussi aller au panneau de configuration de Sons et périphériques audio Menu Démarrer pointez sur Paramètres et cliquez Panneau de configuration puis double cliquez l icône Sons et périphériques audio pour des options supplémentaires Remarque Si vous êtes dans l Affichage des Catégories choisissez Sons voix et périphériques audio Sons et périphériques audio Video Wi...

Page 99: ...r jusqu à D Drivers Modem WINXP Setup exe et cliquez OK 3 Cliquez bouton 4 Cliquez 5 Le modem est prêt pour la configuration de connexion LAN Sans Fil WinXP 1 Cliquez sur le menu Démarrer Exécuter 2 Naviguez Parcourir jusqu à D Drivers WLAN Setup exe et cliquez OK 3 Cliquez sur Qui Next 4 Cliquez sur Finish et redémarrez votre ordinateur 5 Vous pouvez maintenant configurer les paramètres Sélection...

Page 100: ...F1 Help Select Item Change Values F9 Setup Defaults Esc Exit Select Menu Enter Select Sub Menu F10 Save and Exit Item Specific Help Select the operating system installed on your system which you will use most commonly Note An incorrect setting can cause some operating systems to display unexpected behavior Note WinME can not support USB 2 0 Setup Warning Setting itmes on this menu to incorrect val...

Page 101: ...Hyper Threading n est supporté que par Windows XP ou Windows 2000 avec Service Pack 4 installé Si vous avez mis à jour votre BIOS à partir d une version précédente qui ne supportait pas l Hyper Threading Technology vous devez réinstaller Windows et tout Service Pack nécessaire après avoir mis à jour votre BIOS Après avoir activé l Hyper Threading ne désactivez PAS cette option ou votre ordinateur ...

Page 102: ...nstallé le pilote vidéo ou ne l avez pas configuré correctement dans le Panneau de Configuration Reportez vous à Video WinXP à la page 92 pour les instructions d installation du pilote et reportez vous à Contrôles du Pilote Vidéo à la page 86 pour les instructions de configuration du pilote vidéo L ordinateur est plus long à démarrer Des données du disque dur peuvent être perdues ou endommagées Ve...

Page 103: ...olume est réglé trop bas reportez vous à Réglages du Volume Sonore à la page 82 J ai installé un nouveau clavier ou une nouvelle souris externe mais je ne peux pas utiliser toutes les capacités énumérées Vous n avez pas installé le pilote qui active les fonctions spéciales Veuillez lire la documentation qui accompagne votre nouveau périphérique externe et assurez vous d installer le pilote car il ...

Page 104: ...pécifications énumérées dans cet Appendice sont correctes à l heure de la mise sous presse Certains éléments particu lièrement les types de processeur vitesse unique peuvent être modifiés ou mis à niveau en fonction du calendrier des parutions du fabricant Voyez auprès de votre service clientèle pour les détails ...

Page 105: ... principal à 800MHz 2 8 3 0 3 2 GHz Processeur Intel Pentium 4 Conditionnement FC PGA2 478 broches 130nm Procédé de gravure en 130 nm cache 512Ko L2 Bus principal à 533MHz 2 8 GHz Processeur Intel Celeron D 325 330 335 340 345 350 Conditionnement FC PGA2 478 broches 90nm Procédé de gravure en 90 nm cache 256Ko L2 Bus principal à 533MHz 2 53 2 66 2 80 2 93 3 06 3 2 GHz Processeur Intel Celeron Cond...

Page 106: ... intégrant un jeu exclusif d instructions pour 3D Son Interface conforme AC 97 Compatible avec SoundBlaster et Windows Sound System 2 haut parleurs intégrés Trois Prises Audio pour Sortie Casque Entrée de Ligne et Entrée Microphone Caractéristique Modèle A Modèle B Mémoire Vidéo Le système alloue ou partage une portion de la mémoire système pour un usage graphique Voir Dynamic Video Memory Technol...

Page 107: ... de Type III Support de Card bus Stockage de Données Un lecteur de disquettes fixe 3 5 pouces 3 modes Interchangeable Avec Module de Lecteur de Carte 6 en 1 ou Module de Capture Vidéo Disque Dur 3 5 25 4mm Support Ultra 66 100 I F Baie Périphérique 12 7mm h pour UNE des configurations suivantes CD ROM DVD ROM CD RW Combo DVD ROM et CD RW DVD RW R Communication Modem Données Fax 56k MDC Interne amo...

Page 108: ...e Sécurité type Kensington Autres Caracté ristiques Inclinaison 0 15 Rotation 270 Options Module LAN Sans Fil IEEE 802 11b ou 802 11g avec interface Mini PCI Module IEEE 1394 avec interface Mini PCI Module Modem Données Fax MDC 56K Interne Module de Lecteur de Carte 6 en 1 disponible comme option montable à l usine Carte de Capture Vidéo Supportant l Entrée S Vidéo et le Terminal AV disponible com...

Page 109: ... guardar copias de reserva Los nombres de marcas y de productos mencionados en esta publicación pueden o no ser copyrights y o marcas comerciales registradas de sus respectivas compañías Se mencionan sólo con propósitos de identificación y no intentan ser un endoso del producto o fabricante en cuestión Agosto de 2004 Marcas comerciales Este producto incorpora tecnología para la protección del copy...

Page 110: ...or En este CD ROM también se encuentran los controladores y utilitarios necesarios para utilizar el ordenador correctamente Es posible que algunos o todos los parámetros del ordenador estén configurados Si no están configurados o si desea reconfigurar o reinstalar partes del sistema consulte el Manual del usuario completo El CD ROM Device Drivers Utilities User s Manual no contiene ningún sistema ...

Page 111: ...el ordenador y la toma de alimentación lejos de fuentes de calor Éste es un dispositivo eléctrico El agua o cualquier otro líquido podrían dañarlo severamente 3 Evite las interferencias Mantenga el ordenador lejos de transformadores de alta capacidad motores eléctricos y otros campos magnéticos fuertes Estos elementos pueden obstaculizar el rendimiento y dañar los datos 4 Siga los procedimientos d...

Page 112: ...er alargadera que utilice puedan soportar la carga de corriente total de todos los dispositivos conectados Antes de limpiar el ordenador asegúrese de que esté desconectado de cualquier fuente de alimentación externa Advertencia sobre la seguridad eléctrica Antes de realizar procedi mientos de actualización verifique si ha desconec tado la alimentación eléc trica los periféricos y los cables inclui...

Page 113: ...descargas eléctricas Deje las reparaciones en manos de personal de servicio autorizado Desconecte el ordenador de la toma de alimentación eléctrica Deje las reparaciones en manos de personal de servicio cualificado si se presenta alguna de las siguientes condiciones El cable de alimentación está dañado o pelado El ordenador ha estado expuesto a lluvia u otros líquidos El ordenador no funciona norm...

Page 114: ...en los puertos correspondientes los periféricos que desee utilizar con el ordenador p ej teclado y mouse 3 Conecte el cable de alimentación CA al puerto de entrada CA de alimentación que está del lado derecho del ordenador y luego conecte el cable de alimentación CA en un eschufe 4 Presione el botón de encendido para encender Dispositivos periféricos Los periféricos impresoras cámaras digitales et...

Page 115: ...vos o programas consulte los manuales correspondientes Software de sistema Puede ser que su ordenador tenga instalado un software de sistema Si no es el caso o si desea reconfigurarlo con otro sistema este manual considera Microsoft Windows XP como sistema operativo Si desea más información sobre cómo instalar controladores y utilitarios consulte el capítulo 4 del Manual del usuario completo que s...

Page 116: ... serie de LCD PC Los tipos de modelo difieren en su aspecto físico La bahía del dispositivo óptico de CD DVD del Modelo A está situada a la izquierda del ordenador la del Modelo B está en la parte frontal y en sus especificaciones Además el Modelo A tiene dos diseños diferentes Modelo A Diseño I Modelo A Diseño II Figura 1 Tipos de modelos y diferencias de diseño Modelo B ...

Page 117: ...ta frontal 2 4 3 1 2 Modelo A Diseño I Modelo A Diseño II 2 4 3 5 1 2 2 Figura 2 Vista frontal 1 Panel LCD 2 Altavoces incorporados 3 Indicadores LED de actividad 4 Botón de encendido 5 Botón reinicio sólo Modelo A Diseño II 6 Dispositivo óptico de CD DVD sólo Modelo B 6 3 4 1 2 2 Modelo B ...

Page 118: ... verde fija Cuando el sistema esté en el modo de ahorro de energía Suspensión la luz estará en naranja parpadeando Cuando el sistema esté en el modo ahorro de energía Hibernación la luz estará apagada Botón reinicio sólo Modelo A Diseño II Pulse este botón para reiniciar su ordenador Este botón equivale a pulsar Ctrl Alt Supr y sólo está disponible en el Modelo A Diseño II Figura 2 Apagar Por favo...

Page 119: ...lazará el mó dulo de la unidad de disquete en la ranura en el punto 1 Figura 3 Vista izquierda 1 Unidad de disquete 2 Bahía para el disco duro HDD 3 Dispositivo óptico de CD DVD sólo Modelo A Advertencia sobre el disco duro No intente extraer el disco duro HDD mientras el sistema esté funcionando ya que podría perder o dañar datos La extrac ción o manipulación no autorizada del disco duro puede de...

Page 120: ... IBM Microdrive Tarjeta de captura de vídeo La tarjeta de captura de vídeo opcional le permite ver la televisión realizar videoconferencia y capturar imágenes instantáneas y vídeo en su PC Si su compra incluye la tarjeta de captura de vídeo reemplazará al montaje de la unidad de disquete en el lado izquierdo del ordenador La tarjeta tiene un puerto de entrada de S Vídeo y puertos de Audio Vídeo La...

Page 121: ...dar atrapados en el orificio Códigos regionales de DVD La detección del código regional de DVD depende del dispositivo y no del sistema operativo Es posible selec cionar el código regional 5 veces La quinta selección es permanente No se puede alterar por más que se cambie de sistema operativo o el módulo se utilice en otro ordenador Advertencia sobre soportes extraíbles No intente extraer un disqu...

Page 122: ...tones de expulsión de tarjeta PC 5 2 Puertos USB 6 Puerto de entrada de alimentación CA 7 Ranura de bloqueo de seguridad Ajuste del volumen del sonido Lo alto que se puede establecer el volumen usando el botón de control dependerá de la confi guración del control del volu men en Windows Haga clic en el icono del Volumen de la ba rra de tareas o vaya a Inicio Programas Todos los progra mas Accesori...

Page 123: ...trada para micrófono 5 Conector LAN RJ 45 6 Conector de teléfono RJ 11 7 2 Puertos USB 8 Puerto IEEE 1394 sin corriente opcional con Módulo Mini PCI IEEE 1394 9 Puertos mouse y teclado PS 2 10 Puerto paralelo 11 Puerto serie 12 Puerto para monitor externo VGA 13 Rejillas Aviso sobre el puerto El ordenador sólo acepta un teclado o mouse a la vez No intente instalar un teclado o mouse USB y un PS 2 ...

Page 124: ...ema 1 2 2 3 Controlador del mouse Si está utilizando un mouse externo puede que su sistema operativo pueda configurar automá ticamente su mouse du rante la instalación o sólo habilitar sus funciones básicas Compruebe la documentación del dispo sitivo para más detalles Caracteres especiales Algunas aplicaciones de soft ware le permiten usar las teclas numéricas con Alt para producir caracteres espe...

Page 125: ...inalámbrica necesitará instalar su controlador consulte LAN inalámbrica WinXP en la página 127 Podrá entonces configurar las opciones desde la utilidad de configuración inalámbrica Wireless Configuration Utility haciendo clic en el Panel de control de Windows o desde la barra de tareas Figura 8 Utilidad de configuración de WLAN y Propiedades de conexiones de red ...

Page 126: ...adro de diálogo Propiedades de Pantalla haga clic en Configuración ficha 4 En Resolución de pantalla mueva el control deslizante a la configuración predeterminada para resolución 5 En Calidad del color haga clic en la flecha y desplace hasta la configuración preferida para la profundidad del color 6 Haga clic en Opciones avanzadas para abrir las fichas de opciones 7 Puede hacer clic en Propiedades...

Page 127: ...nmutar habilitar pantallas Es posible utilizar los controles incorporados del controlador de vídeo para cambiar de pantalla de la siguiente manera 1 Conecte el monitor VGA al puerto para monitor externo VGA 2 Vaya al panel de control Propiedades de Intel R 82865G Graphics Controller consulte Controles del controlador de vídeo en la página 120 y seleccione Dispositivos ficha 3 Elija la opción de pa...

Page 128: ...de control Propiedades de Intel R 82865G Graphics Controller consulte Controles del controlador de vídeo en la página 120 y seleccione Dispositivos ficha 3 Haga clic en el icono Intel R Dual Display Clone en la ficha Dispositivos Nota Esta opción sólo está disponible cuando ha conectado el monitor VGA 4 Elija un dispositivo para que sea la pantalla Primaria o Secundaria 5 Ajuste la configuración h...

Page 129: ... de energía del ordenador Es posible conservar energía a través de componentes individuales como el monitor o el disco duro o a través del sistema utilizando el modo Suspensión o Hibernación habilitar el soporte de hibernación desde el panel de control como se indica en la Figura 12 El botón de encendido del ordenador puede configurarse para poner al ordenador en modo Suspensión o Hibernación Figu...

Page 130: ...s y utilidades en el Capítulo 4 del Manual del usuario completo en el CD ROM Device Drivers Utilities User s Manual Mensaje de controladores autorizados Si recibe un mensaje diciéndole que el controlador que está instalando no está autorizado No se encuentra firma digital haga clic en Sí o Continuar para ignorar el mensaje y continuar con el proceso de instalación Mensaje de conflicto de versiones...

Page 131: ...icono y luego haga clic en Hardware ficha Administrador de dispositivos botón 2 Haga doble clic en el dispositivo para el que desea actualizar reinstalar el controlador puede que necesite hacer clic en 3 Busque el botón Actualizar controlador compruebe la ficha Controlador y siga los mensajes en pantalla Windows XP Service Pack 1 1a Asegúrese de haber instalado el Service pack 1 1a para Windows XP...

Page 132: ... del audio 5 También puede ir al panel de control Dispositivos de sonido y audio menú Inicio vaya a Configuración y haga clic en Panel de control luego haga doble clic en el icono Dispositivos de sonido y audio para más opciones de configuración Nota Si está en la Vista por categorías elija Dispositivos de sonido audio y voz Dispositivos de sonido y audio Vídeo WinXP 1 Hacer clic en Inicio menú Ej...

Page 133: ...ya a Examinar D Drivers Modem WINXP Setup exe y haga clic en Aceptar 3 Haga clic en botón 4 Haga clic en 5 El módem está listo para la configuración del acceso telefónico LAN inalámbrica WinXP 1 Hacer clic en Inicio menú Ejecutar 2 Vaya a Examinar D Drivers WLAN Setup exe y haga clic en Aceptar 3 Haga clic en Sí Next 4 Haga clic en Finish y reinicie el sistema 5 Ahora puede ajustar la configuració...

Page 134: ... F1 Help Select Item Change Values F9 Setup Defaults Esc Exit Select Menu Enter Select Sub Menu F10 Save and Exit Item Specific Help Select the operating system installed on your system which you will use most commonly Note An incorrect setting can cause some operating systems to display unexpected behavior Note WinME can not support USB 2 0 Setup Warning Setting itmes on this menu to incorrect va...

Page 135: ...l Híper entrelazado Hyper Threading sólo lo soporta Windows XP o Windows 2000 con el Paquete de servicios 4 instalado Si ha actualizado la Flash ROM BIOS desde una versión anterior que no tenía la opción Hyper Threading Technology deberá volver a instalar Windows y los Paquetes de servicios Service Packs necesarios tras la actualización de la BIOS Una vez activado el Híper entrelazado Hyper Thread...

Page 136: ...ado el controlador de vídeo ni lo ha configurado correctamente desde el Panel de control Consulte Vídeo WinXP en la página 126 para instrucciones sobre la instalación de los controladores y consulte Controles del controlador de vídeo en la página 120 para instrucciones sobre la configuración del controlador de vídeo El ordenador tarda más de lo normal para arrancar Pueden perderse o dañarse datos ...

Page 137: ...n la página 117 El botón del control del volumen está demasiado bajo consulte Ajuste del volumen del sonido en la página 116 He instalado un nuevo teclado o mouse pero no puedo utilizar todas sus funciones No ha instalado el controlador para habilitar las funciones suplementarias Lea la documentación suministrada con el nuevo dispositivo externo e instale el controlador para poder acceder a las fu...

Page 138: ...specificaciones Las especificaciones listadas en este Apéndice son correctas en el momento de publicación Ciertas opciones particularmente tipos velocidades de procesadores pueden cambiar o actualizarse según la fecha de lanzamiento del fabricante Diríjase a su centro de ser vicios para más detalles ...

Page 139: ...ma de 800MHz 2 8 3 0 3 2 GHz Procesador Intel Pentium 4 Encapsulado FC PGA2 478 contactos 130nm tecnología de proceso de 130 nm caché L2 de 512KB bus del sistema de 533MHz 2 8 GHz Procesador Intel Celeron D 325 330 335 340 345 350 Encapsulado FC PGA2 478 contactos 90nm tecnología de proceso de 90 nm caché L2 de 256KB bus del sistema de 533MHz 2 53 2 66 2 80 2 93 3 06 3 2 GHz Procesador Intel Celer...

Page 140: ...cias de datos de nivel de bloques integrando un amplio conjunto de instrucciones para 3D Sonido Interfaz compatible con AC 97 Compatible con SoundBlaster Windows Sound System 2 altavoces incorporados Tres clavijas de Audio para salida de auriculares entrada de línea y entrada de micrófono Característica Modelo A Modelo B Memoria para vídeo El sistema asigna al uso del vídeo una porción de memoria ...

Page 141: ...I o una ranura tipo III soporte para Cardbus Dispositivos de almacenamiento Unidad de disquete 3 5 de 3 modos Intercambiable con el Módulo lector de tarjetas 6 en 1 o con el módulo de Captura de vídeo Unidad de disco duro cambiable 3 5 25 4 mm h soporte Ultra 66 100 I F Espacio para unidad 12 7mm h para UNA de las siguientes opciones CD ROM DVD ROM CD RW combo CD RW DVD ROM DVD RW R Comunicaciones...

Page 142: ...eguridad tipo Kensington Contraseña BIOS Otras características Inclinación 0 15 Giro 270 Opcionales Módulo LAN inalámbrico IEEE 802 11b u 802 11g con interfaz Mini PCI Módulo IEEE 1394 con interfaz Mini PCI Módulo Módem Fax Datos interno de 56K MDC Módulo lector de tarjetas 6 en 1 disponible como opción de fábrica Tarjeta de captura de vídeo soporta entrada de S Vídeo y terminal AV disponible como...

Page 143: ...ie conservate dall utente per scopo di back up I nomi di marchio e di prodotto contenuti nella presente pubblicazione possono o non possono essere copyright e o marchi registrati delle aziende corrispondenti Sono citati a solo scopo informativo e non intendono rappresentare un diritto di quel prodotto o del produttore corrispondente Agosto 2004 Marchio di fabbrica Questo prodotto incorpora una tec...

Page 144: ...ual fornito a corredo del computer Inoltre questo CD ROM contiene i driver e le utilità necessari per il corretto uso del computer È possibile che alcune o tutte le funzioni del computer siano già state installate In caso contrario oppure se si desidera riconfigurare o reinstallare parti del sistema consultare il Manuale per l utente esteso Il CD ROM Device Drivers Utilities User s Manual non cont...

Page 145: ...uter e l alimentazione elettrica lontano da elementi riscaldanti Questo è un apparecchio elettrico Se acqua o liquidi penetrano al suo interno il computer ne risulta gravemente danneggiato 3 Evitare le interferenze Allontanare il computer da trasformatori ad alta capacità motori elettrici ed altri campi magnetici potenti che possono compromettere le prestazioni corrette e danneggiare i dati 4 Segu...

Page 146: ...resa e non tirando il cavo Verificare che la presa e l eventuale prolunga usate possano sostenere il carico elettrico totale di tutti i dispositivi collegati Prima di pulire il computer verificare che sia scollegato da qualsiasi fonte di alimentazione Avvertenza di sicurezza di alimentazione Prima di eseguire procedure di aggiornamento verificare di avere spento l alimentazione e scollegato tutte ...

Page 147: ...a ed esporre l utente e il computer a scossa elettrica Per l assistenza rivolgersi solamente a tecnici autorizzati Scollegare il computer dall alimentazione Rivolgersi a tecnici dell assistenza qualificati nel caso si verifichino le seguenti condizioni Quando il cavo di alimentazione è danneggiato o fallato Se il computer è stato esposto a pioggia o ad altri liquidi Se il computer non funziona nor...

Page 148: ...ali di imballo 2 Collegare bene le periferiche che si desidera usare con il computer per esempio tastiera e mouse alle porte corrispondenti 3 Collegare il cavo di alimentazione CA alla porta di ingresso dell alimentazione CA situata a destra del computer quindi inserire il cavo di alimentazione CA in una presa 4 Premere il pulsante di alimentazione per accendere Periferiche Si osservi che le perif...

Page 149: ...i programmi consultare pertanto i manuali corrispondenti Software del sistema È possibile che il software sia già pre installato sul computer In caso contrario oppure in casi di riconfigurazione del computer per un sistema diverso questo manuale si riferisce al sistema operativo Microsoft Windows XP Ulteriori informazioni sull installazione di driver e utilità sono disponibili nel capitolo 4 del M...

Page 150: ...uesta serie di PC LCD Le tipologie di modelli differiscono nell aspetto fisico La bay dell unità ottica CD DVD del Modello A si trova sulla sinistra del computer mentre quella del Modello B si trova davanti e nelle caratteristiche tecniche Inoltre il Modello A presenta due Design differenti Modello A Design I Modello A Design II Figura 1 Tipologie di modelli e differenze nei Design Modello B ...

Page 151: ...a Vista anteriore 2 4 3 1 2 Modello A Design I Modello A Design II 2 4 3 5 1 2 2 Figura 2 Vista anteriore 1 Schermo LCD 2 Altoparlanti incorporati 3 LED indicatori di attività 4 Pulsante di alimentazione 5 Tasto Reset solo Modello A Design II 6 Unità ottica CD DVD solo Modello B 6 3 4 1 2 2 Modello B 1 ...

Page 152: ... il sistema è in modalità di risparmio energetico Standby la luce lampeggia di colore arancione Quando il sistema è in modalità di risparmio energetico Sospensione la luce è spenta Tasto Reset solo Modello A Design II Premere questo tasto per riavviare il computer Questo tasto equivale alla pressione della combinazione Ctrl Alt Canc ed è disponibile solo sul Modello A Design II Figura 2 Spegniment...

Page 153: ...e vid eo il modulo opzionale sostituisce il modulo dell unità floppy nello slot al punto 1 Figura 3 Vista sinistra 1 Unità disco floppy 2 Bay disco rigido 3 Unità ottica CD DVD solo Modello A Avvertenza unità Non cercare di estrarre il disco rigido HDD quando il sistema è acceso Ciò può causare la perdita o il danneggiamento dei dati La rimozione o la alterazione non autorizzata dell HDD può viola...

Page 154: ...e Scheda di acquisizione video La scheda di acquisizione video opzionale consente di vedere la TV partecipare a videoconferenze e catturare immagini fisse e video sul PC Se l acquisto comprende la scheda di acquisizione video essa sostituisce l assemblaggio dell unità floppy sul lato sinistro del computer La scheda dispone di un ingresso S Video e di porte Audio Video La scheda di acquisizione vid...

Page 155: ...i oppure rimanere incastrato nel foro Codici regionali DVD La rilevazione regionale DVD dipende dal dispositivo e non dal sistema operativo È possibile selezionare il codice regionale del modulo 5 volte La quinta selezione è permanente Non può essere modificata anche cambiando il proprio sistema operativo oppure usando il modulo in un altro computer Avvertenza supporti Non cercare di estrarre un d...

Page 156: ...pulsione slot PC Card 5 2 Porte USB 6 Porta di ingresso dell alimentazione CA 7 Slot blocco di sicurezza Regolazione del volume audio L intensità massima del volume audio che è possibile impostare con la manopola di controllo del volume dipende dall imposta zione del controllo volume inter no a Windows Fare clic sull icona Volume nella barra delle applicazioni oppure fare clic su Start Programmi T...

Page 157: ...IEEE 1394 La porta IEEE 1394 opzionale sup porta solamente dispositivi IEEE 1394 AUTOALIMENTATI Figura 6 Vista posteriore tutti i modelli 1 Maniglia di trasporto 2 Jack uscita delle cuffie 3 Jack ingresso segnale esterno Line In 4 Jack ingresso del microfono 5 Jack di rete tipo RJ 45 6 Jack telefonico tipo RJ 11 7 2 Porte USB 8 Porta IEEE 1394 non alimentata opzionale con Modulo Mini PCI IEEE 1394...

Page 158: ...Se si utilizza un mouse esterno il sistema opera tivo potrebbe essere in grado di configurare auto maticamente il mouse du rante l installazione o attivarne solo le funzion alità di base Consultare la documentazione per l utente della periferica per i dettagli Caratteri speciali Alcune applicazioni software consentono di utilizzare i tasti nu merici insieme al tasto Alt per produrre caratteri spec...

Page 159: ...lo LAN Wireless opzionale è necessario installare il driver adatto vedere LAN Wireless WinXP a pagina 161 Quindi è possibile configurare le opzioni dalla Wireless Configuration Utility facendo clic sulla sua icona nel pannello di controllo di Windows o nella barra delle applicazioni Figura 8 WLAN Configuration Utility e Proprietà Connessione di rete ...

Page 160: ...tà Schermo fare clic su Impostazioni scheda 4 In Risoluzione dello schermo scorrere l indicatore nella posizione desiderata per la risoluzione 5 In Colori fare clic sulla freccia e selezionare l impostazione desiderata per la profondità di colore 6 Fare clic su Avanzate per visualizzare le schede delle opzioni 7 YÈ possibile fare clic sul pulsante Proprietà grafiche nella scheda Intel R Extreme Gr...

Page 161: ...splay Per commutare i display è possibile utilizzare i comandi incorporati del driver video come segue 1 Collegare il monitor VGA alla porta per monitor esterno VGA 2 Aprire il pannello di controllo delle proprietà dell interfaccia Intel R 82865G Graphics Controller vedere Comandi driver video a pagina 154 quindi selezionare la scheda Dispositivi 3 Selezionare l opzione di visualizzazione dall ele...

Page 162: ... di controllo delle proprietà dell interfaccia Intel R 82865G Graphics Controller vedere Comandi driver video a pagina 154 quindi selezionare la scheda Dispositivi 3 Fare clic sull icona Intel R Dual Display Clone nella scheda Dispositivi nota questa opzione è disponibile solo quando è collegato un monitor VGA 4 Scegliere un monitor da impostare come dispositivo Primario Secondario 5 Se necessario...

Page 163: ...omputer È possibile risparmiare energia attraverso componenti singoli come il monitor o il disco rigido oppure utilizzare la modalità di Standby o Sospensione per conservare energia in tutto il sistema attivare il supporto di sospensione dal Pannello di controllo come illustrato nella Figura 12 Per portare il computer in modalità di Standby o di Sospensione è possibile impostare il pulsante di ali...

Page 164: ...Manuale utente completo memorizzato sul CD ROM Device Drivers Utilities User s Manual Messaggio di Driver autorizzato Se si riceve un messaggio che afferma che il driver che si sta installando non è autorizzato firma digitale non trovata è sufficiente fare clic su Sì oppure su Continua per ignorare il messaggio e continuare la procedura di installazione Messaggio di conflitto di versione Se durant...

Page 165: ...re clic sulla scheda Hardware pulsante Gestione periferiche 2 Fare doppio clic sulla periferica di cui si desidera aggiornare reinstallare il driver potrebbe essere necessario fare clic sul segno 3 Cercare il pulsante Aggiorna driver controllare la scheda Driver quindi attenersi alle istruzioni visualizzate a schermo Windows XP Service Pack 1 1a Accertarsi di installare il Service Pack 1 1a di Win...

Page 166: ...5 È anche possibile aprire Suoni e periferiche audio nel Pannello di controllo Menu Start e puntare su Impostazioni fare clic su Pannello di controllo quindi doppio clic sull icona Suoni e periferiche audio per ulteriori opzioni di configurazione Nota Se è selezionata la visualizzazione per categorie scegliere Suoni voce e periferiche audio Suoni e periferiche audio Video WinXP 1 Fare clic su Star...

Page 167: ...foglia D Drivers Modem WINXP Setup exe e fare clic su OK 3 Fare clic su pulsante 4 Fare clic su 5 Il modem è pronto per la configurazione della connessione LAN Wireless WinXP 1 Fare clic su Start menu Esegui 2 Cercare Sfoglia D Drivers WLAN Setup exe e fare clic su OK 3 Fare clic su Sí Next 4 Fare clic su Finish quindi riavviare il computer 5 È ora possibile configurare le impostazioni Selezione P...

Page 168: ... Boot Exit F1 Help Select Item Change Values F9 Setup Defaults Esc Exit Select Menu Enter Select Sub Menu F10 Save and Exit Item Specific Help Select the operating system installed on your system which you will use most commonly Note An incorrect setting can cause some operating systems to display unexpected behavior Note WinME can not support USB 2 0 Setup Warning Setting itmes on this menu to in...

Page 169: ...ia Hyper Threading Hyper Threading è supportato unicamente in Windows XP o Windows 2000 con Service Pack 4 installato Se si è aggiornato il Flash ROM BIOS da una versione precedente che non presenta l opzione Hyper Threading Technology è necessario reinstallare Windows e ogni Service Pack necessario dopo l aggiornamento del BIOS Una volta attivato l Hyper Threading NON disattivare l opzione o il c...

Page 170: ...llo di controllo Vedere Video WinXP a pagina 160 per le istruzioni sull installazione del driver e Comandi driver video a pagina 154 per le istruzioni sulla configurazione del driver Il computer impiega più tempo durante l avvio I dati salvati sull unità di disco rigido possono essere perduti o danneggiati Eseguire la scansione del disco o la deframmentazione del disco per verificare la perdita o ...

Page 171: ...golazione del volume audio a pagina 150 Ho installato una nuova tastiera esterna o mouse ma non riesco ad usare tutte le funzioni elencate Non è stato installato il driver per l attivazione delle funzioni accessorie Leggere la documentazione di accompagnamento di tutte le periferiche esterne e verificare di installare il driver necessario per accedere alle funzioni accessorie fornite con il dispos...

Page 172: ...ecifiche tecniche Le specifiche tecniche elencate in questa appendice sono corrette al momento di andare in stampa Alcuni elementi in particolare tipi di processore e velocità possono essere modificati o aggiornati causa la programmazione del produttore Per dettagli rivolgersi al proprio centro di assistenza ...

Page 173: ... L2 da 512KB FSB a 800 MHz 2 8 3 0 3 2 GHz Processore Intel Pentium 4 pacchetto FC PGA2 478 pin 130nm tecnologia di processo a 130 nm cache L2 da 512KB FSB a 533 MHz 2 8 GHz Processore Intel Celeron D 325 330 335 340 345 350 pacchetto FC PGA2 478 pin 90nm tecnologia di processo a 90 nm cache L2 da 256KB FSB a 533 MHz 2 53 2 66 2 80 2 93 3 06 3 2 GHz Processore Intel Celeron pacchetto FC PGA2 478 p...

Page 174: ...are 2D per i trasferimenti di dati a livello di blocco con integrazione di un esteso seti di istruzioni 3D Audio Interfaccia conforme a AC 97 Compatibile con SoundBlaster Windows Sound System 2 altoparlanti integrati Tre jack Audio per uscita cuffie ingresso linea esterna e ingresso microfono Funzionalità Modello A Modello B Memoria video Il sistema colloca o condivide una parte della memoria di s...

Page 175: ... supporto Cardbus Periferiche di memorizzazione Unità floppy da 3 5 1 44MB modo 3 intercambiabile con modulo Lettore di schede 6 in 1 o modulo di acquisizione video Unità disco rigido facilmente sostituibile da 3 5 25 4 mm altezza supporto Ultra 66 100 I F Bay periferica da 12 7 mm altezza per UNA delle seguenti opzioni di configurazione dell unità CD ROM DVD ROM CD RW Combinazione CD RW DVD ROM D...

Page 176: ...sword BIOS Slot blocco di sicurezza Tipo Kensington Altre caratteristiche Inclinazione 0 15 rotazione 270 Opzioni Modulo LAN Wireless IEEE 802 11b oppure 802 11g con interfaccia Mini PCI Modulo IEEE 1394 con interfaccia Mini PCI Modulo Modem MDC dati fax interno da 56K Modulo lettore di schede 6 in 1 disponibile come opzione di fabbrica Scheda di acquisizione video supporto per ingresso S Video e ...

Reviews: