background image

5.

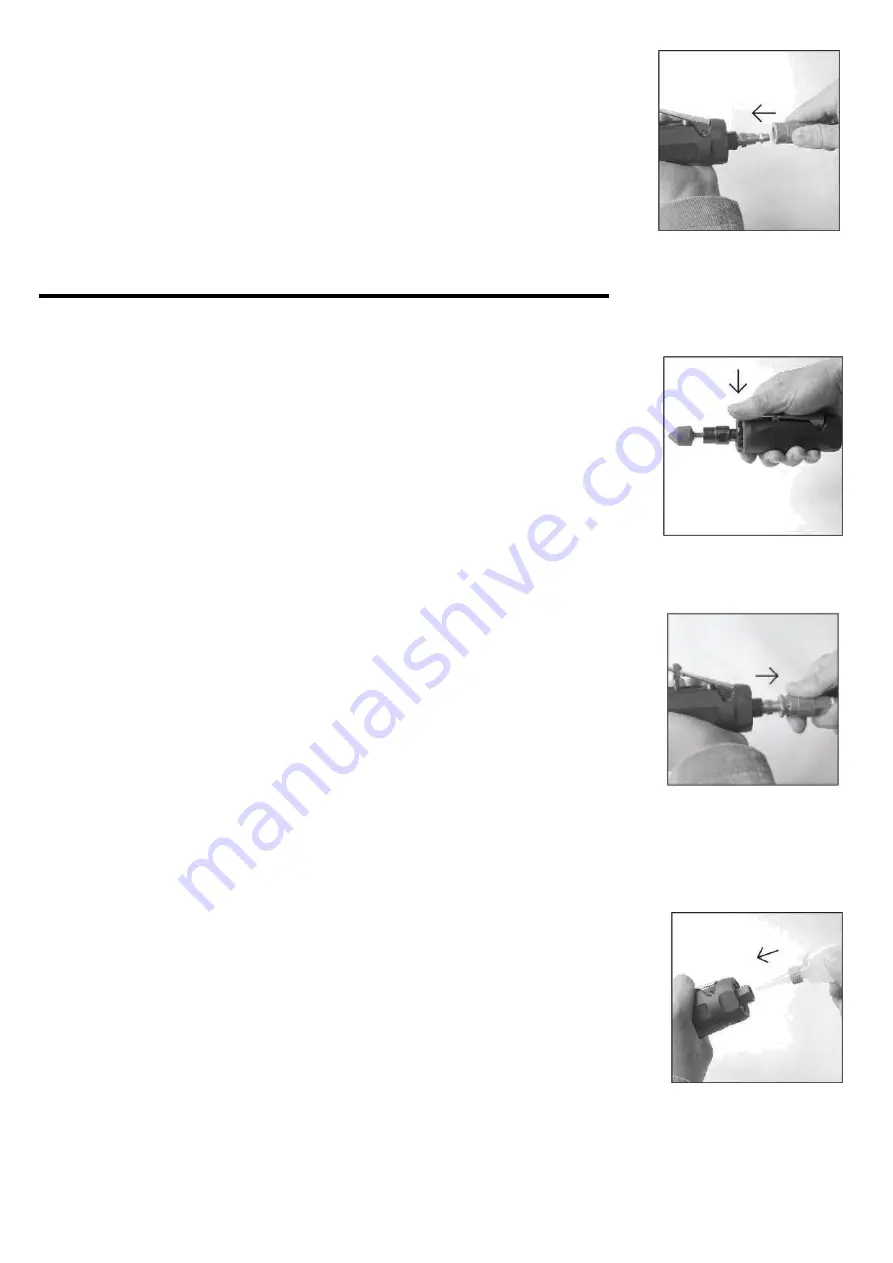
Remove the 

air 

cap 

from the 

tool air 

inlet 

and connect 

the

 air

supply hose to 

the 

tool. Set the air pressure at 

90 

PSI

.

 (See Figure

4)

6.

Push forward the lever block (Part #4)and press down on the
lever trigger (Part #3). How far the lever trigger is

 pressed

determines 

the 

tool rotation speed. Then the tool starts to

work. (See Figure  5)

CARE AND MAINYENANCE 

The tool should be lubricated daily (or before each use) with air 
tool oil (not included). 

Air tool oil is available at major tool hardware stores. SAE 
#10 weight oil or sewing machine lubricant or any other 
high grade turbine oil containing moisture absorbent, 
rust inhibitors, metal wetting agents and an EP (extreme 
pressure) additive may be used as a substitute. Do not 
use detergent oil. 
During continuous operation, the tool should be oiled 

every 1 to 2 hours. This may be done using an in-line oiler, 
or manually. If done manually, proceed as follows: 

1.

Disconnect the tool from air supply. (See Figure 6)

2.

Place a few drops of air tool oil into the air inlet.
(See Figure  7)

Avoid the misuse of thicker oil which may lead to the reduced 

performance or malfunction. 

3.

Connect the tool to the air supply. Run the tool without load for
a few seconds to distribute the oil through the tool.

Any excess oil may be propelled from the exhaust area. So 
keep the tool away in a safe direction. 

4.

After operating the tool and before storing the tool,
disconnect the air hose and place 4 or 5 drops of air tool oil into
the air inlet, then re-connect the air hose and run the tool to
evenly distribute the oil throughout the tool for 30 seconds
approximately. This will prolong the tool life.

5.

Avoid storing the tool in a humid environment which

promotes rusting of internal mechanisms. Always oil the tool
before  storage.

6.

When the tool is seriously damaged or out of life, it should be
left in a resource recycling can. Never drop it into fire.

Figure 4 

Figure 

5


Figure  6 

Figure 7 

Summary of Contents for ADG.2S

Page 1: ...Air die grinder ADG 2S Operators manual ...

Page 2: ...al purchaser of the product HOW TO GET SERVICE The product or part must be returned to the distributor or sales agent for examination You must provide proof of initial purchase date and an explanation of the complaint must accompany the merchandise If our inspection discloses a defect we will repair or replace the product or refund the purchase price at our option We will return the repaired produ...

Page 3: ...ionofflammable materials Neveroperate toolsnear flammable substances such as gasoline naphtha cleaning solvents etc Workinaclean well ventilatedareafreeof combustible materials Never useoxygen carbondioxideorotherbottled gases as a power source for air tools Exceeding themaximumpressure ratingoftoolsor accessoriescouldcauseanexplosionresultingin serious injury Use compressed air regulated to amaxi...

Page 4: ...and balance Keep handles dry clean and free from oiI grease Stayalert Watchwhatyouaredoing Use common sense Donotoperatetoolwhenyouare tired Poorquality improper ordamagedtoolssuchas grinding wheels chisels sockets drills nailers staplers etc can fly apart during operation propelling particles throughout the work area causing serious injury Alwaysusetool attachmentratedforthespeedof the power tool...

Page 5: ...es etc which could become entangledinmovingpartsofthetools Remove any jewelry watches identifications bracelets necklaces etc whichmightbecome caught by the tool Keep handsaway from moving parts Tieuporcover long hair Alwayswearproperfittingclothingandothersafety equipment when using the tool RISK OF CUT OR BURNS WHAT COULD HAPPEN HOW TO PREVENT IT TooIs that cut shear drill staple punch chisel et...

Page 6: ...ily as well asany condensation inthe air lines Water in the air line may enter the tool and damage the tool mechanisms at operation 5 Clean the air inlet filter cartridge weekly The recommended hook up procedure can be viewed in the diagram below 6 Line pressure should be increased accordingly to make up for extra long air hoses usually over 8meters The minimum hose diameter should be 1 4 I D and ...

Page 7: ...sales agent for replacement OPERATING INSTRUCTIONS 1 Lubricate thetool before operating See CAREAND MAINTENANCE section for oilinginstructions 2 Loosen the collet fixing cap Part 31 counterclockwise with one wrench while holding the other wrench on the flats of the collet base Part 27 See Figure 1 3 Insert a grinding accessory like a grinding stone not provided into the collet hole See Figure 2 4 ...

Page 8: ...oiler or manually If done manually proceed as follows 1 Disconnect the tool from air supply See Figure 6 2 Place a few drops of air tool oil into the air inlet See Figure 7 Avoid the misuse of thicker oil which may lead to the reduced performance or malfunction 3 Connect thetool to theair supply Run thetool without load for a fewseconds to distributethe oil throughthe tool Any excess oilmay be pro...

Page 9: ...oseis the propersize Long hose or tools using large volumes of air may require a hose with an1 D of 1 2in or largerdepending on the total length of the hoses b Do not use a multiple number of hoses connected together with quick connect fittings This causes additional pressure drops and reduces the tool power Directly connect the hoses together 6 Replace rotor blade 7 Water in tank drain tank See a...

Page 10: ...9 EXPLODED DIAGRAM AND PARTS LIST ...

Page 11: ... the tool for spare parts ordering for any necessary replacement to get continuous use of tool and for extending the toollife When ordering spare parts and components give each part number and order quantity Thank you Discover other pneumatic grinders on our website ...

Reviews: