

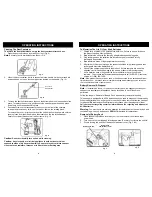


Insert into
Lower
Handle
Fig. 1a
Fig. 1b
Fig. 1
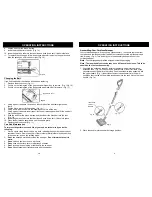
1. Assemble the extension tubes by pushing the plastic insert into the mating
extension tube. (Fig. 1a) Push until only small portion of insert is visible or you
cannot press any farther into the tubing. Push the extension tube assembly into
the upper handle. (Fig. 1) Insert the extension tube assembly into the lower
handle so that the tab on the plastic insert snaps into the open slot on the lower
handle. (Fig. 1b)
Assembling Your Cordless Sweeper
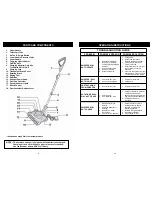
Your cordless sweeper will require very little assembly. You should remove it from
the carton and familiarize yourself with all the components listed per the exploded
view drawing. (Pg. 2) This will help you in the assembly and operation of your
cordless sweeper.
Note:
The charging adapter will be shipped inside the packaging.
3
OPERATING INSTRUCTIONS
Note:
The lower handle extension tube has a different plastic insert. This tube
should be the first on the assembly.
2. Place the handle into the upward storage position.
10
OPERATING INSTRUCTIONS
Care And Maintenance
To improve the performance and life of your unit, we recommend you do the
following:
1. Once a month clean the unit with a dry cloth, including the chamber which the dust
container fits into. Remove any hair, fiber or other materials that may have built up
in the chamber, and on the rotating brush.
2.
Don’t
use abrasive materials to clean the sweeper.
Do not immerse the unit in
water.
3.
Do not
pick up liquids or use on wet floors.
4.
Do not
use on concrete, tar or similar rough surfaces.
5.
Don’t
pick up pieces of string or fabrics with the sweeper.
6.
Do not
clean tasseled or frayed carpets with the sweeper.
Fig. 15
8.
Slip the belt over the brush bar cap.
9.
Insert the brush bar into the slot. (Fig. 14)
10. Insert the gear box tabs into the tab slots and push down until it clicks into place.
11. To replace the squeegee, follow instructions above for removing the gear box and
slide the squeegee out from left to right. (Fig. 16)
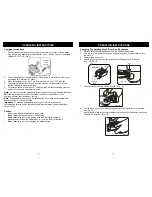
Changing the Belt
If you find that the belt has broken and it needs replacing:
1.
Remove the brush cover. (Fig. 11)
2.
Push in on the locking tab of the gear box and lift gear box to remove. (Fig. 12 & 13)
3.
Push in on the locking tab of the belt access panel and lift off to remove. (Fig. 17)
4.
Using a pair of tweezers, remove any leftover bits of the belt that might still be
there.
5.
Pull the brush bar out of the bushing. (Fig. 14)
6.
Using a new belt, insert it into the opening until it is in all the way.
7.
Using a pair of tweezers, insert them into the belt access panel and lift the new belt
over the back gear.
8.
Slide the belt over the brush bar cap and then insert the brush bar into the slot.
(Fig. 14)
9.
Insert the gear box tabs into the tab slots and push down until it clicks into place.
10. Press the belt access panel down until it snaps in place.
11. Replace the brush cover (Fig. 11)
Belt Access Panel
Fig. 16
Summary of Contents for V1917H
Page 2: ......


