9
AKKUMULÁTOR TÖLTÉSE
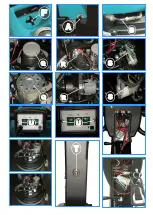
A gép használata előtt csináljon végig egy teljes feltöltési ciklust. Új
akkumulátor vásárlásánál figyelje, hogy az kompatibilis legyen a
beépített töltővel (kizárólag 12V AGM vagy ZSELÉS típus). Először
kapcsolja ki a gépet, majd utána dugja be a töltőkábelt a gépbe majd
az elektromos hálózatba ( C ).
Kövesse e kézikönyv utasításait a töltő megfelelő használatához.
FIGYELEM:
A gépben vagy egy automatikus biztonsági rendszer
ami lekapcsolja az áramellátást, amikor az akkumulátor töltés alatt
van.
FIGYELEM:
Az akkumulátort véglegesen károsíthatja, ha hagyja
teljesen lemerülni, még akkor is ha gép nincs használatban. Az
alacsony akkumulátor szintet jelző lámpa villogásának kezdete után
perceken belül meg kell kezdeni a feltöltést.
VIGYÁZAT:
Ne hagyja teljesen lemerülni az akkumulátort, még
akkor se ha nem használja a gépet.
VIGYÁZAT:
Szigorúan tartsa be a gyártó/forgalmazó előírásait az
akkumulátor napi töltésével kapcsolatban. Minden szerelést és
karbantartást csak szakképzett személy végezhet.
Veszély: gázszivárgás, füst, és maró folyadékok.
Tűzveszély: a gép közelében nyílt láng használata tilos.
VIGYÁZAT
: Fontos hogy mindig TELJES TÖLTÉSI CIKLUST
végezzen az akkumulátoron ( > 8 h). A töltési ciklus idő előtti
megszakítása káros hatással van az akkumulátorra és üzemidejére.
BEÉPÍTETT TÖLTŐ VEZÉRLŐJE
A töltő vezérlőpanele (D) a gép hátulján található. Három led
visszajelző lámpa van rajta, amelyek jelzik az akkumulátor
töltöttségi szintjét:
Zöld – akkumulátor teljesen feltöltve
Sárga – alacsony akkumulátor szint
Piros – újratöltés szükséges
Ezek a töltösségi szintek figyelmeztető villigással vannak társítva.
Alacsony töltöttség esetén a kp-i vezérlés először lekapcsolja a
kefemotort de a szívómotor még néhány percig működik, hogy a piszkos
maradék vizet felszívhassa.
BATTERY CHARGE
Do first a complete charge cycle of the battery before using the
machine. When replacing the battery make sure you use suitable
batteries to the charger installed (use only 12V - AGM or GEL Type).
Ensure the machine has been turned off, then insert the charger plug
into the mains socket (C).
Follow the instructions of the attached manual for the correct use of
the charger.
WARNING:
The machine is designed with automatic security system
that cuts off power when battery is under charge.
WARNING:
To avoid permanent damage to the batteries, it is
essential to avoid complete discharge of the same, even if the machine
is not used. The recharge must begin within a few minutes at the
beginning of the flashing warning light for low battery..
CAUTION:
Never leave the battery completely discharged, even if
the machine is not in use
CAUTION:
For the battery daily recharge, it is necessary to follow
strictly the instructions provided by the manufacturer or its dealer. All
installations and maintenance must be performed by qualified
personnel.
Danger of leaking of gas, fumes and corrosive liquids.
Risk of fire: do not approach with open flames
.
CAUTION: It’s essential to complete the charging cycle UP TO
FULL CHARGE (> 8 h). . A premature termination of the life
cycle itself compromise life and the autonomy of the batteries
.
CHARGE CONTROLLER
The charge controller is (D) on the battery charger which is on back of
the machine and it is divided in three colored LEDs, which indicate the
level of power:
Green
- full charged battery;
Yellow - low battery
Red
- recharge.
These phases are associated to warning flashing lights, after which the
control system will cut power to the brush motor, allowing the vacuum
motor to run for a further minute to complete the recovery of remains
on the floor, before the recharge.
PISZKOSVÍZ TARTÁLY
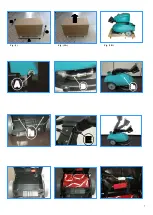
A tolókar csomagolási okok miatt lehajtott állapotban érkezik. Ezt
állítsa föl, mielőtt megkezdené a munkát. Ezt így tudja elvégezni:
1.
Húzza föl a kart (E) és állítsa be a tolókart.
2.
Állítsa a gépet munkára kész pozívcióba
3.
Tegye fel a piszkosvíz tartályt, majd rögzítse a karral (F).
FIGYELEM
: Ellenőrizze, hogy biztosan jól helyezte el a
piszkosvíz tartályt és hogy a karral megfelelően rögzítette.
RECOVERY TANK
The rudder comes folded up for reasons of packaging -it must be put in
position before operating.
To do this, follow these steps:
1. Lift the rudder by pulling up the lever (E).
2. Place the machine in working position.
3. Apply the recovery tank at the helm and secure it with the hook (F).
WARNING: Verify the correct positioning of the recovery tank
and check that the cap is closed properly.
Summary of Contents for E46 Series
Page 7: ...7 Fig 1 A Fig 1 Fig 1 B...
Page 15: ...15...
Page 19: ...19...
Page 21: ...21...
Page 23: ...mod NE286 AKKUMUL TOR T LT www nordelettronica it HASZN LATI TMUTAT www takaritogeppartner hu...

