


6
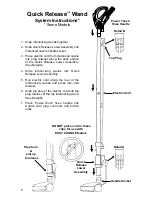
Step here
&
pull up
to release
n
n
n
n
n
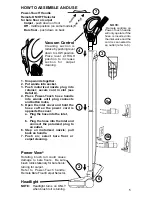
Handle Socket
l
Detail A
Electric Cord
l
l
Top Plug
n
Detail B
l
k
1. Snap interlocking wands together.
2. Slide Quick Release Lower Assembly into
motorized nozzle handle socket.
3. Place electric cord from motorized nozzle
into plug retainer along the back portion
of the Quick Release Lower Assembly.
(See Detail A)
4. Slide interlocking wands into Quick
Release Lower Assembly.
5. Run electric cord along the rear of the
interlocking wands and press into cord
retainer.
6. Slide top plug of the electric cord into the
plug retainer of the top interlocking wand.
(See Detail B)
7. Place Power-Touch hose handle into
wands until plug connects and button
locks.
Quick Release
™
Wand
System Instructions*
* Some Models
Quick
Release
Lower
Assembly
DO NOT place cord in these
clips for use with
EASY CHANGE feature
n
Power Touch
Hose Handle
Summary of Contents for CV190 Series
Page 9: ......