


12
Pre-Motor Filter
Check the pre-motor filter each time the dust cup is emptied.
Clean or replace as needed.
To Clean Pre-Motor Filter
1.
Remove filter centered in the bottom of the dust cup
compartment.
2.
Shake filter to remove excess dust. If necessary, the filter
can be cleaned by vacuuming with another cleaner or
washing with mild detergent.
3.
Reinstall filter after completely dry.
Use GENUINE EUREKA replacement pre-motor filter, Part
No. 71480.
Pre-Motor
Filter
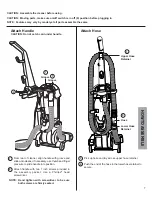
To remove True HEPA
cartridge filter
1.
Push down on filter door latch and pull door away from cleaner.
2.
Push down on HEPA cartridge latch and remove filter.
To replace True HEPA
cartridge filter
1.
Place bottom tabs of filter cartridge into slots. Rotate filter
toward cleaner. Push upward on the latch to secure into place.
Make sure True HEPA cartridge latch is secured on both
sides.
2.
Replace filter door by placing tabs of door into slots on cleaner.
Rotate door up and against cleaner until it locks into place.
NOTE: To have the benefit of a sealed True HEPA system, you
must use one of the True HEPA
cartridge filter systems.
To remove Filter Pad from
filter door
1.
Push down on filter door latch and pull door away
from cleaner.
2. Lift filter pad up and out of filter door. Dispose of old
filter pad.
To replace Filter Pad into
filter door
1.
Place new filter pad in filter door.
2.
Replace filter door by placing tabs of door into slots
on cleaner. Rotate door up and against cleaner until it
locks into place.
These filter pads are interchangeable.
Filter Pad Replacement Options:
Standard (Good), Part No. 71847
Micron (Better), Style MF2
HEPA (Best), Style HF6
Models equipped with Cartridge Filter
(Only cartridge style filters can be used with these
models.)
Check the True HEPA filter each time dust cup is emptied.
Replace twice a year or as needed.
Models equipped with Filter Pads
Check the filter pad each time the dust cup is emptied.
Replace twice a year or as needed.
Filter Door
Latch
Use GENUINE EUREKA replacement True HEPA filter, HF5, or
Washable True HEPA filter, Style WHF5.
Use GENUINE EUREKA replacement filter pads.
True HEPA
Cartridge
Latch
Filter
Door
Latch
Filter Pad
Side Door Filt
ers
RO
UTINE MAINTENANCE
Summary of Contents for 5740 series
Page 18: ......


