


7
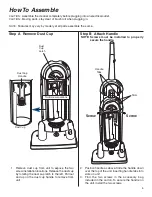
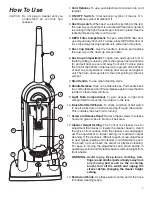
How To Use
CAUTION:
Do not plug in cleaner until you
understand all controls and
features.
1.
Cord Retainer.
To use, push electrical cord down into cord
retainer.
2.
ON/OFF Switch.
International symbol
I
means On,
International symbol
O
means Off.
3.
Dust Cup Latch.
When dust cup latch is pointing to the left,
the dust cup compartment is unlocked. When dust cup latch
is pointing to the right the dust cup is locked in place. See the
locked/unlocked symbols on the unit.
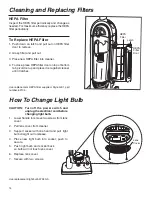
4.
HEPA Filter Compartment.
To open, slide HEPA filter door
up and pull away from unit. To close, place HEPA filter door at
top of opening pressing against unit, slide down into place.
5.
Dust Cup Handle.
Use the handle to remove and replace
the dust cup in the dust cup compartment.
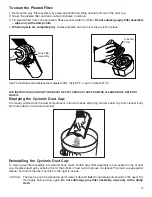
6.
Dust Cup Compartment.
To open, turn dust cup latch (3) to
the left pointing to unlock symbol, then grasp dust cup handle
(5) and pull dust cup out and away from unit. To close, place
the front of the bottom of the dust cup in groove at the bottom
of dust cup compartment, rotating dust cup up and against
unit. Then turn dust cup latch to the right pointing to the lock
symbol.
7.
Stair Handle.
To use when cleaning stairs.
8.
Handle Release.
Step on handle release. Pull handle back
to a comfortable position. Press release again to lower handle
further to clean under furniture.
9.
Light Bulb Compartment.
To gain access to light bulb
compartment remove the two screws in the lens.
10
. Brush Roll Belt Window.
To check condition of belt watch
to see if white dots on belt are moving through the window.
This indicates the brush roll is turning.
11.
Screws to Release Hood.
Remove these screws to release
hood and give access to brush roll belt area.
12.
Cleaner Height Setting.
The front of the cleaner has an
adjustment that raises or lowers the cleaner base to match
the type of floor surface. With the cleaner cord unplugged,
set the adjustment to lowest setting for maximum carpet
cleaning. If the cleaner is difficult to push, move adjustment
to next highest setting until cleaner is comfortable to push.
The brush roll must reach the carpet for effective cleaning.
For ease in moving the adjustment knob, place handle in
operating position and tilt cleaner back to remove weight from
front wheels.
WARNING: Avoid injury. Keep loose clothing, hair,
fingers, and all other parts of body away from
any moving part (such as the revolving
brush). Turn off the switch and unplug the
cleaner before changing the cleaner height
setting.
13.
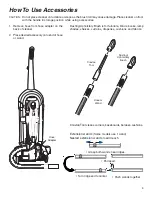
Extension Wands.
Use these wands on the end of the hose
for added cleaning reach.
1
12
11
11
10
9
8
7
6
2
3
4
13
5


