Eureka 4650 Series Owner'S Manual Download Page 10

10

HOW TO MAINTAIN

The instructions in this booklet serve as a guide to routine maintenance. To avoid unnecessary service calls, check the
cyclonic dust cup, belt, and brush roll often.

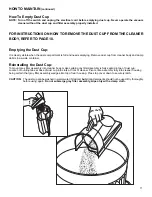
Remove dust cup by pulling latch (1) forward, pivoting dust
cup out and lifting up. To replace dust cup, put bottom of  dust
cup in place by aligning tabs in slots and pivot top assembly
back into place. Push down on latch (1), making certain that
latch securely snaps and overlaps tabs at top of dust cup.

1

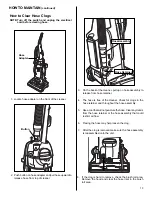
To Change Dust Cup Pleated Filter:

NOTE: Turn off the switch and unplug the electrical cord before changing the Foam Filter. Never operate the

vacuum cleaner without the dust cup or the pleated filter assembly.

|

Use GENUINE EUREKA replacement
pleated filter, 61805

|

|

1

2

Gray Filter
Assembly

Lint Trap
Cone

Slots

Tabs

Check and clean the pleated filter once a month to maintain good performance. The filter can be cleaned by washing
with mild detergent and warm water. Be sure pleated filter is completely dry before reinstalling.

To clean the Pleated Filter:

1. Grasp yellow filter frame and twist counter clockwise to remove.

2. Shake vigorously and brush off dust and lint.

3. If filter needs further cleaning, wash in warm water using a mild detergent.

4. Do not submerge gray dust cup lid, wipe only with a damp cloth.

5. When all parts are completely dry, replace filter on gray dust lid by twisting clockwise to snap and lock in place.

Summary of Contents for 4650 Series

Page 1: ...4 Light Bulb 15 Problem Solving 17 Warranty 18 Customer Order Form 19 IMPORTANT Do not return this product to the store For assembly problems or questions contact Eureka s Customer Service Division to...

Page 2: ...arrying capacity Turn off all controls before unplugging Do not unplug by pulling on cord To unplug grasp the plug not the cord Do not handle plug or vacuum cleaner with wet hands Do not put any objec...

Page 3: ...cher Ne pas d brancher en tirant sur le cordon Pour d brancher tenez la fiche et non le cordon Ne pas manipuler la fiche ou l aspirateur avec les mains mouill es Ne pas rien ins rer dans les ouverture...

Page 4: ...9 Canada 1 800 282 2886 If you prefer you can write to The Eureka Company Service Division 807 North Main Street Bloomington Illinois 61701 USA In Canada write to The Eureka Company 866 Langs Drive Ca...

Page 5: ...cleaner If necessary use thumb and finger pressure to slide handle into position 2 Attach handle with two 1 inch screws in the assembly packet Use either a slotted or Phillips head screwdriver NOTE H...

Page 6: ...ion tool on handle pegs Handle Pegs 5 You will find your cord retainer on the handle above the upper cord hook Firmly push the electrical cord down into the cord retainer This will place the cord out...

Page 7: ...cup unclog the hose or replace the filters 5 Wait at least 30 minutes before attempting to reuse the cleaner 6 After 30 minute cool down period plug the cleaner in and push the switch pedal The cleane...

Page 8: ...any combination of the following accessories 1 Remove hose from rear of cleaner 2 Place desired accessory onto end of hose or wand Turn ridge end to center Push wands together Pull apart Grasp both wa...

Page 9: ...ent cleaning after the first few times you use your new Eureka vacuum the red light should go on less NOTE The dirt alert feature is not intended to be used for above the floor cleaning with attachmen...

Page 10: ...er Never operate the vacuum cleaner without the dust cup or the pleated filter assembly Use GENUINE EUREKA replacement pleated filter 61805 1 2 Gray Filter Assembly Lint Trap Cone Slots Tabs Check and...

Page 11: ...in a waste container Reinstalling the Dust Cup To mount gray filter assembly into cleaner body make certain gray filter assembly is fully seated in top of dust cup Locate 3 mounting tabs at base of d...

Page 12: ...s the carpet nap Remove hair and threads from the brush roll so it continues brushing the carpet To maintain the most efficient cleaning the bristles must touch the carpet To test the bristle length h...

Page 13: ...from hose retainer 4 The hose is free of the cleaner Check for clogs in the hose retainer and throughout the hose assembly 5 Use a tool that will not puncture the hose Clear any debris from the hose r...

Page 14: ...ch to secure into place NOTE To have the benefit of a sealed HEPA system you must use one of the HEPA cartridge filter systems To remove HEPA Micron filters from filter frame 1 Push down latch and pul...

Page 15: ...d socket back so bulb will not touch lens cover 7 Replace lens cover 8 Secure with two screws 3 5 4 HOW TO MAINTAIN continued Exhaust Filter Door Micron and HEPA Exhaust Filters Only for models with t...

Page 16: ...of the bonus hose Step 1 Remove the hose attached to the cleaner WARNING Always work with the cleaner below you pulling hose from side of cleaner not the back or the front of the cleaner Ensure it is...

Page 17: ...bstance tends to reduce suction when it blocks the airflow through the filter s Hose Remove any clogs from the hose that restrict the airflow Check short hose in the base and long hose Refer to page 1...

Page 18: ...type and serial number from the data plate on the cleaner Further Limitations and Exclusions Any warranty that may be implied in connection with your purchase or use of the cleaner including any warra...

Page 19: ...nsolidated Industries Inc Printed in U S A Method of payment no C O D orders Check or money order payable to The Eureka Company Do not send currency Charge to my Visa 13 15 digits MasterCard 13 digits...

Page 20: ...eaner handle Accessory Items in This Carton 1 hardware package 2 screws Questions Do Not Return To Store Call 1 800 282 2886 7 a m to 8 p m Central Standard Time Monday through Saturday Don t Forget t...

Reviews: