background image

24

MAINTENANCE

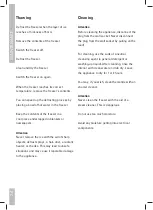
Thawing

Defrost the freezer when the layer of ice 

reaches a thickness of 5 mm.

Remove the contents of the freezer.

Switch the freezer off.

Defrost the freezer.

Clean and dry the freezer.

Switch the freezer on again.

When the freezer reaches its correct 

temperature, replace the freezer’s contents.

You can speed up the defrosting process by 

placing a bowl of hot water in the freezer.

Keep the contents of the freezer in a 

cool place and wrapped in blankets or 

newspapers.

Attention

Never remove the ice with the aid of sharp 

objects, defrost sprays, a hair-drier, a radiant 

heater, or the like. This may lead to unsafe 

situations and may cause irreparable damage 

to the appliance.

Cleaning

Attention

Before cleaning the appliance, disconnect the 

plug from the wall socket. Never disconnect 

the plug from the wall socket by pulling on the 

lead!

For cleaning, use the suds of a neutral 

cleansing agent (a general detergent or 

washing-up liquid). After cleaning, rinse the 

interior with clean water and rub dry. Leave 

the appliance to dry for 1 or 2 hours.

You may, if you wish, clean the mantle with an 

enamel cleaner. 

Attention

Never clean the freezer with the aid of a 

steam cleaner. This is dangerous.

Do not use too much moisture.

Avoid any moisture getting into electrical 

components.

Summary of Contents for EVV0842WIT

Page 1: ...EVV0842WIT VV849WIT GEBRUIKSAANWIJZING INSTRUCTIONS FOR USE VRIESKAST FREEZER...

Page 2: ...ewaartips 9 Energietips 9 Storingen 10 Storingen zelf verhelpen 10 Onderhoud 11 Ontdooien 11 Installatie 12 Wijzigen draairichting van de deur 12 Milieuaspecten 13 Afvoeren verpakking en toestel 13 Th...

Page 3: ...TL lampen in het apparaat zijn bedoeld om de binnenruimte te verlichten en niet geschikt als kamerverlichting WAARSCHUWING Dit apparaat is bedoeld voor huishoudelijk gebruik of gelijksoortige toepass...

Page 4: ...paraat niet in gebieden die te vochtig of te koud zijn zoals bijgebouwen garages of kelders Til de voorkant van het apparaat op als u hem wilt verplaatsen om krassen op de vloer te voorkomen Aansluiti...

Page 5: ...sator niet aan Ze zijn heet Onderhoud en reiniging WAARSCHUWING Gevaar voor letsel of schade aan het apparaat Schakel het apparaat uit en trek de stekker uit het stopcontact voordat u onderhoudshandel...

Page 6: ...6 Toestelbeschrijving TOESTELBESCHRIJVING 1 2 3 4 1 deur 2 thermostaat 3 vrieslades 4 stelvoeten...

Page 7: ...lichtingsbureau voor de voeding in Den Haag kan u informatie verschaffen over het bewaren van levensmiddelen In deze handleiding vindt u informatie over de installatie veiligheid bediening en onderhou...

Page 8: ...act is gehaald de stroom is uitgevallen of is uitgeschakeld dient u 3 tot 5 minuten te wachten voordat u het apparaat opnieuw aanzet Mocht u het apparaat toch aanzetten voordat deze tijd is verstreken...

Page 9: ...ik nadelig Ook direct zonlicht of andere warmtebronnen in de buurt van de vriezer hebben een ongunstige invloed op het energieverbruik Ventilatie openingen vrijhouden Afgedekte vervuilde openingen gev...

Page 10: ...deurrubbers Neem contact op met de service afdeling als de deurrubbers beschadigd zijn Oorzaak Stekker niet in het stopcontact Zekering in meterkast defect Thermostaat foutief ingesteld Onjuiste opst...

Page 11: ...n een straalkacheltje of iets dergelijks Dit kan tot onveilige situaties leiden en onherstelbare schade aan het toestel veroorzaken Reinigen Waarschuwing Trek voor het schoonmaken de stekker uit het s...

Page 12: ...oet 10 los en plaats deze aan de andere kant 8 Bevestig het onderste scharnier 9 aan de andere kant met de schroeven 8 9 Plaats de deur in het onderste scharnier zodanig dat de pin van het onderste sc...

Page 13: ...gevoegd maar naar een speciaal centrum voor gescheiden afvalinzameling van de gemeente moet worden gebracht of naar een verkooppunt dat deze service verschaft Het apart verwerken van een huishoudelijk...

Page 14: ...14...

Page 15: ...y tips 22 Faults 23 Trouble shooting 23 Maintenance 24 Thawing 24 Cleaning 24 Installation 25 Changing the direction in which the door opens 25 Environmental aspects 26 Disposal of packaging and appli...

Page 16: ...s appliance The lamp is not suitable for household room illumination WARNING This appliance is intended to be used in household and similar applications such as Farm houses staff kitchen areas in shop...

Page 17: ...this appliance in areas that are too humid or too colds such as the construction appendices garages or wine cellars When you move the appliance lift it by the front edge to avoid scratching the floor...

Page 18: ...ssor or the condenser They are hot Care and cleaning WARNING Risk of injury or damage to the appliance Before maintenance deactivate the appliance and disconnect the mains plug from the mains socket T...

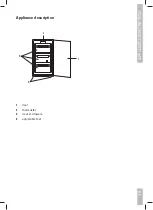
Page 19: ...19 APPLIANCE DESCRIPTION Appliance description 1 2 3 4 1 door 2 thermostat 3 freezer drawers 4 adjustable feet...

Page 20: ...ity of the food These instructions for use contain information about the installation safety control and maintenance of your appliance The installation instructions are intended for the installer who...

Page 21: ...rtant When the plug has been disconnected from the socket or in case of a power failure you have to wait for 3 to 5 minutes before switching on the appliance If you switch on the appliance before this...

Page 22: ...gative effect on energy use Keep the freezer in a position away from direct sunlight or other sources of heat Keep ventilation openings free Clogged dirty openings lead to higher use of energy Use Coo...

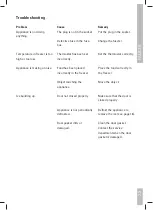
Page 23: ...e service department when the door gasket is damaged Cause The plug is not in the socket Defective fuse in the fuse box Thermostat has been set incorrectly Food has been placed incorrectly in the free...

Page 24: ...cts defrost sprays a hair drier a radiant heater or the like This may lead to unsafe situations and may cause irreparable damage to the appliance Cleaning Attention Before cleaning the appliance disco...

Page 25: ...djustable foot 10 and place it on the opposite side 8 Fit the lower hinge 9 on the opposite side with the screws 8 9 Slide the door back on to the lower hinge making sure that the lower hinge pin fits...

Page 26: ...eeled dustbin This means that at the end of its working life the product must not be disposed of as urban waste It must be taken to a special local authority differentiated waste collection centre or...

Page 27: ...700003888300...

Reviews: