


INTEGRATION INTO eNEXHO SYSTEM
TECHNICAL DATA
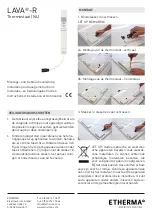
USAGE
In combination with the eNEXHO NT module, the
product data complies with the EU regulations on
the Ecodesign Directive (2009/125/EC) for ener
-
gy-related products (ErP).
There is a 2-level on and off switch on the control
module, as well as a “+” and “–” arrow button to
set the temperature and a two-digit digital room
temperature display.
•
Flashing dot on the lower right edge of the
room temperature display signals active hea
-
ting mode.
•
After approx. 30 seconds display switches into
POWER SAVING MODE.
•
Press an arrow button once to re-activate the
current room temperature display.
•
SWITCH POSITION I: The device is operated at
half nominal capacity and achieves a surface
temperature of approx. 60 °C to 70 °C.
•
SWITCH POSITION II: The device is operated at
full capacity and achieves a surface tempera
-
ture of approx. 85 °C to 95 °C.
•
The desired setpoint room temperature is ad
-
justed in 1°-steps up or down by pressing an
arrow button several times.
CALIBRATION
INFORMATION ABOUT ENERGY CONSUMPTION
TERMS OF GUARANTEE
•
If the displayed actual room temperature is
too high, the room temperature sensor must
be checked on the rear of the infrared heater.
•
Follow the instructions for installing the cont
-
rol module!
•
Once checked the displayed room temperatu
-
re can be calibrated upwards or downwards.
•
First setpoint temperature must be set to 35 °C
by using the „+“ arrow button.
•
Then press „+“ arrow button (approx. 5 sec.)
until „00“ or set calibration value is displayed.
•
Calibrate the actual temperature up or down
using „+“ or „–“ arrow button.
»
UP
Right digit on display
»
DOWN
Left digit on display
•
After approx. 10 seconds display switches back
to temperature display.
www.etherma.com
1. Press „-“ arrow button until 0 °C is displayed
2. Hold „-“ arrow button until displays shows 1
(„program mode“ active).
3. Now follow instructions of the eNEXHO NT
manual.
868 MHZ
31 x 251 x 62 mm
16 A, 230 V
IP
24
°C
+60 °C/+ 95°C
Dear customer!
Please note our general terms and conditions. In
the case of warranty cases, the country-specific
legal claims apply, which you must assert directly
against your dealer.
RESERVATION: We reserve the right to make
technical changes. Modifications, errors and mi
-
sprints shall not constitute grounds for damages.