background image

ETC Installation Guide

SC1008 BCELTS

SC1008 BCELTS

Page 11 of 11

ETC

Troubleshooting

When both of the SC1008 LEDs are blinking, the relays need to be manually reset to a known state.

WARNING:

RISK OF DEATH BY ELECTRIC SHOCK! Failure to disconnect all

power to the panel before working inside could result in serious injury or death.

AVERTISSEMENT :

RISQUE D'ELECTROCUTION! Travailler à l’intérieur du

panneau sans avoir déconnecté le courant peut entrainer des blessures graves,
voire mortelles.

Before you begin pulling and terminating wire to the SC1008 BCELTS enclosure,
make sure the main circuit breaker cabinet or other readily accessible input
power disconnect device for both normal and emergency power input is locked
out and tagged out. Enclosures installed without an accessible input power
disconnect device cannot be serviced or operated safely. Follow all local codes
and restrictions. When the disconnect device is not located near the installed
enclosure, the disconnect must allow for proper lockout/tagout.

1. Disconnect both power supply sources and lock/tag out appropriately.
2. Loosen the four screws and remove the cover.

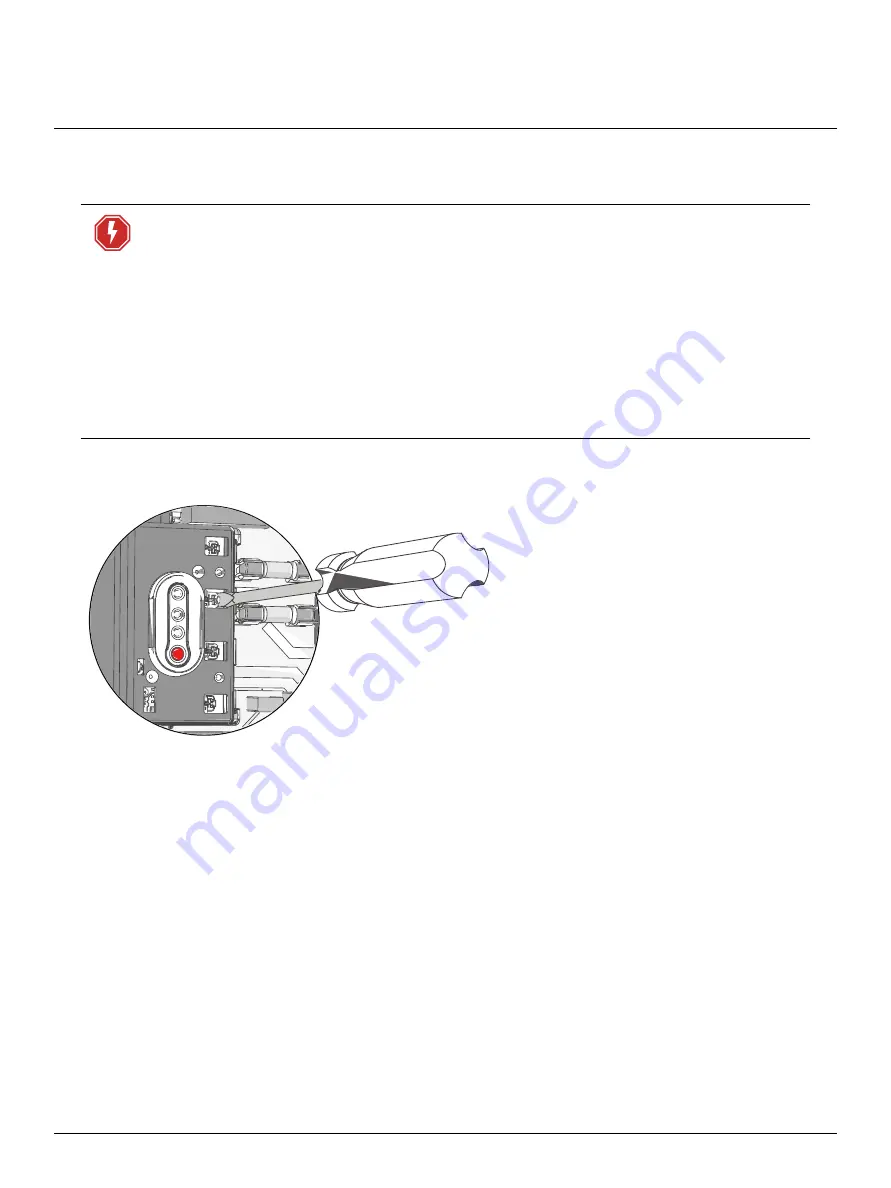
3. Locate the four relay switches near the

status LEDs.

4. Using a flat blade screwdriver, carefully

slide the relay switch to the left.

5. Repeat for all four relays in the SC1008

enclosure.

6. Replace the cover to the enclosure.
7. Reapply power from both sources and

retest the unit. See

Operation and Test

on page 9

for instructions on testing the

unit.

Summary of Contents for BCELTS

Page 1: ...ions a front panel accessible push and hold Test Switch a front panel accessible Laser Test enabling remote testing with the use of a laser pointer or similar front panel status indicators for Normal Power green and Emergency Power red a fire alarm dry contact input which can be set for normally open or normally closed operation an auxiliary relay for 0 10V or Digital Addressable Lighting Interfac...

Page 2: ...ion that conforms to the following ambient environment 0 C 40 C 5 95 non condensing humidity Electrical Specification Note Continuous load current not to exceed 100 of the switch rating Use copper wire only minimum 75 C conductors Normal and Emergency Rated Operational Voltage Input 120 277 VAC 10 50 60 Hz Load Rating Supports a continuous load of up to 20 A for tungsten and resistive load types a...

Page 3: ...of 18 AWG wire connected between the input and the switch Fire Alarm Inputs of up to ten SC1008 units can be wired together using a single normally open or normally closed contact See Fire Alarm Input on page 8 for details 0 10 V Auxiliary Output The 0 10 V Auxiliary Output provides an additional single pole relay that opens when the unit is in the emergency state This allows connection of 0 10 V ...

Page 4: ... or death AVERTISSEMENT RISQUE D ELECTROCUTION Travailler à l intérieur du panneau sans avoir déconnecté le courant peut entrainer des blessures graves voire mortelles Before you begin pulling and terminating wire to the SC1008 BCELTS enclosure make sure the main circuit breaker cabinet or other readily accessible input power disconnect device for both normal and emergency power input is locked ou...

Page 5: ...ed from the SC1008 b Terminate to the respective terminals LOAD 2N neutral and LOAD 1H hot in the SC1008 enclosure securing each terminal screw onto the wire 3 Install normal sense jumpers included Step 3 4 H 5 N 6 H N 3 SENSE NORMAL a Install a jumper wire between terminals SENSE 3H hot and NORMAL 5H hot b Install a jumper wire between SENSE 4N neutral and Normal 6N neutral 4 Terminate normal pow...

Page 6: ... the wire 3 Install a jumper wire included between SENSE 4N neutral and Normal 6N neutral Note If using a separate neutral for the sense circuit do not install the jumper If using a three wire feed as shown above install the jumper as described in step 3 4 Terminate normal power wires a Run a neutral and a hot wire through conduit from the normal power source controlled dimmer or switch to the SC1...

Page 7: ...ad position b Terminate to the respective terminals LOAD 2N neutral and LOAD 1H hot in the SC1008 enclosure securing each terminal screw onto the wire 3 Terminate normal power wires a Run a neutral and a hot wire through conduit from the dimmer module to the SC1008 b Terminate to the respective terminals NORMAL 6N neutral terminal and NORMAL 5H hot terminal in the SC1008 enclosure securing each te...

Page 8: ...ween 0 10 V ballast and the 0 10 V terminal 9 in the SC1008 and secure the terminal onto the wire 3 Run a common wire typically grey between the 0 10 V controller and the 0 10 V ballast Fire Alarm Input SC1008 SC1008 Connect up to 10 units Fire Alarm 11 12 FIRE ALARM 11 12 FIRE ALARM The SC1008 features a single dry contact input that can be used to force the transfer from normal to emergency stat...

Page 9: ... using either the test button or laser test as described in the following sections LED States Red LED Green LED State Notes On On Normal and emergency power are both present The SC1008 is supplying Normal power to the load Blinking Off The SC1008 is supplying emergency power to the load This may be due to the loss of normal power the making of the fire alarm contact or the activation of the test m...

Page 10: ...RIC SHOCK Failure to disconnect all power to the panel before working inside could result in serious injury or death AVERTISSEMENT RISQUE D ELECTROCUTION Travailler à l intérieur du panneau sans avoir déconnecté le courant peut entrainer des blessures graves voire mortelles Before you begin pulling and terminating wire to the SC1008 BCELTS enclosure make sure the main circuit breaker cabinet or ot...

Page 11: ...input power disconnect device for both normal and emergency power input is locked out and tagged out Enclosures installed without an accessible input power disconnect device cannot be serviced or operated safely Follow all local codes and restrictions When the disconnect device is not located near the installed enclosure the disconnect must allow for proper lockout tagout 1 Disconnect both power s...

Reviews: