ETAtouch controller
[Heating circuit] function block
51
5.6.1
Operating elements
[Timer] button
The heating circuit is switched to automatic
mode. This means that changing between
operating modes [Heating] (within a time
window) and [Set-back] (outside a time window) is
based on the set time window. This operating mode is
enabled by default if the heating circuit is turned off and
then turned back on.
[Heating] button
Thus, the heating circuit is manually switched
to heating mode. With the additional switch
(above the
symbol), the heating
circuit can be set to remain permanently in heating
mode, thus ignoring any time window, or set
temporarily until the next time window.
[Set-back] button
Thus, the heating circuit is manually switched
to reduced operation mode. With the additional
switch
(above the
symbol), the
heating circuit can be set to remain permanently in
reduced operation mode, or set temporarily until the
next time window.
Temperature slider
This slider is only displayed if a room sensor is
installed for the heating circuit. The temperature
slider is used to adjust the desired room
temperature in a range of +/- 5 °C. By sliding the
switch into the blue area of the scale, the flow
temperature is lowered, and thus the room
temperature also. In the red area, the flow temperature
is raised.
Adjusting the required room temperature
This field is only displayed if a room sensor
is installed for the heating circuit. The arrows
are used to set the required room tempera-
ture. In heating mode, an increase of 1 °C causes the
room temperatures of all time slots for all days of the
week to increase by this value.
In reduced operation mode, a reduction by 1 °C
causes the reduced temperature for all days of the
week to decrease correspondingly.
5.6.2
Setting the heating time slots
Open the overview screen of set heating times
The operating hours of the heating circuit (heating
times) can be adjusted in the settings (
button). To
adjust, open the settings and then open the heating
times of any given day with the
[Heating times Daily
plan] button. An overview screen opens.
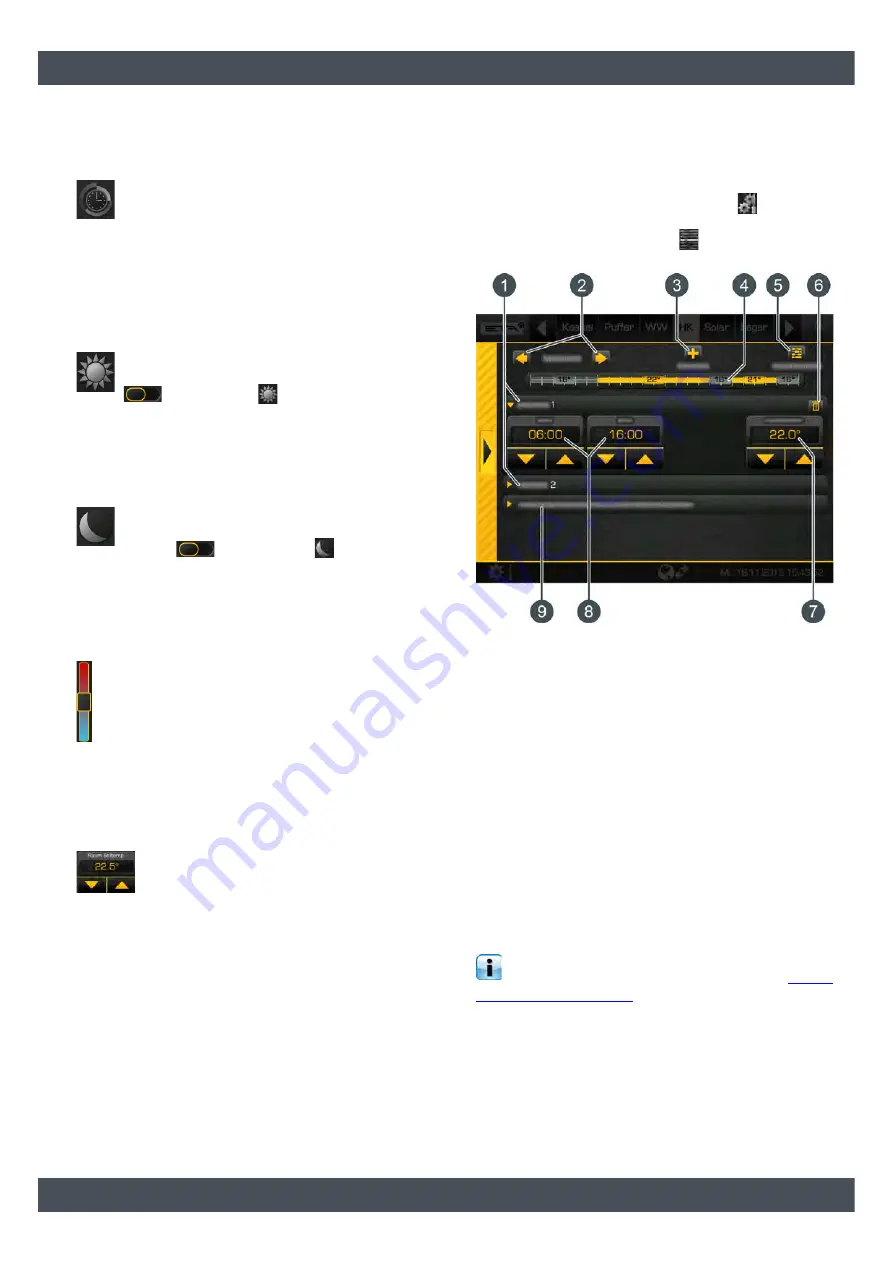
Fig. 5-45: Overview
1
Set time window (heating times)
2
Select day of the week
3
Add another time window
4
Graphical representation of the time window
setting
5
Overview of all time windows for the entire week
6
Delete time window
7
Adjustable room temperature.
This is displayed only when an optional room
sensor is installed.
8
Period of the time window
9
Set-back temperature.
The room temperature may drop to this value
outside the time window.
Setting the time window and copying to other
days of the week is described in chapter
Setting absent time (holiday function)
In each heating circuit, a time frame can be defined for
reduced operation mode. The heating circuit is then
operated with the lowest set-back temperature. This
function is also called the holiday function.
Summary of Contents for PelletsCompact 20-32 kW
Page 1: ...2017 04 19 EN 0000000282 V 003 3 38 1 1910 93108 002 PelletsCompact 20 32 kW Operation...
Page 27: ...ETAtouch controller Getting to know the control system 27...
Page 31: ...ETAtouch controller Boiler function block PelletsCompact 20 32 kW 31...
Page 41: ...ETAtouch controller Buffer function block 41...
Page 45: ...ETAtouch controller Hot water tank function block 45...
Page 49: ...ETAtouch controller Fresh water module function block 49...
Page 63: ...ETAtouch controller Solar function block 63...
Page 67: ...ETAtouch controller Pellet store function block 67...
Page 74: ...www eta co at...
Page 75: ......
Page 76: ...www eta co at www eta co at downloads DOWNLOAD...


