background image

29

3.6 VIDEO PLAYER

Tap the 

“Video”

 app in the main menu or press the 

“Video”

 button on the ESX device to start the video 

player. The video player accesses all compatible files that can be found either on the internal device 

memory or optionally connected storage media (USB).

Important note: In most countries, the playback of videos and photos while driving is prohibited 

in order to avoid accidents and injuries.

3. BASIC FUNCTIONS

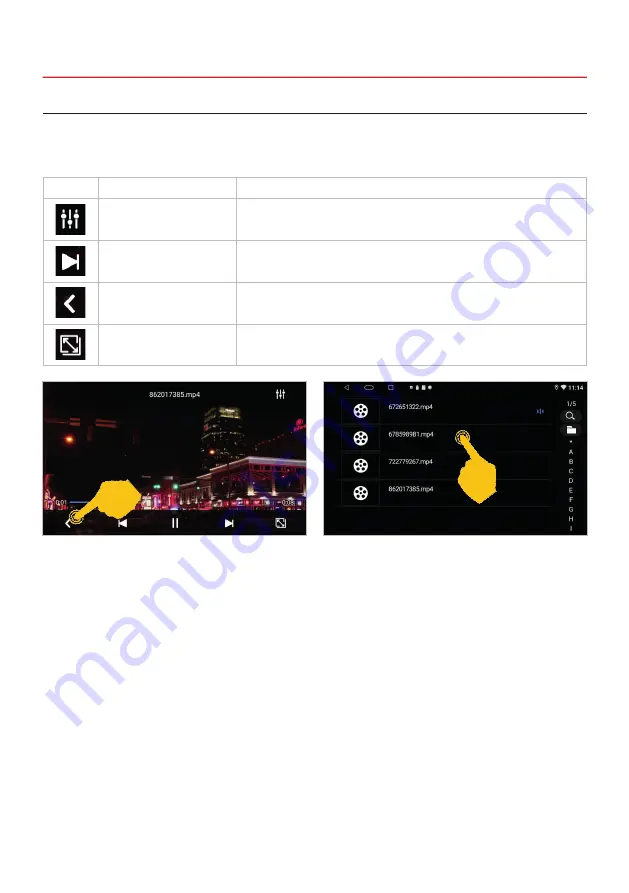
If you switch to the main menu during playback, 

the playback continues until you start another 

media playback.

Here you will see the file menu with the available 

video files.

Symbol Function

Description

Audio

Tap here to open the audio settings.

Control buttons

Tap here to start or pause playback or to play the next or previ-

ous track.

File menu

Tap here to open the file menu.

Aspect ratio

Tap here to fit the video signal to the screen.

Summary of Contents for VN830

Page 1: ...V I S I O N A N D R O I D S E R I E S SMART NAVICEIVER MOBILE INTERNET VIA Wi Fi V 1 1 VN830 O W N E R S M A N U A L...

Page 2: ...1 8 Split screen 14 1 9 Camera 15 2 Settings 16 2 1 Internet connection via WiFi hotspot 16 2 2 Date time 17 2 3 Language 17 2 4 Google account 18 2 5 Screen brightness 18 2 6 Wall paper 19 2 7 Steeri...

Page 3: ...about content or how it works please contact the developer of the app To ensure the safety of the driver the occupants and other road users it is essential that the driver always focuses on the traffi...

Page 4: ...avoid endangering the warranty and extend the life of the appliance Children under 12 should not operate the device Keep the device and all accessories away from small children Keep the device and it...

Page 5: ...afe If problems occur while driving park the vehicle in a safe and appropriate place to continue before you operate Please use only the included original accessories Ensure a sufficient mounting of th...

Page 6: ...here to start the FM AM radio application 5 Power on off with or without ignition Press and hold the knob for more than 3 seconds to turn the ESX device on or off without ignition Mute Briefly press t...

Page 7: ...backwards within the media playback If the ESX device no longer reacts to inputs the system is overloaded or has crashed Then reset the device by pressing the Reset button RST on the front panel at th...

Page 8: ...iew recently used applications The split screen func tion can also be started here USB SC card USB storage medium or SD card is connected Phone A smartphone is connected to the ESX device via Bluetoot...

Page 9: ...slide your finger down from the top to view the latest messages or activity This function is available in every view In this view you can continue swiping down to display additional control panels Th...

Page 10: ...o main menus there are six basic apps at the bottom which you can freely define To move or delete an app press and hold the app and drag the app to another location or drag the app to the trash Here a...

Page 11: ...ccording to your needs Place the app on the main control panel in one of the main menus The main control panel of the second main menu can also be equipped with apps For example drag Maps to the front...

Page 12: ...t to dissolve the split screen again drag the black frame in the center of the picture to the left or right Select the app you want and hold it until the gray area appears Then slide the window all th...

Page 13: ...oks like this Tap one of the halves of the screen to view the full screen With on the left you can also fade in a media app such as radio at the top When the reverse gear is engaged only the rear view...

Page 14: ...ter a successful entry the ESX device should be connected to the Internet after a few seconds The symbol then appears at the top right of the status bar If you tap on the network name again in the Con...

Page 15: ...d language the next language is always used This ESX device has the function of automatically determining the date and time via active GPS reception or the Internet You can also set the date time zone...

Page 16: ...gin details Here you can delete the linked account with Remove account Under Google Account you can make general settings for your account In this menu you can adjust the services of your Google accou...

Page 17: ...e status menu opens Then keep swiping down Here you can change the brightness of the screen You can change the background of the menus In the app menu tap on Wallpaper Swipe left to see all of the bac...

Page 18: ...been taught in a blue mark appears next to the symbol Complete the teaching with End learn and exit the menu 2 7 STEERING WHEEL REMOTE CONTROL Important note If the ESX device does not receive any sig...

Page 19: ...om various equalizer presets Swipe right or left to select an equalizer preset You can use the reset button to return the equalizer to its standard setting In this view you can determine the acoustic...

Page 20: ...you can specify whether the navigation application should start up when the device is started Below you can set the mixing ratio of the announcement voice of the navigation application to the overall...

Page 21: ...se Mirror you can mirror the reversing camera connected to the CAMERA input Under Reverse Mute you can mute the playback when driving backwards You can activate a floating operating assistant under As...

Page 22: ...p right Under System info you can see information about the installed software MCU and CAN bus versions ATTENTION The sections System Update and Factory Setting are reserved for ESX service technician...

Page 23: ...h a corresponding CAN bus adapter The CAN bus protocol then ensures that certain functions of the vehicle can be controlled via the ESX device The My Car menu in the App menu is reserved for ESX servi...

Page 24: ...ate the AF function This function enables automatic switching when leaving the reception area of a radio station The ESX device automatically switches to another frequency if the same program is also...

Page 25: ...RADIO ANALOG In the app menu tap on DAB Z to start the digital radio When using the device for the first time you must first start the station search as requested This process can take several minutes...

Page 26: ...BT on the ESX device Your smartphone is now connected to the ESX device via Bluetooth If you want to disconnect tap the red trash can In the settings tap on Auto Connect in the lower right corner Fro...

Page 27: ...onnected to the device via Bluetooth 3 BASIC FUNCTIONS In the Keypad menu you can enter a number directly and start the call with the green button You end the call with the red button After you have i...

Page 28: ...itch to the main menu during playback playback continues until you start another media playback Open the folder structure at the bottom left Here you can see the file menu with the available audio fil...

Page 29: ...photos while driving is prohibited in order to avoid accidents and injuries 3 BASIC FUNCTIONS If you switch to the main menu during playback the playback continues until you start another media playb...

Page 30: ...videos and photos while driving is prohibited in order to avoid accidents and injuries 3 7 FILE EXPLORER Here you can access all files of the ESX device and the connected storage media Select the sto...

Page 31: ...n is deactivated and the smartphone is charged Connection via WLAN wireless The WLAN function must first be activated on the smartphone Then connect your smartphone to the ESX device via its Bluetooth...

Page 32: ...onnect the smartphone with its charging cable to USB port 1 round socket The connection will then be established automatically The process may take a while An existing Bluetooth connection is deactiva...

Page 33: ...33 NOTES...

Page 34: ...ESX Car Media Systems Audio Design GmbH Am Breilingsweg 3 D 76709 Kronau Germany Tel 49 7253 9465 0 Fax 49 7253 946510 www esxnavi de www audiodesign de All rights reserved technical changes and erro...

Reviews: