

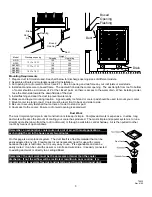


Install Overflow and Drain
Reservoir
Ferrule
Faucet
1. Slide the Rubber Washer over the Drain Bushing and push through the hole in the
bottom of the cooler from the top side.
2. Secure the Drain Bushing from beneath the pan with the Lock Nut. Make sure the
Rubber Washer does not twist while tightening, which could cause it to leak.
DO NOT
OVERTIGHTEN.
3. Thread the Overflow Tube into the Drain Bushing and
HAND TIGHTEN
.
4. If leakage occurs after Reservoir is full, retighten the Overflow Pipe until leaking stops.
A small amount of silicone caulk may be used if necessary.
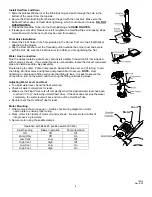
Float Valve Installation
1. Mount the Float Valve in the hole provided in the Corner Post or in the Float Bracket
attached to the blower.
2. Slip the Fiber Washer over the threaded portion outside the corner post and secure
with the Nut. Be sure the Float does not turn while you are tightening the Nut.
Water Line Connection
Find the closest outside water faucet, and install a Water Connection Kit (not included
with cooler) as shown. If an exterior faucet is not available, locate the closest cold water
pipe and install a saddle valve assembly.
Route tubing to cooler. Place Compression Nut and Ferrule over end of tubing. Insert
the tubing into float valve and tighten Compression Nut to secure.
NOTE:
Over
tightening a compression fitting will cause that fitting to leak. It is best to secure the
connections, turn on the water, and then snug the fitting until leaking stops.
Adjusting Water Level and Float
•
To adjust water level, bend the float valve rod.
•
Check all water connections for leaks.
•
Make sure the Float Valve cuts off completely when the desired water level has been
reached (½” to ¾” below top of Overflow Tube). If the float does not stop the water
completely, the water level will rise and run out the Overflow Tube.
•
Double check the Overflow Tube for leaks.
Motor Mounting
1. Wire motor as shown on page 3. Double check wiring diagram on motor
name plate to ensure proper wiring.
2. Place motor into cradles of motor mount as shown. Be sure motor cradles fit
into grooves in grommets.
3. Secure motor using the saddle clamps.
Operation with Essick 6 position switch (ECR-6)
Switch setting
Blower operation
Pump operation
Off Off Off
Pump Only
Off
On
Low Vent
Low
Off
High Vent
High
Off
Low Cool
Low
On
High Cool
High
On
Mount
Motor
70932
Rev. 6/02
4