background image

Esprit Statmux User Manual

December 1997 Issue 1.3  Page  10 of 36

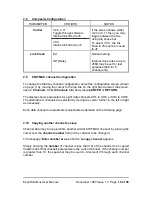
2.8

Composite Configuration

 PARAMETER

CHOICES

NOTES

Carrier

V.24, V.11

If the screen shows either

Toggle through software

V.24 or V.11 then you may

Internal link fitted to J5

toggle between the two
using the space bar.
To select V.35 , the link
fitted to J5 must be moved
to J6

V.35
Internal link fitted to J6

Link Clock

Ext

Normal setting.

INT [Rate]

Internal clock rates of up to
256K may be set for test
purposes.(64K for 8
channel unit)

2.9

STATMUX channel Configuration

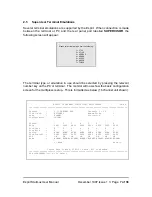
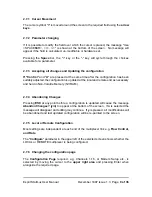
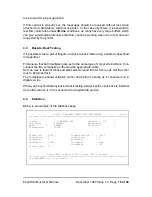
To change the Statmux channel configuration, select the configuration screen (shown
on page 7) by moving the cursor to the top line on the right hand area of the screen,
next to 'Channels 1-16:' (Channels 1-8) and pressing ENTER or RETURN.

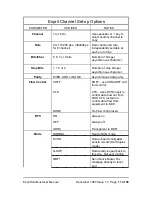
The display shows parameters for eight data channels CH1 to CH8, or CH9 to CH16.
The alternative 8 channels are selected by moving the cursor further to the left or right
as necessary.

Each data channel has parameters selectable as detailed on the following page.

2.10

Copying another channel's set-up

Channel data may be copied from another similar STATMUX channel, by placing the
cursor over the channel number field (of the channel to be changed).

The message 'Enter number or use <+>/<-> to copy channel' appears.

Simply entering the number (if channel is less than 10) of the channel to be copied
transfers all of that channels parameters to the current channel.  If the channel number
is greater than 10, the spacebar may be used to increment it through each channel
number.

Summary of Contents for Statmux

Page 1: ......

Page 2: ...en fitted in accordance with the installation instructions against the following directives standards Low Voltage Directive 73 23 EEC and amendment 93 68 EEC EN60950 1992 Safety Electromagnetic Compat...

Page 3: ...Up display layout 8 2 7 General Keyboard Conventions 8 2 8 Composite confiuration 2 9 Statmux channel configuration 10 2 10 Copying another channel s set up 10 2 11 Modem Configuration Options 12 3 I...

Page 4: ...ments 24 D Rear Panel Layout 26 E Supervisor Port Pinout V 24 25 Way D Type DCE 27 F Composite Link Interface Pinouts DTE 28 G V 24 V 28 Data Channel Pinout 8 Way RJ45 Type DCE 29 H Composite Link Net...

Page 5: ...y be used with Dial up Modems and Leased lines such as KiloStream up to 256 Kbps in the case of the 16 channel unit or 64Kbps for the 8 channel The unit is easily configured from either end of the lin...

Page 6: ...ports synchronous link rates of up to 256Kbps 64Kbps for the 8 channel unit either dial up or leased line for connection to Modems or digital services such as BT KiloStream The sixteen channel unit wi...

Page 7: ...y NONE Flow Control XOFF RTS ON Mode NORMAL 2 3 Changing the Configuration The Esprit may be configured using an asynchronous terminal A laptop PC running an asynchronous terminal emulation program su...

Page 8: ...ONE Flow Control XOFF XOFF XOFF XOFF XOFF XOFF XOFF XOFF RTS ON ON ON ON ON ON ON ON Mode NORMAL NORMAL NORMAL NORMAL NORMAL NORMAL NORMAL NORMAL More More Cursor Keys to move CTRL U to save ESC to ab...

Page 9: ...onventions Only a few keys are required to configure the Esprit multiplexer and are summarised as follows Right arrow Moves the cursor to the next field to the right Left arrow Moves the cursor to the...

Page 10: ...e local and remote end as necessary and held in Non Volatile Memory NVRAM 2 7 4 Abandoning Changes Pressing ESC at any point before a configuration is updated will cause the message Abandon Changes y...

Page 11: ...e on the right hand area of the screen next to Channels 1 16 Channels 1 8 and pressing ENTER or RETURN The display shows parameters for eight data channels CH1 to CH8 or CH9 to CH16 The alternative 8...

Page 12: ...top Bits 1 1 5 or 2 Number of stop bits per asynchronous character Parity EVEN ODD or NONE Asynchronous data parity Flow Control XOFF XOFF use XON XOFF soft CTS CTS Uses DTR input to NONE No Flow cont...

Page 13: ...ick Brown Fox message via link to remote port LOOP R Set this at remote site to loop back data to local via link 2 11 Modem Configuration Options The screen below shows the Modem Configuration options...

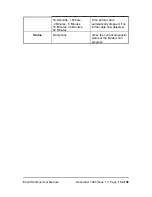
Page 14: ...1 3 Page 13 of 36 30 Seconds 1 Minute Time before call is 2 Minutes 5 Minutes automatically dropped if no 15 Minutes 30 Minutes further data flow detected 60 Minutes Status No Options Gives the curren...

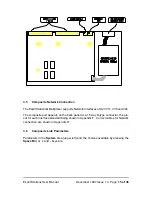
Page 15: ...Temperature 0 to 40 degrees centigrade Humidity 0 to 90 non condensing Air Pressure 86 to 106 kPa 3 3 Mechanical Construction The Esprit is housed in a 1 5U tall 19 enclosure An optional rack mount ki...

Page 16: ...f X21 V11 V35 and V24 The composite port appears on the back panel as a 15 way D type connector the pin out for each interface standard being shown in Appendix F Correct cables for Network connection...

Page 17: ...NTERNAL 64K set on INTERNAL V 11 V 24 V 35 Present Shows whether the link Lost is successfully connected Mode NORMAL Normal RUN Mode LLOOP Loops all transmitted data to the receiver Configuration LOCA...

Page 18: ...lash Call established searching for synchronisation Steady Green Call in progress passing data OK LOOP Not illuminated Normal un looped mode Green Some Channels looped or in QBF test modes ERROR Red R...

Page 19: ...o under off line conditions as many have very large buffers which can give a misleading indication that flow control is working when it is in fact not ever requested by the printer 4 3 Back to Back Te...

Page 20: ...it requests received Throughput Data throughput in bytes second Frames Received Number of frames that have been received across the composite link Frames Errors Number of frames that have errored whil...

Page 21: ...network WARNING INSTALLATION OF EQUIPMENT Installation of this equipment must only be performed by suitably trained service personnel WARNING CONNECTION OF OTHER EQUIPMENT This equipment allows connec...

Page 22: ...Netzen erlischt Warnung Installation des Ger tes Die Installation des Ger tes darf nur von entsprechend ausgebildetem und autorisiertem Personal durchgef hrt werden Warnung Anschlu von anderen Ger te...

Page 23: ...uniquement par des personnels convenablement form s ce type de mat riel Mise en garde Connexion d autres quipements Des quipement compl mentaires pourrant tre connect s aux ports de cet quipement la...

Page 24: ...ble is available from your dealer using the specified part number V 35 Throughout Europe Pan European to I CTR2 at data rates up to and including 256Kbps when the composite interface is configured to...

Page 25: ...and 25 way D Type ports The cables must have the foil or braid screen connected effectively to the metal headshell to ensure continued compliance The following headshells are among those which have be...

Page 26: ...1 3 Mains Connection The mains connection is internally filtered and requires no special consideration C 2 To Ensure that adequate immunity is achieved It is in the user s interest to ensure continued...

Page 27: ...3 Page 26 of 36 APPENDIX D Rear Panel Layout The layout of all ports on the rear panel of a 16 channel Esprit multiplexer is shown in the diagram below the 8 channel version doesn t have ports 9 16 No...

Page 28: ...7 Common 8 DCD 20 DTR 9600bps Operation The multiplexer requires connections to TxD RxD and Common only The output signals CTS DSR and DCD are provided for the terminal if required Cable for connectio...

Page 29: ...OTECTIVE GROUND 8 G COMMON COMMON Common Return 2 T A TXDa TXD Generator 9 T B TXDb Generator 3 C A DTR DTR Generator 10 C B Generator 4 R A RXDa RXD Load 11 R B RXDb Load 5 I A DCD DCD Load 12 I B Lo...

Page 30: ...IX G V 24 Data Channel Pinout V 24 Data Channels connectors 1 16 8 Way RJ45 Type Configured DCE DATA CHANNEL CONNECTIONS Description DCE RJ45 Type Protective Ground TxD 6 Load RxD 5 Generator RTS 8 Lo...

Page 31: ...Generator 10 10 C B Generator 4 4 R A Load 11 11 R B Load 5 5 I A Load 12 12 I B Load 6 6 S A Load 13 13 S B Load Notes 1 Pin 14 on Mux not Connected 2 V11 Male for connection to NTU must have M3 Scre...

Page 32: ...A SHIELD 8 B COMMON Common Return 2 P TXDa Generator 9 S TXDb Generator 15 C RTS Generator 3 H DTR Generator 4 R RXDa Load 11 T RXDb Load 5 F DCD Load 6 V RXCa Load 13 X RXCb Load 7 Y TXCa Load 14 AA...

Page 33: ...onnector Connector UNC 4 40 Screws UNC 4 40 Screws Normal Use 1 1 SHIELD 8 7 COMMON Common Return 2 2 TXD Generator 15 4 RTS Generator 3 20 DTR Generator 4 3 RXD Load 5 8 DCD Load 6 17 RXC Load 7 15 T...

Page 34: ...t Cables Back to Back cable spec fo X 21 V 11 V 24 and V 35 Signal Name 15 way D male Mux A 15 way D male Mux B Common 8 8 TxDa RxDa 2 4 TxDb RxDb 9 11 RxDa TxDa 4 2 RxDb TxDb 11 9 Clocka Xclocka 6 7...

Page 35: ...ator modem up as follows AT F0 Set Defaults AT M2 Set SYNCHRONOUS DTR dialling AT D2 DTR required for modem to go online AT S1 DSR Responds to remote modem AT Z0 tel No Set telephone number AT W Save...

Page 36: ...Local and Remote Loopbacks Quick Brown Fox test messages Echo Mode Flags RTS may be set ON OFF or to follow DSR from the Remote mux COMPOSITE LINK Interface V 11 V 35 V 24 all DTE Data Rates Up to 25...

Page 37: ...Esprit Statmux User Manual December 1997 Issue 1 3 Page 36 of 36 Power Requirements 100 240V AC 50 60Hz...

Reviews: