background image

ET188

13

TREADBELT TRACKING ADJUSTMENT:

The performance of your treadmill is dependent on the frame running on a reasonably level
surface. If the frame is not level, the front and back roller cannot run parallel, and constant belt
adjustment may be necessary.
The treadmill is designed to keep the tread-belt reasonably centered while in use. It is normal
for some belts to drift near one side while the belt is running with no one on it. After a few
minutes of use, the tread-belt should have a tendency to center itself. If, during use, the belt
continues to move toward one side, adjustments are necessary.

TO SET TREADBELT TRACKING:

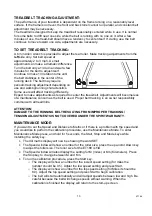
A 6 mm Allen wrench is provided to adjust the rear roller. Make tracking adjustments from the

left

side only. Set belt speed at

approximately 2 to 3 mph. A small
adjustment can make a dramatic difference.
Turn the bolt only a 1/4 turn and wait a few
minutes for the belt to adjust itself.
Continue to make 1/4 rotation turns until
the belt stabilizes in the center of the
running deck. The belt may require
periodic tracking adjustment depending on
use and walking/running characteristics.
Some users will affect tracking differently.
Expect to make adjustments as required to center the tread-belt. Adjustments will become less
of a maintenance concern as the belt is used. Proper belt tracking is an owner responsibility
common with all treadmills.

ATTENTION:
DAMAGE TO THE RUNNING BELT RESULTING FROM IMPROPER TRACKING /
TENSION ADJUSTMENTS IS NOT COVERED UNDER THE SPIRIT WARRANTY.

MAINTENANCE MODE:

If you want to set the Speed and Distance to Metric or if there is a problem with the speed and
you would like to perform the calibration procedure, use the Maintenance Mode. To enter
Maintenance Mode press, and hold for 5 seconds, the Start, Stop and Mode keys while
installing the safety key.

  The dot matrix display will now be showing the word SET

  The Speed window will show a number for the roller size, press the up and/or Down key

to adjust the roller size. The roller size for the ET188 is

1.8

  The Speed window will also display the setting for M (miles) or Km (Kilometers). Press

the Stop key to change between M and Km.

  To run the calibration procedure, press the Start key.

o

  The display will show a number for the lowest speed setting (for miles the

number should be 0.5). Adjust the low speed setting and press Start.

o

  The display will show a number for the top speed setting (for Miles it should be

8.0). Adjust the top speed setting and press Start to begin calibration.

o

  The belt will start automatically and will adjust speeds between low and high. Be

careful because the belt will change speeds without warning. When the
calibration is finished the display will return to the start-up screen.

Summary of Contents for ET188

Page 1: ...OWNER S MANUAL...

Page 2: ...ructions 3 Important Electrical Information 4 Important Operation Instructions 5 Assembly instructions 6 Operation of Your New Treadmill 9 General Maintenance 12 Service Checklist Diagnosis Guide 15 M...

Page 3: ...ir telephone number and the date of purchase below to make any future needed contact easy We appreciate your support and we will always remember that you are the reason that we are in business Please...

Page 4: ...nts and other caution areas that can cause harm l Keep hands away from all moving parts l Never operate the treadmill if it has a damaged cord or plug If the treadmill is not working properly call you...

Page 5: ...equipped with a cord having an equipment grounding plug The plug must be plugged into an appropriate outlet that is properly installed and grounded in accordance with all local codes and ordinances DA...

Page 6: ...p Simply standing on the belt during slow acceleration is proper after you have learned to operate the unit l Always hold on to a handrail or hand bar while making control changes incline speed etc A...

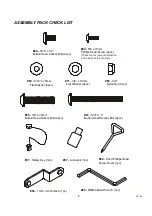
Page 7: ...x 19mm Flat Washer 2pcs 86 13 14 mm Wrench 1pc 85 M5 M6 Allen Wrench 1pc 87 Lubricant 1pc 65 3 8 Nyloc Nut 2pcs 55 3 8 x 46mm Button Head Socket Bolt 2pcs 83 5 16 x 3 Button Head Socket Bolt 4pcs 94...

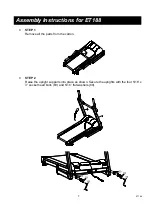
Page 8: ...1 Remove all the parts from the carton n STEP 2 Raise the upright supports into place as shown Secure the uprights with the four 5 16 x socket head bolts 83 and 5 16 flat washers 69 Assembly Instruct...

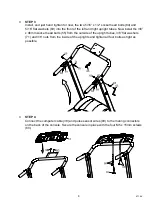
Page 9: ...install the 3 8 x 46mm socket head bolts 55 from the outside of the upright tubes 3 8 flat washers 71 and 3 8 nuts from the inside of the uprights and tighten all four bolts as tight as possible n ST...

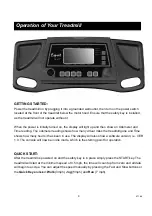
Page 10: ...virtual miles the treadmill gone and Time shows how many hours it has been in use The display will also show a software version i e VER 1 0 The console will now be in idle mode which is the starting...

Page 11: ...n to stop training and press for 3 seconds to reset FAST Press the FAST button to increase your speed SLOW Press the SLOW button to decrease your speed MODE Press the MODE button to select different p...

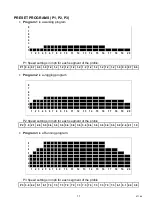
Page 12: ...1 12 13 14 15 16 17 18 19 20 P2 Speed settings in mph for each segment of the profile P2 1 9 2 1 2 6 3 0 3 6 3 6 3 6 3 6 3 6 3 6 3 6 3 6 3 6 3 6 3 6 3 6 3 0 2 6 2 1 1 9 Program 3 is a Running program...

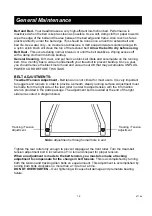
Page 13: ...CORD BEFORE THIS TASK BELT ADJUSTMENTS Treadbelt Tension Adjustment Belt tension is not critical for most users It is very important for joggers and runners in order to provide a smooth steady runnin...

Page 14: ...maintenance concern as the belt is used Proper belt tracking is an owner responsibility common with all treadmills ATTENTION DAMAGE TO THE RUNNING BELT RESULTING FROM IMPROPER TRACKING TENSION ADJUSTM...

Page 15: ...hand under the belt 5 10 turns Make sure to loosen both bolts the same amount of turns and also remember how many turns because when finished you will need to tighten the bolts back to the point they...

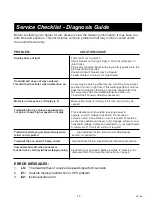
Page 16: ...t responsive Display is lit Make certain clock is running If it is then service may be needed Treadmill will only achieve approximately 3 mph but shows higher speed on display This indicates motor sho...

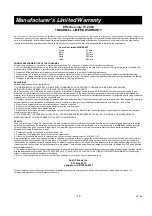
Page 17: ...as alterations modifications abuse misuse accident improper maintenance inadequate power supply or acts of God 4 Products with original serial numbers that have been removed or altered 5 Products that...

Reviews: