background image

ESI 

UDJ6


8

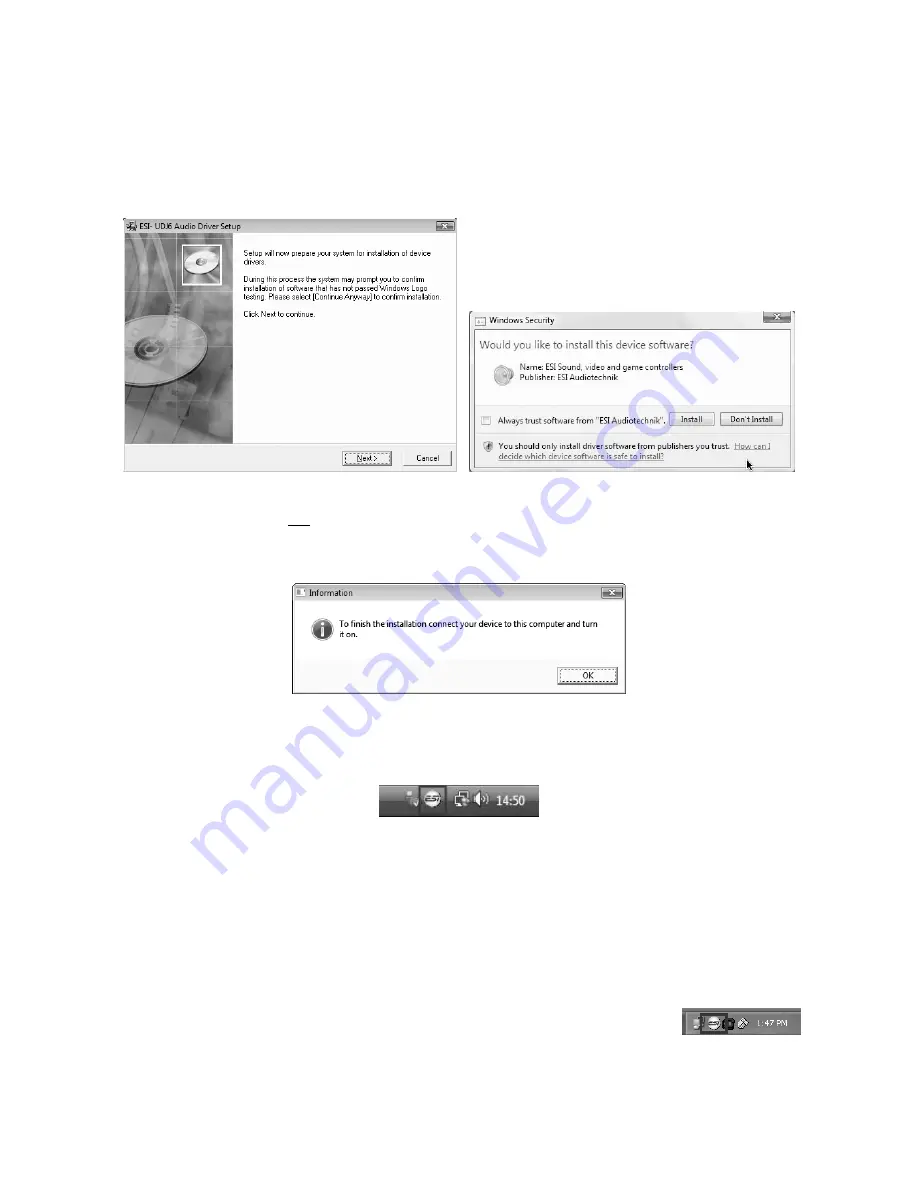
The installer now informs you that the driver installation will start as shown on the left picture 
below. Confirm this with 

Next

. During the following process you might see a 

Windows Security


dialog box once or several times that asks you for confirmation to install the driver software. 
Confirm any such dialog with 

Install


You will now be prompted to connect the hardware on the next dialog that is shown below on the 
left. Plug in UDJ6. Do not click 

Next

 yet. Instead, wait a few seconds for the automatic device 

driver installation. You can monitor this in the task notification area where Windows Vista / 7 
informs that the driver is installed via a bubble message box. 


You can now finally click 

Next

 on the 

ESI UDJ6 Audio Driver Setup

 dialog. The installation is now 

finished. To confirm this, please check if the ESI icon is displayed in the taskbar notification area as 
shown below. Sometimes a reboot is required. 


If yes, the driver installation has been completed successfully. 

3. Control Panel 

This chapter describes the UDJ6 Control Panel under Windows. Under Mac OS X no special 
Control Panel is required. 

To open the control panel double click on the ESI icon in the task notification 
area. The following dialog will appear: 

Summary of Contents for UDJ6

Page 1: ...High Quality 24 bit USB Audio Adapter with 6 separate output channels User s Guide...

Page 2: ...ESI Copyright 2012 Revision 1 July 2012 www esi audio com...

Page 3: ...4 2 Installation 5 2 1 System Recommendation 5 2 2 Hardware Installation 5 2 3 Driver Installation 5 3 Control Panel 8 4 Setting in Applications 10 4 1 Windows Multimedia setup 10 4 2 Deckadance LE 1...

Page 4: ...B connection port connects to your computer 2 4 analog outputs with RCA connectors for output channels 3 to 6 3 1 4 TRS headphone output for output channel 1 and 2 The cool compact design allows you t...

Page 5: ...pport recommended Mac Power Macintosh G3 or higher 1 available USB port at least 64MB RAM Mac OS X 10 4 or higher 2 2 Hardware Installation UDJ6 is simply connected to an available USB port of your co...

Page 6: ...t picture below Click Next You can define the target directory for the installation now Confirm it with Next The installer now informs you that the driver installation will start as shown on the left...

Page 7: ...required If yes the driver installation has been completed successfully Installation under Windows Vista 7 Unplug the device before you start the installer if it is already connected Then launch setup...

Page 8: ...device driver installation You can monitor this in the task notification area where Windows Vista 7 informs that the driver is installed via a bubble message box You can now finally click Next on the...

Page 9: ...6 channels and 44 1kHz is selected You can change this to 48 kHz and you can select 96kHz playback with maximum 2 simultaneous channels Please note that you must change these settings before launching...

Page 10: ...to install or run the program you can download the program on one computer and install it on another without internet access To download the software installer please register using the unique 20 dig...

Page 11: ...it resolution 6 D A Converter 1 dynamic range 112 dB A weighted typical 2 frequency response 20 22 kHz fs 48 kHz 3 resolution 24 bit 4 THD N 94dB 7 Headphone Amplifier 1 Output Power 60mW maximum 2 Si...

Page 12: ...ide reasonable protection against harmful interference when the equipment is operated in a commercial environment This equipment generates uses and can radiate radio frequency energy and if not instal...

Reviews: