background image

PAGE 25

FireBall™ SEi Series User

’s Manual

REGISTRATION

Registering your FireBall is accomplished automatically when you go through the Quick Start process 

described in the User’s Manual. Registration includes properly configuring your FireBall for Internet access 

and then connecting to the Escient servers to register your serial number and download the latest Internet 

Radio stations.

If you experience difficulty completing the registration process in Quick Start, follow these guidelines to 

make sure you have all of the required information and that you can make the proper connection to your 

Internet Service Provider and the Escient Servers.

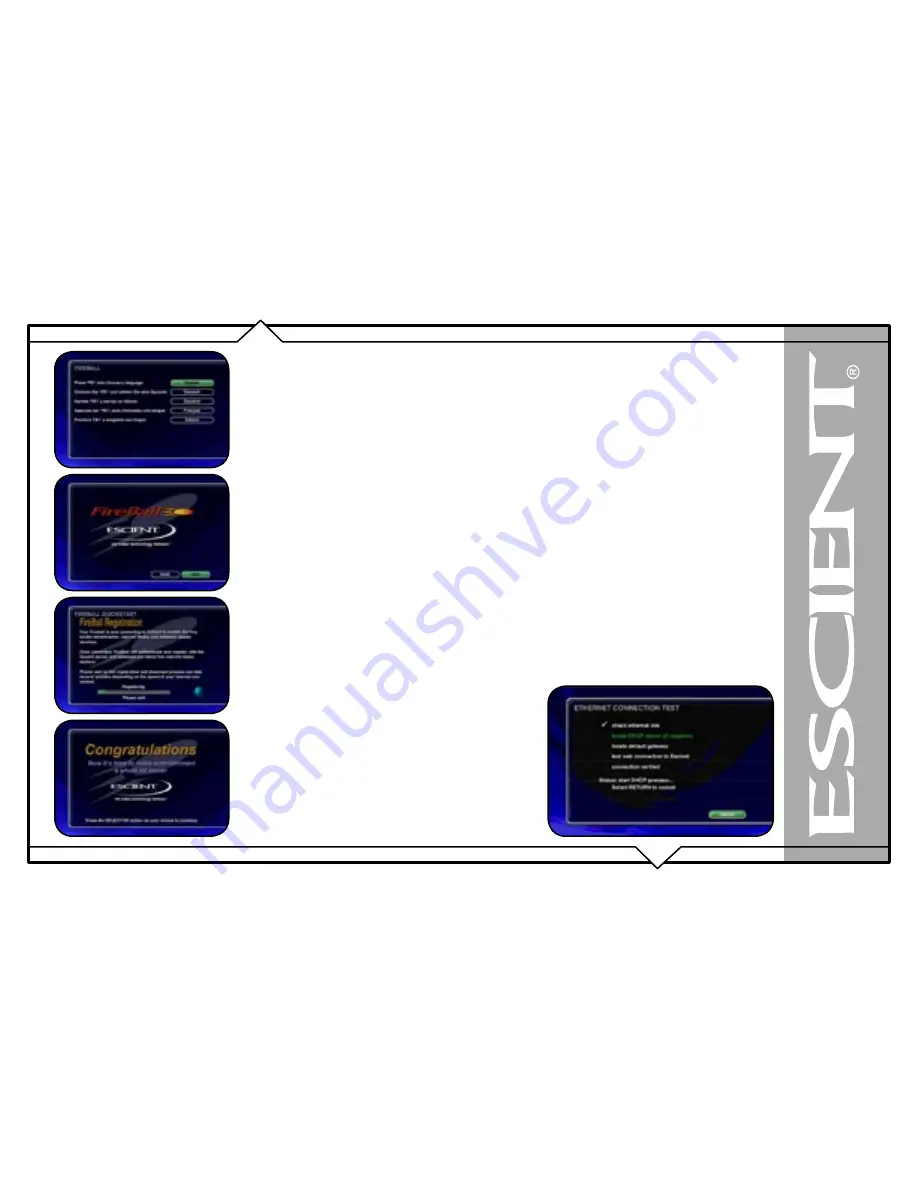
TESTING A BROADBAND CONNECTION

1.  Check the Ethernet Network Link - The green LED next to the FireBall’s back panel Ethernet jack 

should be on when properly connected to an Ethernet network.

2.  From the Ethernet Connection Quick Start screen, select the “perform test” button. This will start 

the Ethernet Connection test which will test your network settings and FireBall’s ability to properly 
reach the Internet and the Escient servers for registration, disc recognition, and software updates.

If any of the tests fail, check your ethernet wiring with the proper test equipment, make sure your router 

is properly configured as a DHCP router, and that you can access the internet using the same network 

connection using a PC.

Check with your ISP or network administrator if you 

need assistance determining whether or not you should 

use DHCP IP addressing. If you are going to use a static 

IP address, it must be in the proper range assigned to 

your subnet. Again, check with your ISP or network 

administrator before using a static IP address.

Summary of Contents for FireBall SEi SERIES

Page 1: ...SEi SERIES USER S MANUAL P N M32003 02A3...

Page 2: ...Customer Support Staff at 800 372 4368 The Escient Team PRODUCT INTRODUCTION 6 ABOUT THIS MANUAL 6 RECORD YOUR SERIAL NUMBER 6 MANUAL DISCLAIMERS 6 WARNINGS AND PRECAUTIONS 7 TRADEMARKS SERVICE MARKS...

Page 3: ...9 USING THE JUKEBOX QUEUE 40 Adding Songs and Playing the Jukebox Queue 40 Reordering the Jukebox Queue 41 Removing a Song from the Jukebox Queue 41 Clearing the Entire Jukebox Queue 41 Saving the Juk...

Page 4: ...LING THE ETP TOUCH PANEL 81 Calibrating the Touch Panel 82 Changing the Touch Panel Button Overlay 83 Using Your Touch Panel 83 IR REMOTE CONTROL 84 DIRECT ACCESS CODES 85 PLAYLIST HOT KEYS 88 SERIAL...

Page 5: ...TWORK PROBLEMS 102 SOFTWARE UPDATE PROBLEMS 102 RECORDING PROBLEMS 102 ADDITIONAL INFORMATION 103 SPECIFICATIONS 103 Video Specifications 103 Audio Specifications 103 Physical Specifications 103 3rd P...

Page 6: ...er RECORD YOUR SERIAL NUMBER The serial number for this unit is located at the rear of the device Please record the serial number in the space provided below Refer to it whenever you call Escient Tech...

Page 7: ...plug A three prong grounded outlet is required You are cautioned that any change or modification not expressly approved in this manual or approved in writing by an authorized representative of Escien...

Page 8: ...is the industry standard in music recognition technology and related content delivery For more information visit www gracenote com CD and music related data from Gracenote Inc copyright 2000 2007 Grac...

Page 9: ...or factory refurbished parts in the repair of these in warranty systems Escient will also pay for the return shipment of the repaired system via standard ground transportation At Escient s discretion...

Page 10: ...maintain the original media and or appropriate backup copies within the specific rights of the media s copyright holder How to Return a Product Contact your dealer Please have the following informati...

Page 11: ...o privacy and be confident that we will use your information responsibly By using the Escient FireBall you are accepting the practices described in this Privacy Policy The option to read the Escient P...

Page 12: ...used to display information about the highlighted title Playlist a collection of one or more music tracks or songs Title a collection of music tracks commonly referred to as a CD Album or Playlist Key...

Page 13: ...or on the remote once and the video output is displayed on your Telly The unit is now ON and the LED will be solid blue To change from the ON mode back to the standby or sleep mode press the Power bu...

Page 14: ...ries User s Manual FRONT PANEL OVERVIEW 1 POWER 2 GUIDE SCREEN 3 MUSIC SOURCE 4 RADIO SOURCE 5 CD RW DRIVE 6 TEXT DISPLAY IR RECEIVER 7 OPEN CLOSE DRIVE 8 NAVIGATION 9 SELECT 10 TRANSPORT CONTROLS FAV...

Page 15: ...SEi Series User s Manual REAR PANEL OVERVIEW SE 160i 1 POWER 2 IR IN 3 DIGITAL AUDIO OPTICAL OUT 4 ANALOG AUDIO AUDIO IN AUDIO OUT 5 VIDEO OUT COMPOSITE S VIDEO COMPONENT 6 COMMUNICATION PORT 7 ETHERN...

Page 16: ...SEi Series User s Manual REAR PANEL OVERVIEW SE 500i 1 POWER 2 IR IN 3 DIGITAL AUDIO OPTICAL OUT 4 ANALOG AUDIO AUDIO IN AUDIO OUT 5 VIDEO OUT COMPOSITE S VIDEO COMPONENT 6 COMMUNICATION PORTS 7 ETHER...

Page 17: ...MENU View Menu toggles through various Guide Views artist title cover CONTROL Options displays Options menu GUIDE Guide Player toggles between Guide and Player screens INFO Info displays ad ditional...

Page 18: ...ves to the next location so that the same key can be pressed again to enter a second character The 2 3 4 5 6 and 8 keys each support three letters and one number and can be pressed from one to seven t...

Page 19: ...e FireBall assumes that lower case is preferred and the character entry cycles in the following pattern lowercase uppercase and numeric The following text entry table describes the sequence of charact...

Page 20: ...e active at the same time so you can use as many as you like without causing signal degradation The Component Video output will provide the best possible video quality for the FireBall User Interface...

Page 21: ...he Red Light will start to flash once the 5 digit code is accepted If the FireBall does not reboot wait 5 seconds and try the code again or if you have already setup and registered your FireBall 1 Usi...

Page 22: ...llows much longer distances between FireBall and the control system and provides a much faster path for data transfer IR CONNECTIONS The direct IR input jack on the back panel of the FireBall is for c...

Page 23: ...res 1 2 3 and 6 are used by Ethernet networks for communication Although only four wires are used if the cable has 8 wires all the wires have to be connected in both jacks Straight through cables are...

Page 24: ...User s Manual CAT5 cabling should not exceed 100 meters The following drawing depicts the typical wiring scheme for CAT5 For more information about wiring an Ethernet network please refer to the Links...

Page 25: ...e FireBall s back panel Ethernet jack should be on when properly connected to an Ethernet network 2 From the Ethernet Connection Quick Start screen select the perform test button This will start the E...

Page 26: ...ll The process of getting music into FireBall is called Recording or sometimes Ripping There are several ways to get your music into FireBall Record CDs using the internal CD Drive Transfer Music file...

Page 27: ...ition Service and are displayed on your Telly 5 Press the RECORD key on the remote control to display the Recording Options Menu 6 Press the RECORD key a second time to choose the default recording op...

Page 28: ...files follow these guidelines before importing them into your FireBall System Requirements 10 100 Ethernet network PC or Mac connected to the same local ethernet network as the FireBall Windows XP or...

Page 29: ...te control to display the Setup menu 2 Select the NETWORK menu item 3 Select the SERVER SETTINGS menu item 4 Enter a name for your FireBall On the PC 1 Go to the START menu and select RUN 2 Enter two...

Page 30: ...g client Make sure your Mac is connected to the same network as your FireBall and follow these steps to mount transfer and import music files from your PC to your FireBall 1 Go to the Finder and selec...

Page 31: ...5 Next an authentication dialog will appear You can ignore this dialog and just click the OK button 6 You will then have a new drive mounted on your desktop called Import 7 Drag and drop your audio fi...

Page 32: ...be displayed showing the default information for the recording you are about to make You can use these default settings or edit them The default recording length is 30 minutes Enter a different numbe...

Page 33: ...able CD 1 Press the RECORD key on the remote to display the Record menu 2 Select the ERASE CD RW DISC menu 3 Confirm that you want to proceed with completely erasing the disc by selecting the ERASE bu...

Page 34: ...c collection The Music Guide displays a scrolling list of all your Music Titles Using the remote control you can navigate up and down the list As each Title is highlighted you will notice that the Inf...

Page 35: ...Track highlighted you will start playback from the selected Track You ll notice that a new screen appears with a list of the songs or tracks on the current Title this is the Music Player screen The M...

Page 36: ...usic Library is by using the Music Views There are four Views that you can switch between using the MENU VIEW key on the remote control Artist Artist Title Title Artist Song List Cover View By Artist...

Page 37: ...y Genre then by Artist Album and finally by songs View By Cover View By Cover displays a graphical grid of album cover art sorted alphabetically from A to Z according to the Artist Name then Album Nam...

Page 38: ...the current title Continue until you press stop or every track in the current title is played Random Group randomly select and play a track from any title in the current group Continue until you press...

Page 39: ...or Groups are visible at one time The All genre is the default which displays all Titles in your Music Library Using the LEFT and RIGHT arrow keys on the remote you can select a different Genre Notice...

Page 40: ...ote control to add the highlighted item to your Jukebox Queue 4 Press the PLAY JUKEBOX key on the remote control to display the Music Player screen and play your Jukebox Queue 5 If you want to add mor...

Page 41: ...Queue 1 Press the MUSIC key on the remote to make sure you are in the Music Source Mode 2 Select the Jukebox Menu Item 3 Select the Clear Queue button All songs are cleared from the Jukebox Queue Savi...

Page 42: ...Internet Radio Stations Using the remote control you can navigate up and down the list As each Station is highlighted you will notice that the Information Area and Cover Art changes to reflect the cu...

Page 43: ...the current Internet Radio station stream Playing Internet Radio requires a valid Internet connection Although some stations will work over a Dialup Internet Connection a broadband Internet connectio...

Page 44: ...ic Guide Navigate up and down to highlight expand or collapse music titles 6 For each song you want to add to the Playlist highlight the song name and press the SELECT key on the remote A checkmark ap...

Page 45: ...ess the OPTIONS key to display the Options Menu 3 Select the GROUPS NEW GROUP menu item 4 Using the remote control or keyboard enter a name for your Group 5 Select the CONTINUE button on screen to adv...

Page 46: ...tion follow these steps to add your own Internet Radio Station to the Radio Guide 1 Make sure you are in the Radio source mode by pressing the RADIO key on the remote 2 Press the OPTIONS key to displa...

Page 47: ...stations you may have added from your Radio Guide It WILL replace the Escient supplied stations with a fresh new list If you want to replace the current Internet Radio Stations with a new list of sta...

Page 48: ...rmation for the current Music Title 1 Highlight the Music Title you want to edit in the Music Guide 2 Press the OPTIONS key on the remote control 3 Select the EDIT DISC INFO menu item to display the E...

Page 49: ...usic Title you want to edit in the Music Guide 2 Press the OPTIONS key on the remote control 3 Select the EDIT DISC INFO Info menu item to display the Edit Disc Information screen 4 Select the EDIT TR...

Page 50: ...itle you want to edit in the Music Guide 2 Press the OPTIONS key on the remote control 3 Select the EDIT DISC INFO menu item to display the Edit Disc Information screen 4 Select the LOOKUP THIS DISC B...

Page 51: ...ngs You can change either one of these to modify the search Note that editing the Artist Name or Title WILL NOT change them in the Music Library These edits are ONLY used to search for a new cover 6 S...

Page 52: ...3 Select the EDIT DISC INFO menu item to display the Edit Disc Information screen 4 Select the SELECT A COVER button to display the Select Cover Art screen 5 Using the arrow and page keys on the remot...

Page 53: ...mode by pressing the RADIO key on the remote 2 Press the OPTIONS key to display the Options Menu 3 Select the EDIT STATION menu item to display the Edit Station screen 4 Using the remote or keyboard...

Page 54: ...to the Playlist highlight the song name and press the SELECT key on the remote A checkmark appears to the right of each selected song indicating that it will be added to the Playlist 7 For each song y...

Page 55: ...Radio Station you want to add to the Group highlight the Music Title or Radio Station and press the SELECT key on the remote A checkmark appears to the right of each selected Music Title or Radio Stat...

Page 56: ...to display the Delete Music Info screen 4 For each Track you want to delete highlight the Track and press the SELECT key on the remote A checkmark appears to the right of each selected Track indicatin...

Page 57: ...y the Options Menu 3 Select the PLAYLISTS DELETE PLAYLISTS menu item to display the Delete Playlists screen 4 For each Playlist you want to delete highlight the Playlist and press the SELECT key on th...

Page 58: ...ovies Groups or press the RADIO key if you want to edit the Radio Groups 2 Press the OPTIONS key to display the Options Menu 3 Select the GROUPS DELETE GROUPS menu item to display the Delete Groups sc...

Page 59: ...ndard audio CD which can be played in almost any CD player or select the CREATE A DATA MIX CD button if you want to create an data CD that can be played in any computer or CD player which supports MP3...

Page 60: ...CD tray and ask you to insert a blank CD 11 Insert a blank CD R or CD RW disc and close the CD tray by pressing the Eject button on the front panel Note You must use royalty paid blank CDs which are...

Page 61: ...D Read screen 6 FireBall will read the selected CD and create an image of the CD on it s internal hard drive Note If you selected any songs which are from changer based CDs this process may take a whi...

Page 62: ...nt number to increase or decrease the recording time 5 When you are finished editing the default settings press the RECORD key again to start recording from the external analog inputs to the internal...

Page 63: ...tion keys on the remote control up down left and right to highlight and select any menu item SELECTING YOUR LANGUAGE FireBall supports 5 different languages for it s on screen menus and text Follow th...

Page 64: ...t the SCREEN SAVER Menu 4 Select your Screen Saver Preferences Activation Idle Time You can specify the amount of idle time that FireBall will wait before activating the screen saver from 1 to 60 minu...

Page 65: ...aver Follow these steps to enable the Retail Demo Mode in your FireBall display model 1 Follow the Quick Start instructions to connect and register your demo FireBall 2 When your FireBall is configure...

Page 66: ...n the remote 2 Select the General menu 3 Select the Screen Saver menu 4 Select the Photo Viewer option and the number of minutes to wait before displaying the next photo 5 Select Random or Alphabetica...

Page 67: ...IME ZONE Specify which US time zone your FireBall is located in Follow these steps to set your Time Zone 1 Press the SETUP key on the remote to display the Setup menu 2 Select the GENERAL Menu 3 Selec...

Page 68: ...eral menu 3 Select the User Interface Skins menu 4 Select one of the built in Themes or Custom if you want custom backgrounds and Select the Save button 5 If you selected the Custom Theme you will see...

Page 69: ...d is specified you will be prompted for your password whenever you press the Setup key on the remote If the password entered matches the stored password full access is granted to the user until the ne...

Page 70: ...hardware If your PC is setup using Dynamic or DHCP addressing you should most likely use the same for your FireBall Connect your FireBall to your Ethernet network using the included Ethernet cable and...

Page 71: ...remote to display the Setup menu 2 Select the NETWORK menu 3 Select the FIREBALL SERVER SETTINGS menu 4 Enter a name for your FireBall using the remote control or wireless keyboard For example Living...

Page 72: ...FireBall SEi Servers that have been upgraded to Version 4 0 or later FireBall Features Package Follow these steps to connect your FireBall to another FireBall Music Server 1 Press the SETUP key on the...

Page 73: ...the RECORDING PREFERENCES menu 4 Select MP3 or CD Quality FLAC as your preferred encoder 5 If you selected MP3 as your preferred encoder select a bitrate The MP3 bitrate is used to determine the relat...

Page 74: ...ding then ejecting each one Follow these steps to set the Disc Insert Preferences 1 Press the SETUP key on the remote to display the Setup menu 2 Select the AUDIO menu 3 Select the DISC INSERT PREFERE...

Page 75: ...screen 1 Press the SETUP key on the remote to display the Setup menu 2 Select the VIDEO menu 3 Select the VIDEO FORMAT menu 4 Using the Up and Down keys on the remote select your desired aspect ratio...

Page 76: ...ter the FireBall screen 1 Press the SETUP key on the remote to display the Setup menu 2 Select the VIDEO menu 3 Select the SCREEN CENTERING menu 4 Using the Left and Right keys on the remote adjust th...

Page 77: ...e Setup menu 2 Select the VIDEO menu 3 Select the BRIGHTNESS menu 4 Turn your TV s brightness control all the way up then lower it to the point where the vertical black bar on the left just disappears...

Page 78: ...steps to adjust the contrast on your TV 1 Press the SETUP key on the remote to display the Setup menu 2 Select the VIDEO menu 3 Select the CONTRAST menu 4 Turn your TV s Contrast or Picture control a...

Page 79: ...curately Follow these steps to adjust the sharpness on your TV 1 Press the SETUP key on the remote to display the Setup menu 2 Select the VIDEO menu 3 Select the SHARPNESS menu 4 Turn your TV s Sharpn...

Page 80: ...P key on the remote to display the Setup menu 2 Select the VIDEO menu 3 Select the COLOR BARS menu 4 Turn your TV s Color and Tint controls up and down until the color bars are at the point where they...

Page 81: ...r FireBall 3 Connect the other end of the RS 232 serial cable to the bottom of the ETP 1500 4 Connect one end of an S Video cable to FireBall s S Video output 5 Connect the other end of the S Video ca...

Page 82: ...ect the External Control Menu 3 Select the Touch Panel Menu 4 Select the Calibration Menu 5 The calibration screen is displayed 6 Follow the on screen instructions by touching the moving target with y...

Page 83: ...s There are two types of overlays the Button Frame and the Toggle Bar The Button Frame is useful for panels that are capable of displaying video in the overscan area such as the ETP 1500 The Toggle Ba...

Page 84: ...which source button FB1 FB2 FB3 or FB4 each FireBall will listen for commands from Follow these steps to configure your FireBall to be controlled by any of the four IR code banks 1 Press the Setup key...

Page 85: ...available for all music and movie titles playlists groups and radio stations Follow these steps to view the direct IR codes for your FireBall content 1 Press the Setup key on the remote to display the...

Page 86: ...Definitions Function Multi Key Combinations Direct Play Mode Macro 1 play mode number Enter Direct Disc Macro 2 changer number Macro disc number Enter Direct Artist Title Macro 3 artist title access n...

Page 87: ...o R iRadio access number Enter Direct Disc Macro C changer number D disc number Enter Direct Track Macro T track number Enter Direct Playlist Macro P playlist access number Enter Direct Group Macro G...

Page 88: ...board combinations 1 Press the Setup key on the remote to display the FireBall setup menu 2 Select the External Control menu item 3 Select the IR Serial menu item 4 Select the Playlist Hot Keys menu i...

Page 89: ...ble COM ports you must use the Ethernet based external control for two way external control communications with a third party control system Follow these steps to select which serial port to use for e...

Page 90: ...ystem using direct IR codes two way RS 232 serial control two way Ethernet control and wireless web pad control FireBall has built in support for the following companies control products AMX Net Strea...

Page 91: ...ble under the Utilities menu This information is useful for troubleshooting any problems you may encounter with your network connection or verifying the current software versions Follow these steps to...

Page 92: ...l begins to flash release the power button 3 When the LED on the front panel glows solid RED standby mode FireBall is ready to use 4 Press and release the Power button to turn on FireBall Follow these...

Page 93: ...hese steps to manually update the software 1 Press the SETUP key on the remote to display the Setup menu 2 Select the UTILITIES menu 3 Select the UPDATE SOFTWARE menu 4 Select the Check for Update but...

Page 94: ...FireBall Server Name entered on the Server Settings Menu in the SETUP NETWORK menus is used for the web address to access the FireBall web interface To access the FireBall web server simply open the...

Page 95: ...eBall web interface client mode to either streaming from or remote controlling your FireBall 1 Make sure your web browser is properly configured and connected to your FireBall 2 Click the SETUP button...

Page 96: ...drag and drop from the Content directory to the external drive or using more elaborate features provided by a third party backup software product such as Dantz Retrospect A free trial of this software...

Page 97: ...ort All MP3 AAC and FLAC files should have the proper ID3 tags in each file in order for FireBall to properly add each music file to it s internal Library The following ID3 tag formats are supported b...

Page 98: ...etwork Currently there are three different FireBall products that can play media from FireBall servers Another FireBall SEi FireBall FP 1 Home PC or Mac Client Server networking is limited to the same...

Page 99: ...t radio to every room of the home or office and provides the professional installer with tools for almost any installation FireBall is built from the ground up with many features that allow you to cen...

Page 100: ...ate over a wired or wireless network to share access to your media The biggest advantage of a distributed client server system over a central system is that everything you need is built into FireBall...

Page 101: ...eBall through the standard HTTP port 80 on your subnet CONFIGURING A FIREBALL CLIENT Networking Each FireBall client must be on the same network as the server This document will assume that you have p...

Page 102: ...10 0 0 0 10 255 255 255 172 16 0 0 172 31 255 255 and 192 168 0 0 192 168 255 255 Note that the first block is nothing but a single class A network number while the second block is a set of 16 contigu...

Page 103: ...ecifications Frequency Response 2 20 000 Hz 1 dB THD N playback 80 dB FS A 0 01 A_D DSP D A Dynamic Range 96 dB FS A 1kHz Channel Separation 95 dB Full Scale Line Output 2 Vrms 50 k ohms S PDIF Output...

Page 104: ...you agree to cease any and all use of the Gracenote Data the Gracenote Database and Gracenote Embedded Software Gracenote reserves all rights in the Gracenote Data Gracenote Database and Gracenote Em...

Reviews: