background image

PAGE 81

FireBall™ 

A

VX & MX Series User

’s Manual

DELETING MUSIC

You can remove any music you have recorded to the FireBall by using the Delete Music feature. 

You may want to do this if you have filled up your FireBall and you can not record any more music 

or if you want to remove songs that you just don’t listen to.

Follow these steps to delete music from your FireBall:
1.  Press the MUSIC key to make sure you are in the Music source mode.
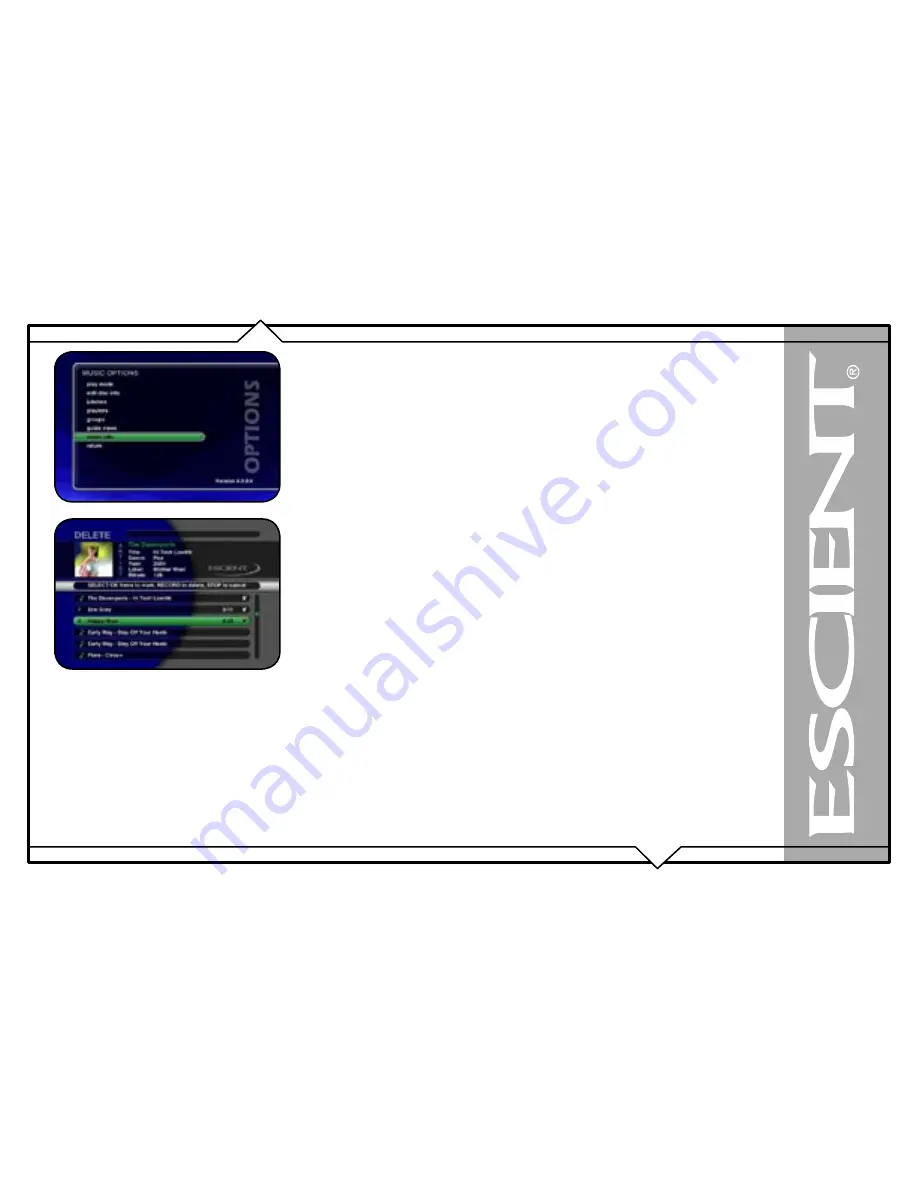
2.  Press the OPTIONS key to display the Options Menu
3.  Select the MUSIC INFO/DELETE MUSIC menu item to display the Delete Music Info screen.
4.  For each Track you want to delete, highlight the Track and press the SELECT key on the 

remote. A checkmark appears to the right of each selected Track indicating that it will be 
deleted. Press the SELECT key again to remove the checkmark. Pressing the TOGGLE 
key on the remote when a Title is highlighted will toggle all or none of the Title’s tracks for 
deletion.

5.  When you have selected all of the Titles you want to delete in the group, press the 

RECORD button on the remote control to permanently remove and delete the checked 
tracks.

You can not “delete” physical CDs from the Music Library. You must remove the discs from your 

changers if you want the CDs to be removed from the Music Guide.

Summary of Contents for FireBall AVX

Page 1: ...AVX MX SERIES USER S MANUAL P N M42001 02A3...

Page 2: ...ODUCTION 6 ABOUT THIS MANUAL 6 RECORD YOUR SERIAL NUMBER 6 MANUAL DISCLAIMERS 6 WARNINGS AND PRECAUTIONS 7 TRADEMARKS SERVICE MARKS 8 WARRANTY INFORMATION 9 ESCIENT PRIVACY POLICY 11 CONTACT INFORMATI...

Page 3: ...LIBRARY FROM ANOTHER ROOM 39 WATCHING A DIFFERENT MOVIE IN THE OTHER ROOM 39 WATCHING THE SAME MOVIE IN TWO ROOMS 41 GETTING MUSIC INTO FIREBALL 42 RECORDING FROM THE INTERNAL CD 43 RECORDING FROM EXT...

Page 4: ...k Names 74 Automatically Lookup Information for This Disc 75 Searching for the Original Cover 76 Tips for Searching for Covers 76 Selecting an Existing Cover 77 EDITING RADIO INFORMATION 78 EDITING PL...

Page 5: ...USING THE WEB USER INTERFACE 121 USING THE WEB BROWSER AS A MUSIC CLIENT 122 BACKUP AND RESTORE 123 FIREBALL MUSIC BACKUP 123 FIREBALL MUSIC RESTORE 124 ID3 Tag Support 124 NETWORKED AUDIO USING FIREB...

Page 6: ...ealer RECORD YOUR SERIAL NUMBER The serial number for this unit is located at the rear of the device Please record the serial number in the space provided below Refer to it whenever you call Escient T...

Page 7: ...r plug A three prong grounded outlet is required You are cautioned that any change or modification not expressly approved in this manual or approved in writing by an authorized representative of Escie...

Page 8: ...e is the industry standard in music recognition technology and related content delivery For more information visit www gracenote com CD and music related data from Gracenote Inc copyright 2000 2006 Gr...

Page 9: ...ient reserves the right to use new or factory refurbished parts in the repair of these in warranty systems Escient will also pay for the return shipment of the repaired system via standard ground tran...

Page 10: ...r How to Return a Product Contact your dealer or Escient s Customer Support group at 800 372 4368 Please have the following information ready for your dealer or Escient s Customer Support technician P...

Page 11: ...t FireBall you are accepting the practices described in this Privacy Policy The option to read the Escient Privacy Policy appears on the zip code screen of the Quick Start automatic setup procedure In...

Page 12: ...n used to display information about the highlighted title Playlist a collection of one or more music tracks or songs Title a collection of music tracks commonly referred to as a CD Album or Playlist K...

Page 13: ...nel or on the remote once and the video output is displayed on your TV The unit is now ON and the LED will be solid blue To change from the ON mode back to the standby or sleep mode press the Power bu...

Page 14: ...eries User s Manual FRONT PANEL OVERVIEW 1 POWER 2 MOVIES SOURCE 3 MUSIC SOURCE 4 RADIO SOURCE 5 CD RW DRIVE 6 TEXT DISPLAY IR RECEIVER 7 OPEN CLOSE DRIVE 8 NAVIGATION 9 SELECT 10 TRANSPORT CONTROLS G...

Page 15: ...IO OPTICAL IN 1 5 3 DIGITAL AUDIO OPTICAL OUT 1 2 4 DIGITAL AUDIO COAX OUT 1 2 5 ANALOG AUDIO OUT 1 2 6 ANALOG AUDIO IN 1 5 7 VIDEO OUT COMPONENT COMPOSITE S VIDEO 1 2 8 VIDEO IN COMPONENT COMPOSITE S...

Page 16: ...AUDIO IN 1 3 3 IR IN S LINK IR OUT 1 3 4 DIGITAL AUDIO OUT COAX OPTICAL 5 DIGITAL AUDIO IN OPTICAL 1 3 6 DIGITAL AUDIO IN COAX 1 3 7 ANALOG AUDIO OUT 8 VIDEO OUT COMPONENT COMPOSITE S VIDEO 1 2 9 VIDE...

Page 17: ...ZONE 1 POWER 2 IR IN S LINK IR OUT 3 DIGITAL AUDIO OUT COAX OPTICAL 4 DIGITAL AUDIO IN COAX OPTICAL 5 ANALOG AUDIO IN 6 ANALOG AUDIO OUT 7 VIDEO OUT COMPONENT COMPOSITE S VIDEO 8 VIDEO IN COMPONENT C...

Page 18: ...PAGE 18 FireBall AVX MX Series User s Manual REMOTE OVERVIEW...

Page 19: ...sociated with that key replaces the initial character If you do not press the same key within 5 seconds the text cursor moves to the next location so that the same key can be pressed again to enter a...

Page 20: ...ace FireBall assumes that lower case is preferred and the character entry cycles in the following pattern lowercase uppercase and numeric The following text entry table describes the sequence of chara...

Page 21: ...t changer should be connected to video in 1 digital audio in 1 and RS232 1 The second changer to all 2 connectors and so on ABOUT SACD AUDIO DISCS FireBall can also manage SACD audio discs loaded into...

Page 22: ...ur changer 7 Connect one end of the three wire yellow video cable into the Video In jacks Composite number 1 on the back of your FireBall 8 Connect the other end of the three wire yellow video cable i...

Page 23: ...using the steps described below The disc information that FireBall displays on your TV screen is NOT included on the original discs loaded into your changers The artist name album name and track list...

Page 24: ...ds your Music and DVD Library As each disc is accessed and looked up the Quick Lookup screen is updated to display the disc s information and cover art When all of the discs are looked up the Guide sc...

Page 25: ...to lookup a range of changer slots 1 Press the SETUP key on the remote to display the Setup menu 2 Select the CHANGER MANAGEMENT menu 3 Select the LOOKUP DISCS menu 4 Select the LOOKUP RANGE menu 5 E...

Page 26: ...ers you can use the Lookup All feature Follow these steps to lookup all discs in all changers 1 Press the SETUP key on the remote to display the Setup menu 2 Select the CHANGER MANAGEMENT menu 3 Selec...

Page 27: ...the FireBall to output both digital and analog outputs This table shows which audio outputs are active for each type of audio source Audio Source Analog Out Digital Optical Out Digital Coax Out Hard D...

Page 28: ...corresponding video input from the changer must also be connected to watch a movie from the changer on that video output The Component Video output will provide the best possible video quality for the...

Page 29: ...be connected to watch a movie from the changer on that video output The Component Video output will provide the best possible video quality for the FireBall User Interface but will require that your...

Page 30: ...t COM port for other purposes allows much longer distances between FireBall and the control system and provides a much faster path for data transfer IR CONNECTIONS The direct IR input jack on the back...

Page 31: ...wires 1 2 3 and 6 are used by Ethernet networks for communication Although only four wires are used if the cable has 8 wires all the wires have to be connected in both jacks Straight through cables ar...

Page 32: ...s User s Manual CAT5 cabling should not exceed 100 meters The following drawing depicts the typical wiring scheme for CAT5 For more information about wiring an Ethernet network please refer to the Lin...

Page 33: ...ote Do NOT connect any S Link cables from the FireBall to the Sony 777ES changers Digital Audio Connections Changer 1 should be connected to Optical Digital in 1 Changer 2 should be connected to Optic...

Page 34: ...when properly connected to an Ethernet network 2 From the Ethernet Connection Quick Start screen select the perform test button This will start the Ethernet Connection test which will test the follow...

Page 35: ...displays a scrolling list of all your Movies Using the remote control you can navigate up and down the list As each Title is highlighted you will notice that the Information Area and Cover Art change...

Page 36: ...nfromation for the currently highlighted movie by pressing the Info button on the remote CHANGING THE GUIDE VIEW The Movies Guide provides you with two different ways to view the contents of your DVD...

Page 37: ...s Guide automatically organizes your DVDs into default Genres also called Groups The Group Bar displays a horizontal scrolling list of Genres corresponding to the movies in your library Five Genres or...

Page 38: ...l FireBall MP 200 Digital Media Player The FireBall MP 200 provides a separate on screen media guide for browsing and selecting a movie in another room without interrupting the user s movie or music i...

Page 39: ...out title indicates that the disc is stored in a changer that is currently playing a disc Non grayed out titles are stored in idle changers WATCHING A DIFFERENT MOVIE IN THE OTHER ROOM Watching a Dif...

Page 40: ...ie If you select CONTINUE your movie will load and play and the user in the main room will see a message indicating what happened you started a different movie in the other room The user who s movie w...

Page 41: ...Guide will display the name of the currently playing movie grayed out at the top of the All Group and it s icon will have a 1 or 2 indicating which room it is playing in If you select this movie title...

Page 42: ...g music into FireBall is called Recording or sometimes Ripping There are several ways to get your music into FireBall Record CDs using the internal CD Drive Record CDs using optional external CD DVD c...

Page 43: ...ognition Service and are displayed on your TV 5 Press the RECORD key on the remote control to display the Recording Options Menu 6 Press the RECORD key a second time to choose the default recording op...

Page 44: ...and unload load each disc after it s recorded however there is the disadvantage that external recording must occur in real time at 1x record speeds taking up to several weeks to complete for large mus...

Page 45: ...already record to your FireBall in one easy step Follow these steps to automatically record changer CDs to your FireBall 1 Press the SETUP key on the remote to display the Setup menu 2 Select the CHA...

Page 46: ...changer slots 1 Press the SETUP key on the remote to display the Setup menu 2 Select the CHANGER MANAGEMENT menu 3 Select the RECORD DISCS menu 4 Select the RECORD RANGE menu 5 Enter a valid range of...

Page 47: ...ch disc in all changers 1 Press the SETUP key on the remote to display the Setup menu 2 Select the CHANGER MANAGEMENT menu 3 Select the RECORD DISCS menu 4 Select the RECORD ALL menu 5 The Record All...

Page 48: ...io files follow these guidelines before importing them into your FireBall System Requirements 10 100 Ethernet network PC or Mac connected to the same local ethernet network as the FireBall Windows XP...

Page 49: ...mote control to display the Setup menu 2 Select the NETWORK menu item 3 Select the SERVER SETTINGS menu item 4 Enter a name for your FireBall On the PC 1 Go to the START menu and select RUN 2 Enter tw...

Page 50: ...ing client Make sure your Mac is connected to the same network as your FireBall and follow these steps to mount transfer and import music files from your PC to your FireBall 1 Go to the Finder and sel...

Page 51: ...5 Next an authentication dialog will appear You can ignore this dialog and just click the OK button 6 You will then have a new drive mounted on your desktop called Import 7 Drag and drop your audio f...

Page 52: ...l be displayed showing the default information for the recording you are about to make You can use these default settings or edit them The default recording length is 30 minutes Enter a different numb...

Page 53: ...teable CD 1 Press the RECORD key on the remote to display the Record menu 2 Select the ERASE CD RW DISC menu 3 Confirm that you want to proceed with completely erasing the disc by selecting the ERASE...

Page 54: ...sic collection The Music Guide displays a scrolling list of all your Music Titles Using the remote control you can navigate up and down the list As each Title is highlighted you will notice that the I...

Page 55: ...a Track highlighted you will start playback from the selected Track You ll notice that a new screen appears with a list of the songs or tracks on the current Title this is the Music Player screen The...

Page 56: ...Music Library is by using the Music Views There are four Views that you can switch between using the MENU VIEW key on the remote control Artist Artist Title Title Artist Song List Cover View By Artis...

Page 57: ...by Genre then by Artist Album and finally by songs View By Cover View By Cover displays a graphical grid of album cover art sorted alphabetically from A to Z according to the Artist Name then Album Na...

Page 58: ...the current title Continue until you press stop or every track in the current title is played Random Group randomly select and play a track from any title in the current group Continue until you pres...

Page 59: ...or Groups are visible at one time The All genre is the default which displays all Titles in your Music Library Using the LEFT and RIGHT arrow keys on the remote you can select a different Genre Notic...

Page 60: ...mote control to add the highlighted item to your Jukebox Queue 4 Press the PLAY JUKEBOX key on the remote control to display the Music Player screen and play your Jukebox Queue 5 If you want to add mo...

Page 61: ...Queue 1 Press the MUSIC key on the remote to make sure you are in the Music Source Mode 2 Select the Jukebox Menu Item 3 Select the Clear Queue button All songs are cleared from the Jukebox Queue Sav...

Page 62: ...of Internet Radio Stations Using the remote control you can navigate up and down the list As each Station is highlighted you will notice that the Information Area and Cover Art changes to reflect the...

Page 63: ...bout the current Internet Radio station stream Playing Internet Radio requires a valid Internet connection Although some stations will work over a Dialup Internet Connection a broadband Internet conne...

Page 64: ...usic Guide Navigate up and down to highlight expand or collapse music titles 6 For each song you want to add to the Playlist highlight the song name and press the SELECT key on the remote A checkmark...

Page 65: ...ress the OPTIONS key to display the Options Menu 3 Select the GROUPS NEW GROUP menu item 4 Using the remote control or keyboard enter a name for your Group 5 Select the CONTINUE button on screen to ad...

Page 66: ...tation follow these steps to add your own Internet Radio Station to the Radio Guide 1 Make sure you are in the Radio source mode by pressing the RADIO key on the remote 2 Press the OPTIONS key to disp...

Page 67: ...m stations you may have added from your Radio Guide It WILL replace the Escient supplied stations with a fresh new list If you want to replace the current Internet Radio Stations with a new list of st...

Page 68: ...Editing Disc Info Follow these steps to edit the disc information for the current Movie Title 1 Highlight the Movie Title you want to edit in the Movies Guide 2 Press the OPTIONS key on the remote co...

Page 69: ...the remote control 3 Select the EDIT DISC menu item to display the Edit Disc Information screen 4 Select the LOOKUP THIS DISC BUTTON The Get Movie Info screen will be displayed as FireBall attempts t...

Page 70: ...r Movie screen 5 The current Movie Title is entered as the default search string You can change the Title to modify the search Note that editing the Title WILL NOT change it in the Movie Library These...

Page 71: ...trol 3 Select the EDIT DISC menu item to display the Edit Disc Information screen 4 Select the SELECT COVER button to display the Select Cover Art screen 5 Using the arrow and page keys on the remote...

Page 72: ...dit in the Movie Guide 2 Press the OPTIONS key on the remote control 3 Select the EDIT DISC menu item to display the Edit Disc Information screen 4 Select the EDIT DESCRIPTION button to display the Ed...

Page 73: ...formation for the current Music Title 1 Highlight the Music Title you want to edit in the Music Guide 2 Press the OPTIONS key on the remote control 3 Select the EDIT DISC INFO menu item to display the...

Page 74: ...Music Title you want to edit in the Music Guide 2 Press the OPTIONS key on the remote control 3 Select the EDIT DISC INFO Info menu item to display the Edit Disc Information screen 4 Select the EDIT T...

Page 75: ...Title you want to edit in the Music Guide 2 Press the OPTIONS key on the remote control 3 Select the EDIT DISC INFO menu item to display the Edit Disc Information screen 4 Select the LOOKUP THIS DISC...

Page 76: ...ings You can change either one of these to modify the search Note that editing the Artist Name or Title WILL NOT change them in the Music Library These edits are ONLY used to search for a new cover 6...

Page 77: ...3 Select the EDIT DISC INFO menu item to display the Edit Disc Information screen 4 Select the SELECT A COVER button to display the Select Cover Art screen 5 Using the arrow and page keys on the remo...

Page 78: ...e mode by pressing the RADIO key on the remote 2 Press the OPTIONS key to display the Options Menu 3 Select the EDIT STATION menu item to display the Edit Station screen 4 Using the remote or keyboard...

Page 79: ...d to the Playlist highlight the song name and press the SELECT key on the remote A checkmark appears to the right of each selected song indicating that it will be added to the Playlist 7 For each song...

Page 80: ...Radio Station you want to add to the Group highlight the Music Title or Radio Station and press the SELECT key on the remote A checkmark appears to the right of each selected Music Title or Radio Sta...

Page 81: ...m to display the Delete Music Info screen 4 For each Track you want to delete highlight the Track and press the SELECT key on the remote A checkmark appears to the right of each selected Track indicat...

Page 82: ...lay the Options Menu 3 Select the PLAYLISTS DELETE PLAYLISTS menu item to display the Delete Playlists screen 4 For each Playlist you want to delete highlight the Playlist and press the SELECT key on...

Page 83: ...Movies Groups or press the RADIO key if you want to edit the Radio Groups 2 Press the OPTIONS key to display the Options Menu 3 Select the GROUPS DELETE GROUPS menu item to display the Delete Groups...

Page 84: ...andard audio CD which can be played in almost any CD player or select the CREATE A DATA MIX CD button if you want to create an data CD that can be played in any computer or CD player which supports MP...

Page 85: ...he CD tray and ask you to insert a blank CD 11 Insert a blank CD R or CD RW disc and close the CD tray by pressing the Eject button on the front panel Note You must use royalty paid blank CDs which ar...

Page 86: ...CD Read screen 6 FireBall will read the selected CD and create an image of the CD on it s internal hard drive Note If you selected any songs which are from changer based CDs this process may take a wh...

Page 87: ...ent number to increase or decrease the recording time 5 When you are finished editing the default settings press the RECORD key again to start recording from the external analog inputs to the internal...

Page 88: ...gation keys on the remote control up down left and right to highlight and select any menu item SELECTING YOUR LANGUAGE FireBall supports 5 different languages for it s on screen menus and text Follow...

Page 89: ...ect the SCREEN SAVER Menu 4 Select your Screen Saver Preferences Activation Idle Time You can specify the amount of idle time that FireBall will wait before activating the screen saver from 1 to 60 mi...

Page 90: ...saver Follow these steps to enable the Retail Demo Mode in your FireBall display model 1 Follow the Quick Start instructions to connect and register your demo FireBall 2 When your FireBall is configur...

Page 91: ...on the remote 2 Select the General menu 3 Select the Screen Saver menu 4 Select the Photo Viewer option and the number of minutes to wait before displaying the next photo 5 Select Random or Alphabeti...

Page 92: ...TIME ZONE Specify which US time zone your FireBall is located in Follow these steps to set your Time Zone 1 Press the SETUP key on the remote to display the Setup menu 2 Select the GENERAL Menu 3 Sele...

Page 93: ...eneral menu 3 Select the User Interface Skins menu 4 Select one of the built in Themes or Custom if you want custom backgrounds and Select the Save button 5 If you selected the Custom Theme you will s...

Page 94: ...rd is specified you will be prompted for your password whenever you press the Setup key on the remote If the password entered matches the stored password full access is granted to the user until the n...

Page 95: ...assword Protection Select the highest movie ration you want to display in the Movies Guide without entering a password For example if you select PG 13 all movies with an MPAA rating above PG 13 R NC 1...

Page 96: ...k hardware If your PC is setup using Dynamic or DHCP addressing you should most likely use the same for your FireBall Connect your FireBall to your Ethernet network using the included Ethernet cable a...

Page 97: ...remote to display the Setup menu 2 Select the NETWORK menu 3 Select the FIREBALL SERVER SETTINGS menu 4 Enter a name for your FireBall using the remote control or wireless keyboard For example Living...

Page 98: ...VX MX SE E2 or DVDM Music Servers that have been upgraded to Version 4 0 or later FireBall Features Package Follow these steps to connect your FireBall to another FireBall Music Server 1 Press the SET...

Page 99: ...the RECORDING PREFERENCES menu 4 Select MP3 or CD Quality FLAC as your preferred encoder 5 If you selected MP3 as your preferred encoder select a bitrate The MP3 bitrate is used to determine the rela...

Page 100: ...ording then ejecting each one Follow these steps to set the Disc Insert Preferences 1 Press the SETUP key on the remote to display the Setup menu 2 Select the AUDIO menu 3 Select the DISC INSERT PREFE...

Page 101: ...ll screen 1 Press the SETUP key on the remote to display the Setup menu 2 Select the VIDEO menu 3 Select the VIDEO FORMAT menu 4 Using the Up and Down keys on the remote select your desired aspect rat...

Page 102: ...enter the FireBall screen 1 Press the SETUP key on the remote to display the Setup menu 2 Select the VIDEO menu 3 Select the SCREEN CENTERING menu 4 Using the Left and Right keys on the remote adjust...

Page 103: ...the Setup menu 2 Select the VIDEO menu 3 Select the BRIGHTNESS menu 4 Turn your TV s brightness control all the way up then lower it to the point where the vertical black bar on the left just disappea...

Page 104: ...se steps to adjust the contrast on your TV 1 Press the SETUP key on the remote to display the Setup menu 2 Select the VIDEO menu 3 Select the CONTRAST menu 4 Turn your TV s Contrast or Picture control...

Page 105: ...accurately Follow these steps to adjust the sharpness on your TV 1 Press the SETUP key on the remote to display the Setup menu 2 Select the VIDEO menu 3 Select the SHARPNESS menu 4 Turn your TV s Shar...

Page 106: ...TUP key on the remote to display the Setup menu 2 Select the VIDEO menu 3 Select the COLOR BARS menu 4 Turn your TV s Color and Tint controls up and down until the color bars are at the point where th...

Page 107: ...ode while FLAC audio would use straight STEREO mode Follow these steps to set the Surround Mode Settings 1 Press the SETUP key on the remote control 2 Select the External Control Menu 3 Select the Sur...

Page 108: ...l 3 Connect the other end of the RS 232 serial cable to the bottom of the ETP 1500 4 Connect one end of an S Video cable to FireBall s S Video output 5 Connect the other end of the S Video cable to th...

Page 109: ...elect the External Control Menu 3 Select the Touch Panel Menu 4 Select the Calibration Menu 5 The calibration screen is displayed 6 Follow the on screen instructions by touching the moving target with...

Page 110: ...ays There are two types of overlays the Button Frame and the Toggle Bar The Button Frame is useful for panels that are capable of displaying video in the overscan area such as the ETP 1500 The Toggle...

Page 111: ...e which source button FB1 FB2 FB3 or FB4 each FireBall will listen for commands from Follow these steps to configure your FireBall to be controlled by any of the four IR code banks 1 Press the Setup k...

Page 112: ...all music and movie titles playlists groups and radio stations Follow these steps to view the direct IR codes for your FireBall content 1 Press the Setup key on the remote to display the FireBall set...

Page 113: ...Key Combinations Direct Play Mode Macro 1 play mode number Enter Direct Disc Macro 2 changer number Macro disc number Enter Direct Artist Title Macro 3 artist title access number Enter Direct Group Ma...

Page 114: ...Track Macro T track number Enter Direct Playlist Macro P playlist access number Enter Direct Group Macro G group access number Enter Example 1 Use the keyboard to play disc 14 in changer 1 Press MACRO...

Page 115: ...eyboard combinations 1 Press the Setup key on the remote to display the FireBall setup menu 2 Select the External Control menu item 3 Select the IR Serial menu item 4 Select the Playlist Hot Keys menu...

Page 116: ...lable COM ports you must use the Ethernet based external control for two way external control communications with a third party control system Follow these steps to select which serial port to use for...

Page 117: ...system using direct IR codes two way RS 232 serial control two way Ethernet control and wireless web pad control FireBall has built in support for the following companies control products AMX Net Str...

Page 118: ...lable under the Utilities menu This information is useful for troubleshooting any problems you may encounter with your network connection or verifying the current software versions Follow these steps...

Page 119: ...nel begins to flash release the power button 3 When the LED on the front panel glows solid RED standby mode FireBall is ready to use 4 Press and release the Power button to turn on FireBall Follow the...

Page 120: ...these steps to manually update the software 1 Press the SETUP key on the remote to display the Setup menu 2 Select the UTILITIES menu 3 Select the UPDATE SOFTWARE menu 4 Select the Check for Update b...

Page 121: ...he FireBall Server Name entered on the Server Settings Menu in the SETUP NETWORK menus is used for the web address to access the FireBall web interface To access the FireBall web server simply open th...

Page 122: ...ireBall web interface client mode to either streaming from or remote controlling your FireBall 1 Make sure your web browser is properly configured and connected to your FireBall 2 Click the SETUP butt...

Page 123: ...e drag and drop from the Content directory to the external drive or using more elaborate features provided by a third party backup software product such as Dantz Retrospect A free trial of this softwa...

Page 124: ...pport All MP3 AAC and FLAC files should have the proper ID3 tags in each file in order for FireBall to properly add each music file to it s internal Library The following ID3 tag formats are supported...

Page 125: ...ll FP 1 FireBall ZP 1 FireBall MP 150 FireBall MP 200 FireBall DVDM 100 Client Server networking is limited to the same local subnet You can not stream over the Internet unless you have a VPN setup be...

Page 126: ...ternet radio to every room of the home or office and provides the professional installer with tools for almost any installation FireBall is built from the ground up with many features that allow you t...

Page 127: ...icate over a wired or wireless network to share access to your media The biggest advantage of a distributed client server system over a central system is that everything you need is built into FireBal...

Page 128: ...reBall through the standard HTTP port 80 on your subnet CONFIGURING A FIREBALL CLIENT Networking Each FireBall client must be on the same network as the server This document will assume that you have...

Page 129: ...ours Monday Friday 9 00am 7pm EST Phone 800 372 4368 Press 2 for Sales or 3 for Support Fax 317 616 6790 Internet www escient com Email support escient com Please have the following information ready...

Page 130: ...s 10 0 0 0 10 255 255 255 172 16 0 0 172 31 255 255 and 192 168 0 0 192 168 255 255 Note that the first block is nothing but a single class A network number while the second block is a set of 16 conti...

Page 131: ...5 Subpart B Class B Note This equipment has been tested and found to comply with the limits for a Class B digital device pursuant to Part 15 of the FCC Rules These limits are designed to provide reaso...

Page 132: ...es you agree to cease any and all use of the Gracenote Data the Gracenote Database and Gracenote Embedded Software Gracenote reserves all rights in the Gracenote Data Gracenote Database and Gracenote...

Reviews: