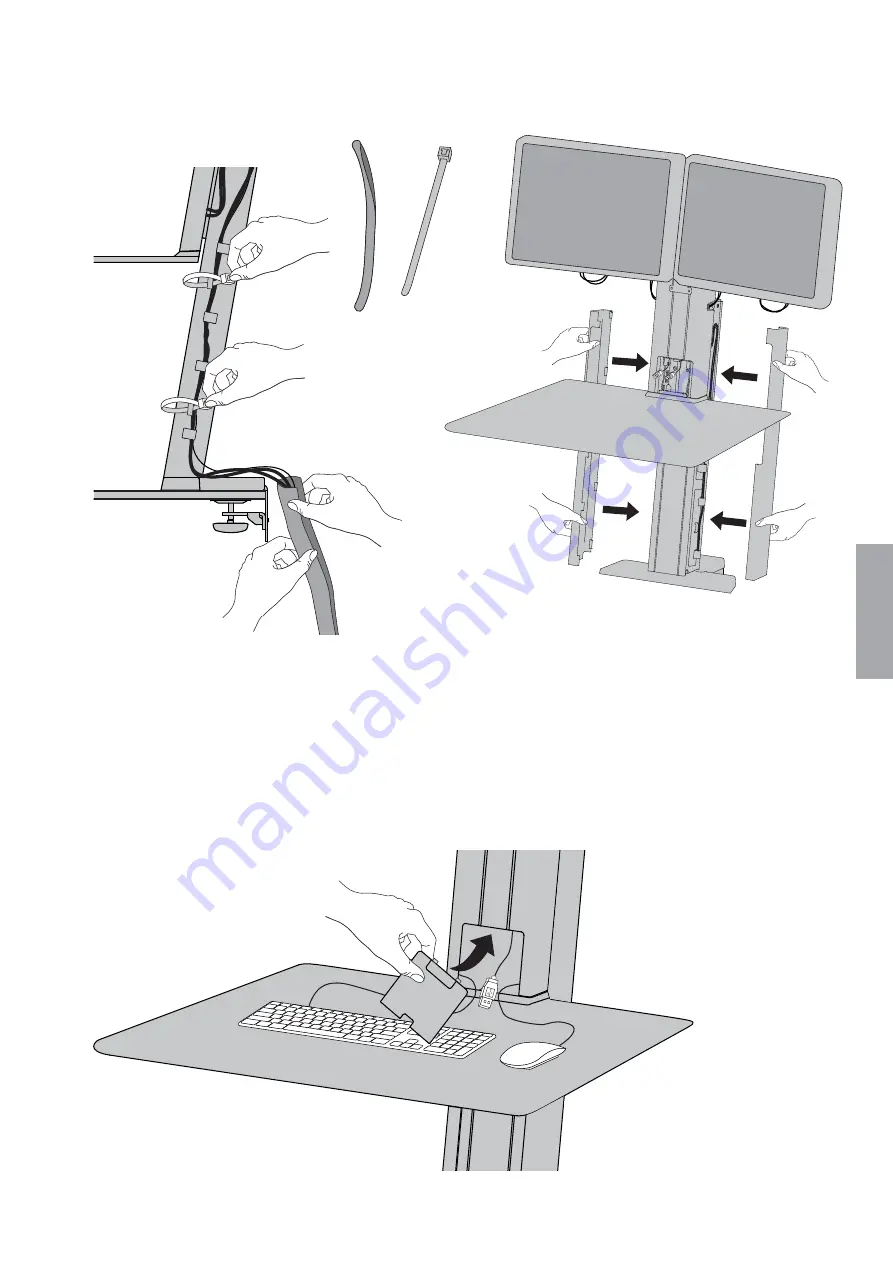
17 of 20
888-33-387-G-01 rev. D • 03/16
16
4x
2x
17
18
a
ENGLISH
Wrap cables and fasten cable ties
Attach side panels.
Attach front panel.
Page 1: ...ais Gebruikersgids Deutsch Benutzerhandbuch Nederlands Guida per l utente Italiano Anv ndarhandbok svenska Includes Constant Force Technology Workfit SR Dual Monitor Short Surface ENGLISH User s Guid...
Page 2: ...nt You will need to adjust this product after installation is complete Make sure all your equipment is properly installed on the product before attempting adjustments This product should move smoothly...
Page 3: ...10mm 8x 1x 1x 4mm 2x 1x 1x 8x 2x M4 x 6mm 2x M4 x 8mm 2x 1x 2x 1x 2mm 1x M3 x 6mm 2x 1x 1x 2 1 1x 5 13 lbs 2 3 5 9 kg 5 12 lbs 2 3 5 9 kg 5 lbs 2 2 kg A B C A B 26 lbs 11 8 kg A B C 29 lbs 13 2 kg ENG...
Page 4: ...4 of 20 888 33 387 G 01 rev D 03 16 1 2 a b ENGLISH Lay engine down Attach worksurface to bottom of riser NOTE Make sure slots align when installing work surface...
Page 5: ...4 1 4 10mm 36mm 1 1 2 4 28mm 61mm d b 2 1 ENGLISH Screw worksurface into riser Disassemble desk clamp Measure desk thickness Partially reinstall screws into clamp base 1 5 revolutions Desk Thickness R...
Page 6: ...9cm 36 91cm 35 90cm 34 86cm b c 4x M6 x 12mm 4mm 4 a 2 1 ENGLISH Slide clamp base into bottom of riser Secure clamp base to riser NOTE Align the clamp window with the line on the bottom of the riser f...
Page 7: ...888 33 387 G 01 rev D 03 16 a 4mm 5 c b 2x d ENGLISH Two person lift Use cardboard blocks to support worksurface Mount to desk Secure clamp to clamp base Caution Worksurface not stable until clamp is...
Page 8: ...ve cardboard blocks from underneath work surface NOTE Crossbar can be mounted to accommodate different heights NOTE Push clamp base to edge of mounting surface Caution Follow the instructions in this...
Page 9: ...9 of 20 888 33 387 G 01 rev D 03 16 7 2x a 8 ENGLISH Slide cable routing clips onto crossbar Lay monitor facedown on worksurface...
Page 10: ...8mm 1x b 0 M4x 6mm 1x ENGLISH Cable Routing Plug power and video cables into monitor by routing through cable clip Attach monitors to mounting brackets Loosely thread thumb screws into mounting bracke...
Page 11: ...bles through cable clips on side of riser Check cable lengths NOTE Monitor mounting brackets can be installed upside down to lower monitor 4 Slide monitor onto crossbar Follow relief loop when routing...
Page 12: ...88 33 387 G 01 rev D 03 16 b 11 2x M3 x 6mm 2x 2mm 1x b a ENGLISH Tighten thumb screws to secure monitors Center total width of mounted equipment on stand Attach end caps to crossbar Secure end caps t...
Page 13: ...13 of 20 888 33 387 G 01 rev D 03 16 12 a b ENGLISH Keyboard and Mouse cables Route mouse and keyboard cables through cable clips on side of riser Follow relief loop when routing cables...
Page 14: ...difficult or if product does not stay in desired positions follow the adjustment instructions to create smooth and easy movements Depending on your product and the adjustment it may take many turns t...
Page 15: ...uct does not stay up when raised then you ll need to increase Lift Strength Decrease Lift Strength If the mounted weight is too light or this product does not stay down when lowered then you ll need t...
Page 16: ...n Lower crossbar into lowest position NOTE Leave enough slack in cable to allow full range of motion Caution To avoid the potential to pinch cables it is important to follow the cable routing instruct...
Page 17: ...17 of 20 888 33 387 G 01 rev D 03 16 16 4x 2x 17 18 a ENGLISH Wrap cables and fasten cable ties Attach side panels Attach front panel...
Page 18: ...18 of 20 888 33 387 G 01 rev D 03 16 19 b ENGLISH Attach cap to top...
Page 19: ...GLISH How to align worksurface to desk Loosen clamp Rotate Worfit SR so that worksurface is parallel to front edge of desk Secure clamp to desk Top View Follow these instructions if worksurface is not...
Page 20: ...h wrists flat Distance Position screen an arm s length from face at least 20 508mm Position keyboard close enough to create a 90 angle in elbow Angle Tilt screen to eliminate glare Tilt the keyboard b...