background image

14   

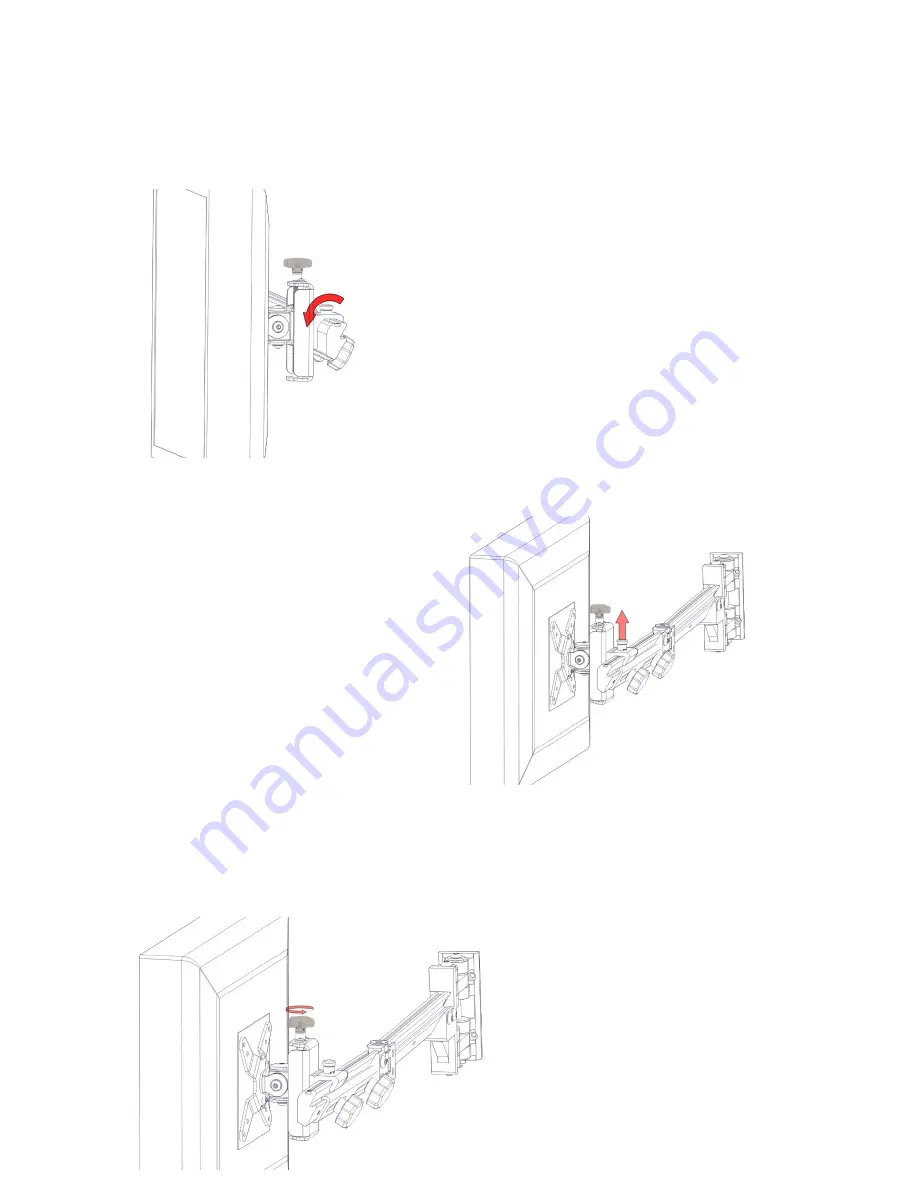
22) Tilt    the    monitor    forwards    until    it
seats    on    the    bar.    The    quick    release    pin
should    make    a    clicking    noise    as    it
engages    with    the    channel    on    the    top    of
the   bar.

To    adjust    position    side    to    side,    tilt   
upward    slightly,    unweighting    the   

monitor,   and   slide   right   or   left.   

23) To   remove   monitors,   pull   up   on   quick
release    pin,    tilt    monitor    backward    and
lift   off   of   bar.

24) To   align   monitors   in   the   up   or   down,
turn    the    micro    adjustment    knob.    It    may
help    to    lift    up    slightly    on    the    monitor

Summary of Contents for One-Touch

Page 1: ...1 One Touch Installation Instructions ...

Page 2: ... 2 Rail Mount Knobs 10 Back Cover 3 Transformer 11 Center Pivot w screws 4 Support Legs 12 Left Monitor Arm 5 Center Pivot Receptacle 13 Cable Management Clips 6 Clamps 14 Right Monitor Arm 7 Work surface Attachment Bolts 15 Lift Assembly 8 Lower Work Surface ...

Page 3: ...Allen Screws on the underside of the lift assembly Take care not to remove them fully just enough to be able to slide the support legs onto the T Nut Slide support feet onto T nuts on lift assembly base Then re tighten Allen screws securing support legs to base ...

Page 4: ...n the rail in the approximate locations of the slots on the base of the lift assembly Use the hex tool provided to align the T Nuts in the channel more precisely Position the lift assembly over the mount rail and secure with the four supplied mounting knobs ...

Page 5: ...age on the right If there is a vertical wall directly behind desk a 3 8 gap is required to install clamp If this is the case the lower bracket will need to be removed from the upper bracket 4 If there is not a large enough gap between the rear edge of the desk and the wall or obstruction the clamp must be disassembled to position in place Remove button head screws holding the upper and lower clamp...

Page 6: ...racket to top bracket underneath the desk Please note there are three sets of mounting holes on the upper bracket to accommodate many different desk thicknesses 7 Tighten clamp to secure lift assembly to desk Bracket Mount ...

Page 7: ...7 8 To mount to courtesy panel disassemble clamp and set aside lower bracket assembly Place upper bracket in position shown and secure to panel with 8 wood screws in the position shown ...

Page 8: ...ssembly with the threaded holes facing up as shown 10 Tighten screws on both sides of the pocket using the supplied 5mm wrench 11 Tilt the larger lower work surface backwards slightly and lower over the bolts on either side of the U shaped bracket Once hooks are on the bolt head tilt forward ...

Page 9: ...Lower the work surface all the way down onto the bolt heads 13 Position the upper work surface over the U shaped bracket with the switch in the lower right hand corner Insert the four 4mm screws and tighten ...

Page 10: ...the cord coming from the control switch on the upper work surface in the left receptacle of the transformer Connect the lift motor cord to the center receptacle The right receptacle is not used Plug power cord from transformer to 110v outlet ...

Page 11: ...t interference with work surface Place the grooves indicated by the yellow arrow facing upward Center the transformer left to right about an inch from the lift assembly If installing on a desk equipped with an infield panel the transformer should be placed there in a spot that will allow for maximum cable travel as the unit is raised ...

Page 12: ...b facing down Repeat with center pivot receptacle if included 17 Mount the Pivots to the monitors with the provided screws as shown Note orientation of pivot The knob should face up 18 If mounting a center monitor be sure to mount the pivot to the monitor with the tabs in the orientation shown Arrow points to top of monitor ...

Page 13: ...g knob and raising or lowering monitor Be sure to support weight of monitor when adjusting these knobs 20 To mount the right and left monitors to the arms tilt the monitor back and position the pivot hook over the bar 21 With the monitor still tilted backward lower the monitor in position hooking the pivot on the bar ...

Page 14: ...nnel on the top of the bar To adjust position side to side tilt upward slightly unweighting the monitor and slide right or left 23 To remove monitors pull up on quick release pin tilt monitor backward and lift off of bar 24 To align monitors in the up or down turn the micro adjustment knob It may help to lift up slightly on the monitor ...

Page 15: ...15 when doing this to make the knob easier to turn 25 Install cable management clips on arm by hooking upper edge into top channel on the bar then pressing the bottom in place ...

Reviews: