background image

 
Installing the Retainer Bar 


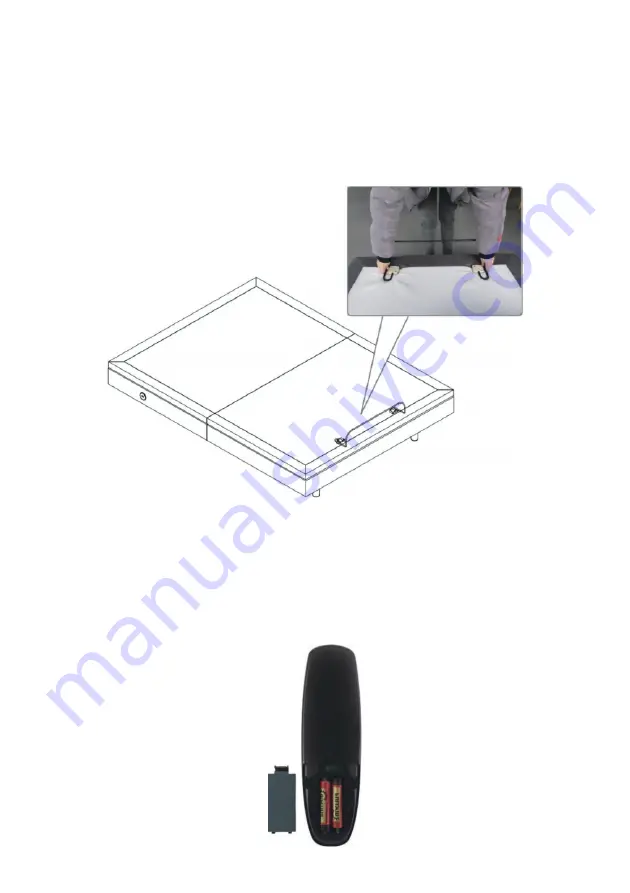
With the assistance of another person, carefully flip over the bed frame onto its 
feet. 


Insert the mattress retainer bar into the 2 mount holes located at the foot end of 
the power base (Figure 8). 


Remote Control 


Install the 2 AAA batteries into the remote control. 


Confirm the remote control works by pressing the lift buttons.  


Figure 8 

Summary of Contents for ELEVAMSBKSA

Page 1: ...EVA MASSAGE BED FRAME ELEVAMSBKSA...

Page 2: ......

Page 3: ...gan com for support Keep the power cord away from open flames and other sources of heat Do not drop or insert any objects into any openings on this product This product is not suitable for outdoor use...

Page 4: ...y for its intended use as described in these instructions Do not use with any attachments that are not supplied with this product If there is an overload weight condition on the head or foot mechanism...

Page 5: ...of experience and knowledge unless they have been given supervision or instruction concerning use of the product in a safe way by the person responsible for their safety and understand the hazards in...

Page 6: ...are included If any pieces are missing check all packaging thoroughly then contact help Kogan com for assistance Bed Frame A Bed Frame B Legs x6 Frame Bracket Screws x4 Retainer Bar Allen Key Remote A...

Page 7: ...OVERVIEW Head massage motor Foot motor LED light Foot massage motor Head motor USB port Control box...

Page 8: ...d down Head massage on 3 intensities Foot up Timer Massage ON OFF Pair with control box Anti snore Zero G Light Lounge Massage time indicators 10 20 30 Min Foot massage 3 intensities Massage modes 3 m...

Page 9: ...ed Frame Assembly Step 1 Carefully remove the 2 bed frames from the shipping cartons Remove and discard the plastic packaging Place the 2 bed frames facing downwards Attach the 2 bed frames together u...

Page 10: ...Step 2 Attach the 6 legs to the treaded holes in the bed frame by screwing them in a clockwise direction Note Ensure the corner legs are inserted into the outer most holes...

Page 11: ...e Figure 1 Locate the cable labelled USB Outlet and connect it to USB input on the control box in the position 1 shown below Figure 1 LED lights USB ports Power supply Power cord Head massage motor He...

Page 12: ...to the Head Motor input on the control box Locate the cable with the RED tape and connect it to the Foot Motor input on the control box Step 3 Connect the Massage cable Locate the cable labelled Mass...

Page 13: ...Y shaped cable with RED and BLUE labels and connect it to the Massage input on the control box Figure 4 Ensure the 5 cables shown below Figure 5 are all properly connected to the control box Figure 4...

Page 14: ...ure 6 Connect the power supply to the Power input on the control box Step 2 Connect to power outlet Figure 7 Connect the power cord to the power supply Plug the power cord into a power outlet The unde...

Page 15: ...p over the bed frame onto its feet Insert the mattress retainer bar into the 2 mount holes located at the foot end of the power base Figure 8 Remote Control Install the 2 AAA batteries into the remote...

Page 16: ...frames can be connected using the included sync cable Step 1 Ensure both bed frames are plugged into the power outlets Connect the sync cable to the Sync input on both control boxes on the bed frames...

Page 17: ...t on Adjusts the bed to the TV preset position Adjusts the bed to the Lounge preset position Adjusts the bed to the Zero G preset position Adjusts the bed to the Anti snore preset position Adjusts the...

Page 18: ...and or foot sections are raised you can enable the emergency power down feature to return the bed to the flat position Install 2 new 9V batteries not included into the battery compartment of the powe...

Page 19: ...Elevate bed and check for obstruction Remove obstruction Head section may be too close to the wall Headboard may be too close to the edge of the mattress Verify that there is enough distance between t...

Page 20: ...NOTES...

Page 21: ...ion We hope that this user guide has given you the assistance needed for a simple set up For the most up to date guide for your product as well as any additional assistance you may require head online...

Reviews: