background image

Page 7

DOOR / WINDOW
SENSOR PLACEMENT

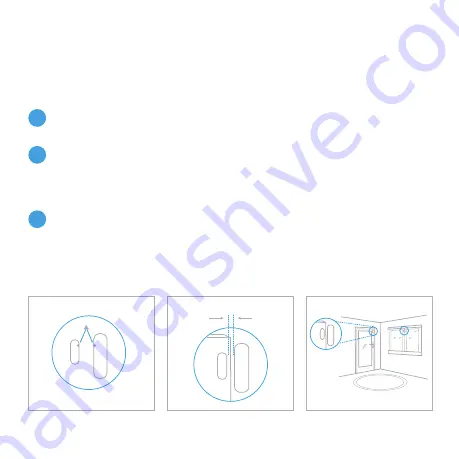
Fig 1

Fig 2

Max - 20mm

1.

2.

3.

To activate your Door / Window Sensor, pull out the battery tab on the 

back of the sensor.

Choose your location. Ensure the sensor and magnetic contact are 

positioned in the correct direction with the arrow indicators facing 

each other (Fig 1). It is recommended to place the sensor on the fixed 

surface and the smaller magnetic contact on the moving surface. 

Position the sensor and magnetic contact as close to each other as 

possible. For optimum performance please ensure the gap is no more 

than 10mm. The maximum supported gap is 20mm (fig 2). To confirm  

that the sensor is working, separate the contacts and the red LED will 

start flashing.

Summary of Contents for Protect

Page 1: ...Unique HUB ID SERIOUS ABOUT SECURITY SMART ALARM SYSTEM QUICK START GUIDE Version 1 1 ...

Page 2: ...Sensor 4 1 4 PIR Motion Sensor 4 ERA Protect Hub Set Up 5 Installing An Accessory 6 Add Devices 6 Door Window Sensor Placement 7 Door Window Sensor How it works 8 PIR Motion Sensor Placement 10 PIR Motion Sensor How it works 11 App Screens 12 Factory Reset 13 Need Support 14 ERA Protect Guarantee 15 ...

Page 3: ...SYSTEM OVERVIEW LED Status 1 2 REMOTE CONTROL Arm Button Home Mode Button Disarm Button Plus Action Button Plus members only LED Indicator Hard Reset Button PIN Required Ethernet Port Battery Disconnect Button PIN Required Power ...

Page 4: ... SENSOR 1 4 PIR MOTION SENSOR Tamper Switch underneath the sensor LED Indication Light Magnetic Contact Fixing Bracket Battery CR123A 3V _ Battery CR123A 3V PIR motion Sensor is equipped with an accelerometer sensor for tamper ...

Page 5: ...r smartphone 2 Select Sign Up to create an account Existing users select Protect from the side bar menu New users select ERA Protect Hub from the Device selection menu Decide how you would like to use the ERA Protect system You have three options Internet with SIM Card Back up Recommended Plus Service required Internet only Note If your internet fails your alarm will no longer alert you Follow on ...

Page 6: ...ice Repeat as necessary for each device you would like to add You can add sensors in any order Once all devices have been added please check the Alarm Settings page accessible via the side bar menu to ensure all devices are listed and displayed correctly 1 Add Device to app Place in required position Switch on the Anti tamper after installation in the settings menu Note Anti tamper is disabled to ...

Page 7: ...tion with the arrow indicators facing each other Fig 1 It is recommended to place the sensor on the fixed surface and the smaller magnetic contact on the moving surface Position the sensor and magnetic contact as close to each other as possible For optimum performance please ensure the gap is no more than 10mm The maximum supported gap is 20mm fig 2 To confirm that the sensor is working separate t...

Page 8: ...email support eraprotect com Page 8 Customer Helpline 0345 257 2500 www eraprotect com ERA Home Security Ltd Valiant Way Wolverhampton West Midlands WV9 5GB ...

Page 9: ...ed on the top and bottom of the sensor back plate Attach the sensor to surface using appropriate screws and wall plugs Close the Door Window Sensor carefully DOOR WINDOW SENSOR HOW IT WORKS The clever design of the Door Window Sensor means that the two parts do not have to necessarily be aligned horizontally This means they can be fitted to angled doors and window frames see Top view diagram locat...

Page 10: ...all door and window frames are level the sensor will still work when positioned as above Front Closeup View Matching arrows INSTALLATION TIPS 1 2 3 Position on a flat stable surface Do not install near other wireless devices Adhesive tape may damage surface when removed ...

Page 11: ...90 angle at room temperature 25 C when installed parallel to the wall Please make sure your PIR Motion Sensor is installed the correct way up as indicated by the arrow on the rear of the sensor and the diagram below 3 2 3 M There are two ways to attach the sensor to the wall 1 Adhesive mounting Attach the double sided adhesive pad to the back of the Motion Sensor adhesive pad is located in the acc...

Page 12: ...ly around your property without triggering the ERA Protect Alarm System When the PIR Motion Sensor is triggered the ERA Protect Alarm System will send a notification to your compatible smartphone To ensure you do not receive multiple notifications for the same event the sensor will stop detecting motion for the next 5 minutes During this period the LED indication light will not flash This is a bat...

Page 13: ...separate the Door Window sensor and contact The alarm should trigger and the siren will sound Press the Disarm Button APP SCREENS Side Bar Menu Add Device Status Bar Customisable Plus Action Button Plus members only Arm Disarm Activity Log Plus members only Home disarms internal sensors while keeping perimeter sensors active default Protect System Cameras Protect Settings Protect Activity Log Plus...

Page 14: ...nt please proceed to the next steps 3 4 Locate the factory reset button hole on the back of the Alarm Hub Using the reset pin provided slot the pin into the reset button hole Press and hold the pin on the reset button for 10 seconds until the Hub LED starts flashing Hub LED will flash for approximately 5 10 seconds and after that the Hub has been reset to factory default please proceed to power cy...

Page 15: ...ur website Visit www eraprotect com or phone us 0345 257 2500 WANT THESE GREAT FEATURES Automated phone call alerts 24 7 connected alarm status Plus Action Button 30 day activity log SIM backup SMS alerts ADD THE ERA PROTECT PLUS Includes up to 4 cameras that will stay connected in the event of loss of service by your Internet provider Subject to mobile network connectivity Alarm trigger only ...

Page 16: ...CLUSIONS A full list of exclusions can be found within the full product guarantee as detailed on our website www eraprotect com This guarantee is in addition to your contractual and statutory rights and does not affect your statutory rights TO MAKE A CLAIM Please contact Customer Support either by telephone on 0345 257 2500 or email support eraprotect com with full details of your claim If your cl...

Reviews: