background image

3

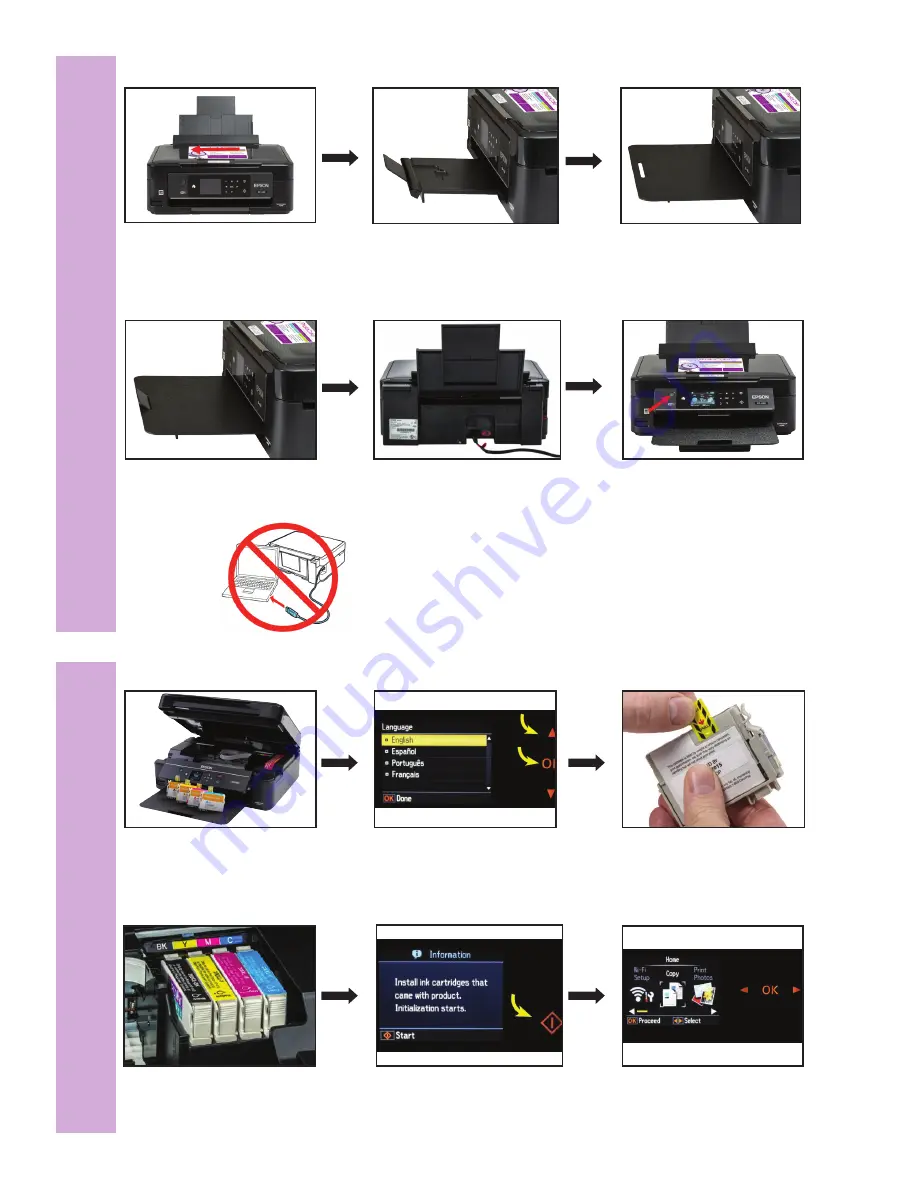
Ink Cartridge Installation

:

3A: 

With the Printer powered on, 

open the lid of the Printer.

3B: 

Use arrow to select  

preferred language. 

3C: 

Touch ‘OK’ once selected.

3D: 

Remove Ink Cartridge from 

packaging. 

3E

: Remove yellow ‘Pull’ tab  

from each cartridge.

3F: 

Insert each cartridge according 

to the color code displayed on the 

Ink Carriage.

3G: 

Once Ink Cartridges have  

been installed, close the Printer  

and select ‘Start’.

3H: 

Once initialization is complete, 

the Home Screen will appear. 

2

Printer Set Up

:

2A

: Extend the Input Tray.

2B

: Slide the gray paper guide to 

the left.

2C

: Extend the stationary Output 

Tray extension.    

2D

: Lift the tab up on the end of 

the extension.   

2E

: Slide the removable OutputTray 

onto the stationary Output Tray 

extension.

2F: 

Place the extension through  

the hole in the removable  

Output Tray. 

2G: 

Connect the Power Cable into 

the back of the Printer and into the 

wall outlet. 

2H: 

Press and hold the Power 

button to power on the Printer. 

IMPORTANT REMINDER

To ensure your printer functions properly, please DO NOT  

connect the printer USB Cable until you are prompted during 

the Epson Printer/Scanner Driver Installation.

Summary of Contents for XP series

Page 1: ... Cable until you are prompted during the Epson Printer Scanner Driver Installation 1 Contents Printer Power Cable USB Cable Removable Output Tray Sample Pack of Ink Cartridges Cyan Magenta Yellow Black 1A Remove all clear plastic protective wrap foam and blue tape from the Printer Remove all clear plastic protective wrap foam and blue tape from the Printer ...

Page 2: ...will appear 2 Printer Set Up 2A Extend the Input Tray 2B Slide the gray paper guide to the left 2C Extend the stationary Output Tray extension 2D Lift the tab up on the end of the extension 2E Slide the removable OutputTray onto the stationary Output Tray extension 2F Place the extension through the hole in the removable Output Tray 2G Connect the Power Cable into the back of the Printer and into ...

Page 3: ...he download is complete click the downloaded file This should appear in the Downloads section of your browser 4E Ensure Set as default printer box is checked and printer icon is selected Select OK 4F Select language Click OK 4G Read agreement verify language is correct select Agree and click OK 4H Connect USB cable and wait until install is complete This may take a few minutes The power symbol on ...

Page 4: ...ner Driver and EPSON Scan Utility 5B Once the download is complete click the downloaded file This should appear in the Downloads section of your browser Select OK 5C Click Next 5D Read and accept agreement Select Next 5E Once installed click Finish 6 Disable Automatic Firmware Updates 6A Right click the EPSON Printer icon in the Windows system tray 6B Click on Software Update Settings 6C Select Ne...

Reviews: