background image

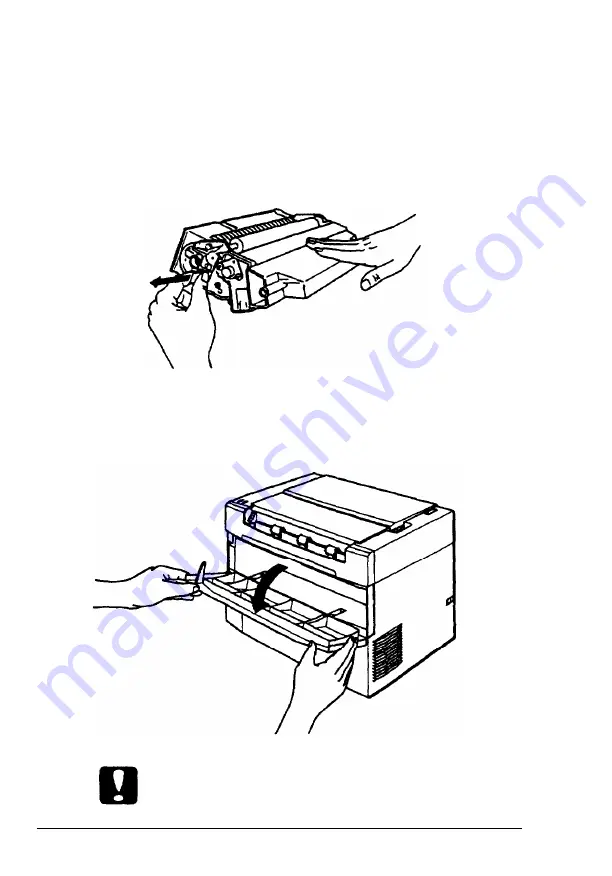
4. Set the toner cartridge on a clean, flat surface.

5.

While holding the cartridge steady with one hand, firmly

grip the tab on the left side of the cartridge. Pull the clear

seal all the way out with firm, even pressure as shown. Do

not pull up on the seal.

6.

Open the front

cover 

by pulling the top of the cover toward

you.

Caution:

Do not lean on or rest heavy objects on the open front cover.

4

Setup

Summary of Contents for WorkForce 1100

Page 1: ......

Page 2: ...nly and may be trademarks of their respective companies EPSON disclaims any and all rights in those trademarks The Energy Star emblem does not rep t EPA endorsement of any product or service Manual is copy right 1994 by Epson America Inc Torrance California USA software copyrights Copyright HostPanel TM 1993 1994 Destiny Technology Corporation Ver 1 0 Copyright WinPanel TM 1993 1994 Destiny Techno...

Page 3: ...per 7 5 Attaching the power cord 11 6 Testing the printer 12 7 Connecting the printer to the computer 12 8 Testing the computer to printer connection 13 9 Setting up your software 14 Using Energy Wisely 16 Maintenance Replacing the Toner Cartridge 17 Clearing Feed Jams 21 Clearing Paper Jams 21 i i i ...

Page 4: ...formation on how to install and use the EPSON Control Panel for DOS 1 System requirements To use the printer and the software included with the printer you need the following A 386 based or higher IBM PC or compatible MS DOS 3 3 or higher Microsoft Windows 3 1 not required if you install the EPSON Control Panel for DOS 4MB of RAM installed on the computer 1 3MB of hard disk space To connect the pr...

Page 5: ... mm above the printer to be able to fully extend the paper trays and load paper 3 Take the packaging off the printer and the other items and store for future use Note The printer weighs about 11 lb 5 kg and should be lifted with care 4 Open the paper and exit trays at the top of the printer and remove the shipping spacer from the center of the feeder 5 Close the paper and exit trays 2 Setup ...

Page 6: ...ide the toner cartridge 1 Remove the toner cartridge from its aluminum bag 2 Remove the shipping spacer from the cartridge by lifting the horizontal tab in the direction of the arrow Then remove the protective cap at the end of the cartridge 3 Gently shake the toner cartridge back and forth a few times to distribute the toner evenly Setup 3 ...

Page 7: ...hand firmly grip the tab on the left side of the cartridge Pull the clear seal all the way out with firm even pressure as shown Do not pull up on the seal 6 Open the front cover by pulling the top of the cover toward you Caution Do not lean on or rest heavy objects on the open front cover 4 Setup ...

Page 8: ...he other hand on the rear of the printer to hold it steady while you insert the toner cartridge 8 Insert the cartridge into the opening at the front of the printer Position the locking knobs on both sides of the cartridge into the guides inside the printer Setup 5 ...

Page 9: ...firmly until it locks in place 10 Close the front cover and press the top comers to lock the cover into position Note When the printer is turned on the Ready light will not light if the toner cartridge is not inserted properly or if the front cover is not completely closed 6 Setup ...

Page 10: ...n the top of the printer and extend the paper support located at the top of the tray 2 If you are loading legal sized or other oversized paper extend the support further by rotating the paper support extension out of its recess at the end of the paper support Setup 7 ...

Page 11: ...rt than the width of the paper 4 Open the exit tray If you re printing oversized pages pull out the paper support extension 5 Fan a stack of paper and even up the edges 6 Pull the paper release lever at the top right of the printer toward you 8 Setup ...

Page 12: ... Insert the paper stack up to 100 sheets between the paper guides of the paper tray 8 Slide the paper guides against the paper stack Make sure the paper guides do not press the paper too tightly Setup 9 ...

Page 13: ...not in the feed position Note To reload paper pull the paper release lever toward the front of the printer and remove any paper from the paper tray Do not add paper to paper already loaded in the paper tray Take a new stack of paper combine the old stack with the new stack and insert in the paper tray Then push the paper release lever toward the back of the printer 10 Setup ...

Page 14: ...ounded outlet Use a grounded three prong electrical outlet Do not use an adapter to fit the threeprong plug into a two hole outlet Avoid using an outlet that is controlled by wall switches or automatic timers Accidental disruption of power can wipe out valuable information in the memory of your computer or printer Also avoid outlets on the same circuit with large motors or appliances that might di...

Page 15: ...ntains information about the printer including the current settings 7 Connecting the printer to the computer 1 Turn off the printer and make sure the computer is off 2 Connect a shielded parallel interface cable to the connector on the back of the printer Fasten the connector with the two wire clips 3 Connect the other end of the interface cable to the back of your computer Tighten the screws on b...

Page 16: ...owing and press Enter PRINT AUTOEXEC BAT The computer displays the following message NAME OF LIST DEVICE PRN 4 Type the following and press Enter LPT1 Note If you are using an interface port other than LPT1 be sure to specify the appropriate port The printer prints the AUTOEXEC BAT file If nothing prints or the results are not what you expect make sure you are using the proper cable and that the c...

Page 17: ...you informed of the printer status and notifies you when a print error occurs For more information about this utility see your Reference Guide When you install the EPSON Control Panel for Windows you also install the ActionLaserTM 1100 printer driver The driver works with your software to control the operation of the printer by translating a document s margins fonts and other selections into contr...

Page 18: ...port that will be used by the EPSON Control Panel and the printer To use the default of LPT1 choose Connect If you are using another port change the port selection as appropriate and choose Connect The next dialog box prompts you for the name of the directory in which the EPSON Control Panel software is to be installed To accept the default EPPRT directory choose OK The setup program begins copyin...

Page 19: ... your monitor isn t Energy Star compliant turn it off when you re not using it Use the print preview option on your software before you print something You ll be able to catch formatting errors before you commit them to paper If you have an electronic mail system available to you send E mail rather than memos Not only is this faster but you ll save paper and storage space too Use recycled paper wh...

Page 20: ... toner saving mode See Chapter 2 in the Reference Guide for more information If your printed images become too faint you should replace the toner cartridge as follows 1 Turn off the printer if it is on and disconnect the power cord 2 Remove paper from the paper tray and remove all printed pages from the exit tray 3 Close the paper and exit trays 4 Open the front cover Maintenance 17 ...

Page 21: ...ter that can be very hot Avoid touching the fuser area which is located immediately above the toner cartridge when you open the front cover and the motor which is further inside the printer 6 Tilt the front of the cartridge downward slightly until it is level and then slide it out of the printer The cartridge will not slide smoothly unless it is level 7 Discard the cartridge with nonburnable items...

Page 22: ... cartridge 10 Gently shake the toner cartridge back and forth a few times to distribute the toner evenly 11 While holding the cartridge steady with one hand firmly grip the tab on the left side of the cartridge Pull the clear seal all the way out with firm even pressure as shown Do not pull up on the seal Maintenance 19 ...

Page 23: ...e other hand on the rear of the printer to hold it steady while you insert the cartridge 13 Insert the cartridge into the opening at the front of the printer Position the locking knobs on both sides of the cartridge into the guides inside the printer 20 Maintenance ...

Page 24: ... printer Remove paper from the paper tray Remove any sheets that have misfed from the paper tray into the paper feeder area Tap the edges of the paper stack on a flat surface and carefully reload paper into the paper tray Push the paper release lever toward the back of the printer Clearing Paper Jams If the printer stops printing and the Error light is flashing while the Ready light is off follow ...

Page 25: ... inside the printer that can be very hot Avoid touching the fuser area which is located immediately above the toner cartridge when you open the front cover and the motor which is further inside the printer 5 Rest one hand on top of the printer With your other hand grasp the toner cartridge by its molded center grip 22 Maintenance ...

Page 26: ...d slightly until it is level then slide it out of the printer The toner cartridge will not slide out smoothly unless it is in a level position Jammed paper may have caught in the toner cartridge making it difficult to remove the cartridge Pull firmly to remove the paper along with the cartridge Maintenance 23 ...

Page 27: ... does not come out with the toner cartridge look inside the printer If the paper is still inside draw it out from the front of the printer 10 After removing the jammed paper reinstall the toner cartridge and close the front cover 11 Open the exit tray 12 Tap the edges of the paper stack on a flat surface and carefully reload paper into the paper tray 13 Push the paper release lever toward the back...

Reviews: